Line 6 FBV MkII Advanced User Guide, English (Rev. 2)
Line 6 FBV MkII Advanced User Guide, English (Rev. 2)
Line 6 FBV MkII Advanced User Guide, English (Rev. 2)

You also want an ePaper? Increase the reach of your titles
YUMPU automatically turns print PDFs into web optimized ePapers that Google loves.
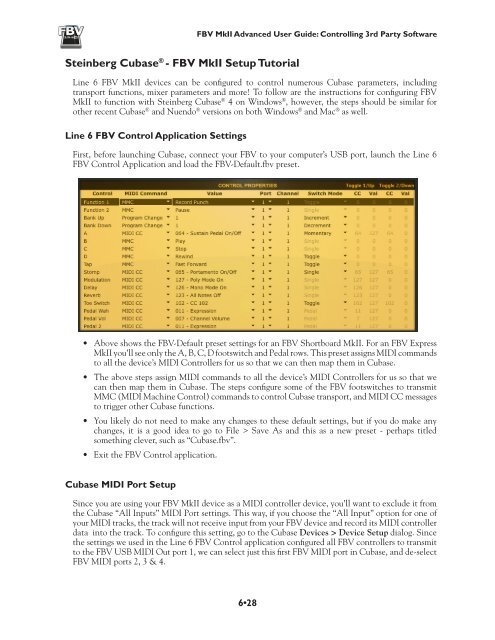
<strong>FBV</strong> <strong>MkII</strong> <strong>Advanced</strong> <strong>User</strong> <strong>Guide</strong>: Controlling 3rd Party SoftwareSteinberg Cubase ® - <strong>FBV</strong> <strong>MkII</strong> Setup Tutorial<strong>Line</strong> 6 <strong>FBV</strong> <strong>MkII</strong> devices can be configured to control numerous Cubase parameters, includingtransport functions, mixer parameters and more! To follow are the instructions for configuring <strong>FBV</strong><strong>MkII</strong> to function with Steinberg Cubase ® 4 on Windows ® , however, the steps should be similar forother recent Cubase ® and Nuendo ® versions on both Windows ® and Mac ® as well.<strong>Line</strong> 6 <strong>FBV</strong> Control Application SettingsFirst, before launching Cubase, connect your <strong>FBV</strong> to your computer’s USB port, launch the <strong>Line</strong> 6<strong>FBV</strong> Control Application and load the <strong>FBV</strong>-Default.fbv preset.• Above shows the <strong>FBV</strong>-Default preset settings for an <strong>FBV</strong> Shortboard <strong>MkII</strong>. For an <strong>FBV</strong> Express<strong>MkII</strong> you’ll see only the A, B, C, D footswitch and Pedal rows. This preset assigns MIDI commandsto all the device’s MIDI Controllers for us so that we can then map them in Cubase.• The above steps assign MIDI commands to all the device’s MIDI Controllers for us so that wecan then map them in Cubase. The steps configure some of the <strong>FBV</strong> footswitches to transmitMMC (MIDI Machine Control) commands to control Cubase transport, and MIDI CC messagesto trigger other Cubase functions.• You likely do not need to make any changes to these default settings, but if you do make anychanges, it is a good idea to go to File > Save As and this as a new preset - perhaps titledsomething clever, such as “Cubase.fbv”.• Exit the <strong>FBV</strong> Control application.Cubase MIDI Port SetupSince you are using your <strong>FBV</strong> <strong>MkII</strong> device as a MIDI controller device, you’ll want to exclude it fromthe Cubase “All Inputs” MIDI Port settings. This way, if you choose the “All Input” option for one ofyour MIDI tracks, the track will not receive input from your <strong>FBV</strong> device and record its MIDI controllerdata into the track. To configure this setting, go to the Cubase Devices > Device Setup dialog. Sincethe settings we used in the <strong>Line</strong> 6 <strong>FBV</strong> Control application configured all <strong>FBV</strong> controllers to transmitto the <strong>FBV</strong> USB MIDI Out port 1, we can select just this first <strong>FBV</strong> MIDI port in Cubase, and de-select<strong>FBV</strong> MIDI ports 2, 3 & 4.6•28