Line 6 FBV MkII Advanced User Guide, English (Rev. 2)
Line 6 FBV MkII Advanced User Guide, English (Rev. 2)
Line 6 FBV MkII Advanced User Guide, English (Rev. 2)

You also want an ePaper? Increase the reach of your titles
YUMPU automatically turns print PDFs into web optimized ePapers that Google loves.
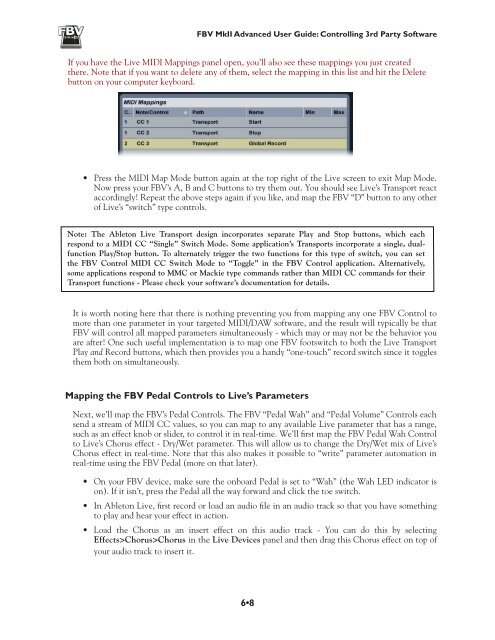
<strong>FBV</strong> <strong>MkII</strong> <strong>Advanced</strong> <strong>User</strong> <strong>Guide</strong>: Controlling 3rd Party SoftwareIf you have the Live MIDI Mappings panel open, you’ll also see these mappings you just createdthere. Note that if you want to delete any of them, select the mapping in this list and hit the Deletebutton on your computer keyboard.• Press the MIDI Map Mode button again at the top right of the Live screen to exit Map Mode.Now press your <strong>FBV</strong>’s A, B and C buttons to try them out. You should see Live’s Transport reactaccordingly! Repeat the above steps again if you like, and map the <strong>FBV</strong> “D” button to any otherof Live’s “switch” type controls.Note: The Ableton Live Transport design incorporates separate Play and Stop buttons, which eachrespond to a MIDI CC “Single” Switch Mode. Some application’s Transports incorporate a single, dualfunctionPlay/Stop button. To alternately trigger the two functions for this type of switch, you can setthe <strong>FBV</strong> Control MIDI CC Switch Mode to “Toggle” in the <strong>FBV</strong> Control application. Alternatively,some applications respond to MMC or Mackie type commands rather than MIDI CC commands for theirTransport functions - Please check your software’s documentation for details.It is worth noting here that there is nothing preventing you from mapping any one <strong>FBV</strong> Control tomore than one parameter in your targeted MIDI/DAW software, and the result will typically be that<strong>FBV</strong> will control all mapped parameters simultaneously - which may or may not be the behavior youare after! One such useful implementation is to map one <strong>FBV</strong> footswitch to both the Live TransportPlay and Record buttons, which then provides you a handy “one-touch” record switch since it togglesthem both on simultaneously.Mapping the <strong>FBV</strong> Pedal Controls to Live’s ParametersNext, we’ll map the <strong>FBV</strong>’s Pedal Controls. The <strong>FBV</strong> “Pedal Wah” and “Pedal Volume” Controls eachsend a stream of MIDI CC values, so you can map to any available Live parameter that has a range,such as an effect knob or slider, to control it in real-time. We’ll first map the <strong>FBV</strong> Pedal Wah Controlto Live’s Chorus effect - Dry/Wet parameter. This will allow us to change the Dry/Wet mix of Live’sChorus effect in real-time. Note that this also makes it possible to “write” parameter automation inreal-time using the <strong>FBV</strong> Pedal (more on that later).• On your <strong>FBV</strong> device, make sure the onboard Pedal is set to “Wah” (the Wah LED indicator ison). If it isn’t, press the Pedal all the way forward and click the toe switch.• In Ableton Live, first record or load an audio file in an audio track so that you have somethingto play and hear your effect in action.• Load the Chorus as an insert effect on this audio track - You can do this by selectingEffects>Chorus>Chorus in the Live Devices panel and then drag this Chorus effect on top ofyour audio track to insert it.6•8