Pool & Spa Heaters
Pool & Spa Heaters
Pool & Spa Heaters

You also want an ePaper? Increase the reach of your titles
YUMPU automatically turns print PDFs into web optimized ePapers that Google loves.
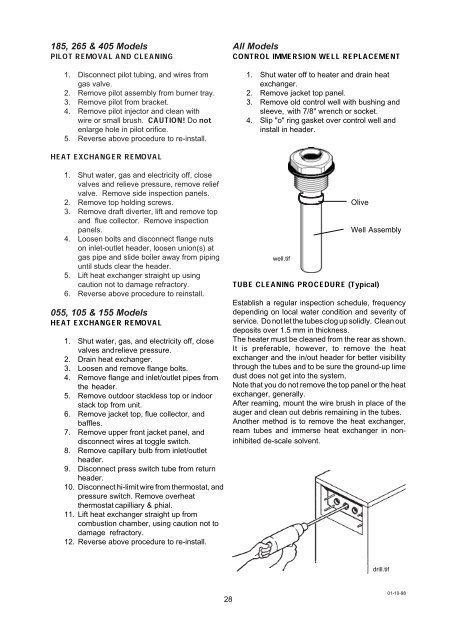
185, 265 & 405 ModelsPILOT REMOVAL AND CLEANING1. Disconnect pilot tubing, and wires fromgas valve.2. Remove pilot assembly from burner tray.3. Remove pilot from bracket.4. Remove pilot injector and clean withwire or small brush. CAUTION! Do notenlarge hole in pilot orifice.5. Reverse above procedure to re-install.HEAT EXCHANGER REMOVAL1. Shut water, gas and electricity off, closevalves and relieve pressure, remove reliefvalve. Remove side inspection panels.2. Remove top holding screws.3. Remove draft diverter, lift and remove topand flue collector. Remove inspectionpanels.4. Loosen bolts and disconnect flange nutson inlet-outlet header, loosen union(s) atgas pipe and slide boiler away from pipinguntil studs clear the header.5. Lift heat exchanger straight up usingcaution not to damage refractory.6. Reverse above procedure to reinstall.055, 105 & 155 ModelsHEAT EXCHANGER REMOVAL1. Shut water, gas, and electricity off, closevalves andrelieve pressure.2. Drain heat exchanger.3. Loosen and remove flange bolts.4. Remove flange and inlet/outlet pipes fromthe header.5. Remove outdoor stackless top or indoorstack top from unit.6. Remove jacket top, flue collector, andbaffles.7. Remove upper front jacket panel, anddisconnect wires at toggle switch.8. Remove capillary bulb from inlet/outletheader.9. Disconnect press switch tube from returnheader.10. Disconnect hi-limit wire from thermostat, andpressure switch. Remove overheatthermostat capilliary & phial.11. Lift heat exchanger straight up fromcombustion chamber, using caution not todamage refractory.12. Reverse above procedure to re-install.All ModelsCONTROL IMMERSION WELL REPLACEMENT1. Shut water off to heater and drain heatexchanger.2. Remove jacket top panel.3. Remove old control well with bushing andsleeve, with 7/8" wrench or socket.4. Slip "o" ring gasket over control well andinstall in header.well.tifOliveWell AssemblyTUBE CLEANING PROCEDURE (Typical)Establish a regular inspection schedule, frequencydepending on local water condition and severity ofservice. Do not let the tubes clog up solidly. Clean outdeposits over 1.5 mm in thickness.The heater must be cleaned from the rear as shown.It is preferable, however, to remove the heatexchanger and the in/out header for better visibilitythrough the tubes and to be sure the ground-up limedust does not get into the system,Note that you do not remove the top panel or the heatexchanger, generally.After reaming, mount the wire brush in place of theauger and clean out debris remaining in the tubes.Another method is to remove the heat exchanger,ream tubes and immerse heat exchanger in noninhibitedde-scale solvent.drill.tif2801-10-98
![314 MSDS - Swimfresh Calcium Hardness In[...]](https://img.yumpu.com/49910507/1/190x245/314-msds-swimfresh-calcium-hardness-in.jpg?quality=85)