PAXI PAXC PAXR Data Sheet/Manual PDF - Red Lion Controls
PAXI PAXC PAXR Data Sheet/Manual PDF - Red Lion Controls
PAXI PAXC PAXR Data Sheet/Manual PDF - Red Lion Controls

You also want an ePaper? Increase the reach of your titles
YUMPU automatically turns print PDFs into web optimized ePapers that Google loves.
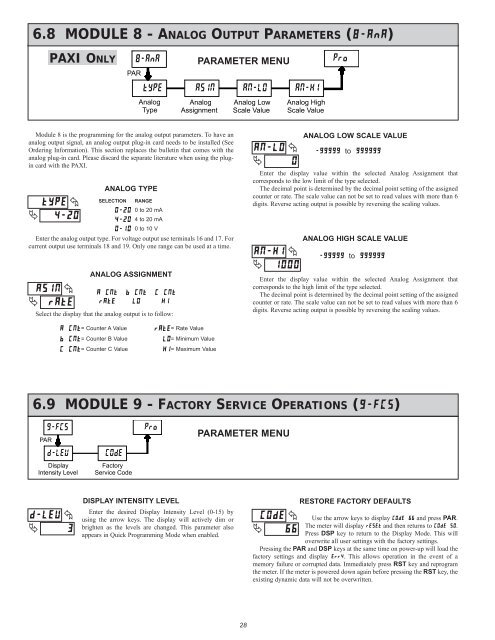
6.8 MODULE 8 - ANALOG OUTPUT PARAMETERS (�����)<br />
�<br />
���� �<br />
����<br />
PAR<br />
8-AnA<br />
tYPE ASIN AN-LO AN-HI<br />
Analog<br />
Type<br />
ANALOG ASSIGNMENT<br />
Analog<br />
Assignment<br />
Module 8 is the programming for the analog output parameters. To have an<br />
analog output signal, an analog output plug-in card needs to be installed (See<br />
Ordering Information). This section replaces the bulletin that comes with the<br />
analog plug-in card. Please discard the separate literature when using the plugin<br />
card with the <strong>PAXI</strong>.<br />
�<br />
���� �<br />
����<br />
PAR<br />
d-LEV<br />
Display<br />
Intensity Level<br />
ANALOG TYPE<br />
SELECTION RANGE<br />
���� 0 to 20 mA<br />
���� 4 to 20 mA<br />
Enter the analog output type. For voltage output use terminals 16 and 17. For<br />
current output use terminals 18 and 19. Only one range can be used at a time.<br />
�����<br />
����<br />
9-FCS Pro<br />
COdE<br />
Factory<br />
Service Code<br />
���� 0 to 10 V<br />
�����<br />
��<br />
�����<br />
��<br />
Select the display that the analog output is to follow:<br />
PARAMETER MENU<br />
Analog Low<br />
Scale Value<br />
28<br />
�����<br />
�<br />
�����<br />
�<br />
Analog High<br />
Scale Value<br />
�<br />
�<br />
�<br />
����<br />
PARAMETER MENU<br />
Pro<br />
ANALOG LOW SCALE VALUE<br />
�������to�������<br />
Enter the display value within the selected Analog Assignment that<br />
corresponds to the low limit of the type selected.<br />
The decimal point is determined by the decimal point setting of the assigned<br />
counter or rate. The scale value can not be set to read values with more than 6<br />
digits. Reverse acting output is possible by reversing the scaling values.<br />
ANALOG HIGH SCALE VALUE<br />
�������to�������<br />
Enter the display value within the selected Analog Assignment that<br />
corresponds to the high limit of the type selected.<br />
The decimal point is determined by the decimal point setting of the assigned<br />
counter or rate. The scale value can not be set to read values with more than 6<br />
digits. Reverse acting output is possible by reversing the scaling values.<br />
6.9 MODULE 9 - FACTORY SERVICE OPERATIONS (�����)<br />
�����<br />
�<br />
<strong>PAXI</strong> ONLY<br />
�����= Counter A Value ����=<br />
Rate Value<br />
����� ��<br />
����� ��<br />
�<br />
�<br />
= Counter B Value = Minimum Value<br />
= Counter C Value = Maximum Value<br />
DISPLAY INTENSITY LEVEL<br />
Enter the desired Display Intensity Level (0-15) by<br />
using the arrow keys. The display will actively dim or<br />
brighten as the levels are changed. This parameter also<br />
appears in Quick Programming Mode when enabled.<br />
�<br />
����<br />
�<br />
��<br />
RESTORE FACTORY DEFAULTS<br />
Use the arrow keys to display ������� and press PAR.<br />
The meter will display ����� and then returns to �������.<br />
Press DSP key to return to the Display Mode. This will<br />
overwrite all user settings with the factory settings.<br />
Pressing the PAR and DSP keys at the same time on power-up will load the<br />
factory settings and display ����. This allows operation in the event of a<br />
memory failure or corrupted data. Immediately press RST key and reprogram<br />
the meter. If the meter is powered down again before pressing the RST key, the<br />
existing dynamic data will not be overwritten.