PAXI PAXC PAXR Data Sheet/Manual PDF - Red Lion Controls
PAXI PAXC PAXR Data Sheet/Manual PDF - Red Lion Controls
PAXI PAXC PAXR Data Sheet/Manual PDF - Red Lion Controls

Create successful ePaper yourself
Turn your PDF publications into a flip-book with our unique Google optimized e-Paper software.
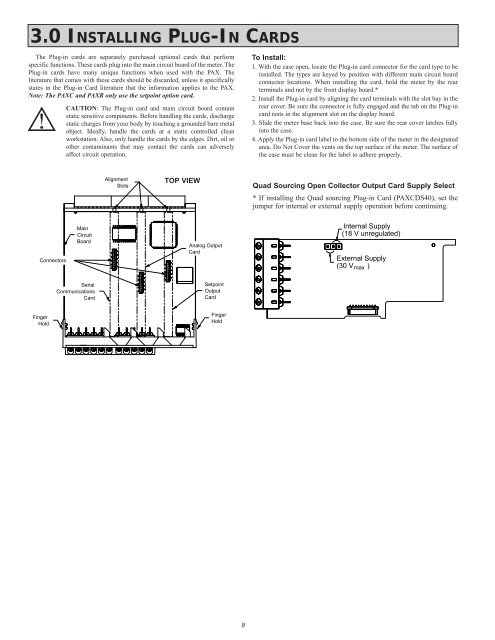
3.0 INSTALLING PLUG-IN CARDS<br />
The Plug-in cards are separately purchased optional cards that perform<br />
specific functions. These cards plug into the main circuit board of the meter. The<br />
Plug-in cards have many unique functions when used with the PAX. The<br />
literature that comes with these cards should be discarded, unless it specifically<br />
states in the Plug-in Card literature that the information applies to the PAX.<br />
Note: The <strong>PAXC</strong> and <strong>PAXR</strong> only use the setpoint option card.<br />
Connectors<br />
Finger<br />
Hold<br />
CAUTION: The Plug-in card and main circuit board contain<br />
static sensitive components. Before handling the cards, discharge<br />
static charges from your body by touching a grounded bare metal<br />
object. Ideally, handle the cards at a static controlled clean<br />
workstation. Also, only handle the cards by the edges. Dirt, oil or<br />
other contaminants that may contact the cards can adversely<br />
affect circuit operation.<br />
Main<br />
Circuit<br />
Board<br />
Serial<br />
Communications<br />
Card<br />
Alignment<br />
Slots<br />
TOP VIEW<br />
Analog Output<br />
Card<br />
Setpoint<br />
Output<br />
Card<br />
Finger<br />
Hold<br />
8<br />
To Install:<br />
1. With the case open, locate the Plug-in card connector for the card type to be<br />
installed. The types are keyed by position with different main circuit board<br />
connector locations. When installing the card, hold the meter by the rear<br />
terminals and not by the front display board.*<br />
2. Install the Plug-in card by aligning the card terminals with the slot bay in the<br />
rear cover. Be sure the connector is fully engaged and the tab on the Plug-in<br />
card rests in the alignment slot on the display board.<br />
3. Slide the meter base back into the case. Be sure the rear cover latches fully<br />
into the case.<br />
4. Apply the Plug-in card label to the bottom side of the meter in the designated<br />
area. Do Not Cover the vents on the top surface of the meter. The surface of<br />
the case must be clean for the label to adhere properly.<br />
Quad Sourcing Open Collector Output Card Supply Select<br />
* If installing the Quad sourcing Plug-in Card (<strong>PAXC</strong>DS40), set the<br />
jumper for internal or external supply operation before continuing.<br />
Internal Supply<br />
(18 V unregulated)<br />
External Supply<br />
(30 V )<br />
max