Cessna 150 Aerobat 250 ARF - Great Hobbies
Cessna 150 Aerobat 250 ARF - Great Hobbies
Cessna 150 Aerobat 250 ARF - Great Hobbies
- No tags were found...

You also want an ePaper? Increase the reach of your titles
YUMPU automatically turns print PDFs into web optimized ePapers that Google loves.
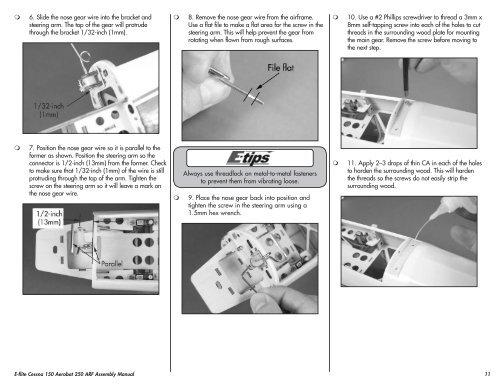
6. Slide the nose gear wire into the bracket andsteering arm. The top of the gear will protrudethrough the bracket 1/32-inch (1mm).8. Remove the nose gear wire from the airframe.Use a flat file to make a flat area for the screw in thesteering arm. This will help prevent the gear fromrotating when flown from rough surfaces.10. Use a #2 Phillips screwdriver to thread a 3mm x8mm self-tapping screw into each of the holes to cutthreads in the surrounding wood plate for mountingthe main gear. Remove the screw before moving tothe next step.7. Position the nose gear wire so it is parallel to theformer as shown. Position the steering arm so theconnector is 1/2-inch (13mm) from the former. Checkto make sure that 1/32-inch (1mm) of the wire is stillprotruding through the top of the arm. Tighten thescrew on the steering arm so it will leave a mark onthe nose gear wire.Always use threadlock on metal-to-metal fastenersto prevent them from vibrating loose.9. Place the nose gear back into position andtighten the screw in the steering arm using a1.5mm hex wrench.11. Apply 2–3 drops of thin CA in each of the holesto harden the surrounding wood. This will hardenthe threads so the screws do not easily strip thesurrounding wood.E-flite <strong>Cessna</strong> <strong>150</strong> <strong>Aerobat</strong> <strong>250</strong> <strong>ARF</strong> Assembly Manual11