Cessna 150 Aerobat 250 ARF - Great Hobbies
Cessna 150 Aerobat 250 ARF - Great Hobbies
Cessna 150 Aerobat 250 ARF - Great Hobbies
- No tags were found...

You also want an ePaper? Increase the reach of your titles
YUMPU automatically turns print PDFs into web optimized ePapers that Google loves.
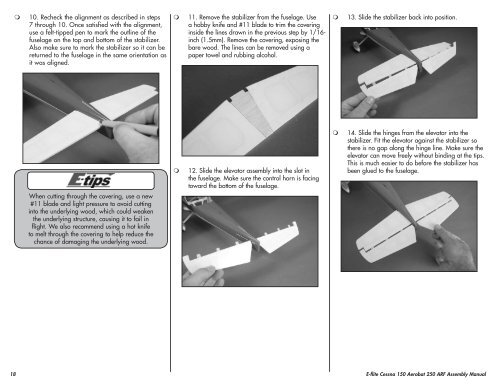
10. Recheck the alignment as described in steps7 through 10. Once satisfied with the alignment,use a felt-tipped pen to mark the outline of thefuselage on the top and bottom of the stabilizer.Also make sure to mark the stabilizer so it can bereturned to the fuselage in the same orientation asit was aligned.11. Remove the stabilizer from the fuselage. Usea hobby knife and #11 blade to trim the coveringinside the lines drawn in the previous step by 1/16-inch (1.5mm). Remove the covering, exposing thebare wood. The lines can be removed using apaper towel and rubbing alcohol.13. Slide the stabilizer back into position.12. Slide the elevator assembly into the slot inthe fuselage. Make sure the control horn is facingtoward the bottom of the fuselage.14. Slide the hinges from the elevator into thestabilizer. Fit the elevator against the stabilizer sothere is no gap along the hinge line. Make sure theelevator can move freely without binding at the tips.This is much easier to do before the stabilizer hasbeen glued to the fuselage.When cutting through the covering, use a new#11 blade and light pressure to avoid cuttinginto the underlying wood, which could weakenthe underlying structure, causing it to fail inflight. We also recommend using a hot knifeto melt through the covering to help reduce thechance of damaging the underlying wood.18 E-flite <strong>Cessna</strong> <strong>150</strong> <strong>Aerobat</strong> <strong>250</strong> <strong>ARF</strong> Assembly Manual