Cessna 150 Aerobat 250 ARF - Great Hobbies
Cessna 150 Aerobat 250 ARF - Great Hobbies
Cessna 150 Aerobat 250 ARF - Great Hobbies
- No tags were found...

You also want an ePaper? Increase the reach of your titles
YUMPU automatically turns print PDFs into web optimized ePapers that Google loves.
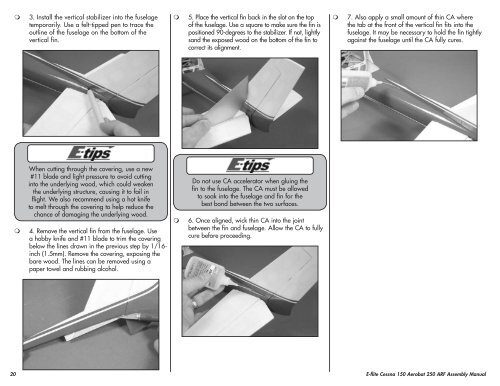
3. Install the vertical stabilizer into the fuselagetemporarily. Use a felt-tipped pen to trace theoutline of the fuselage on the bottom of thevertical fin.5. Place the vertical fin back in the slot on the topof the fuselage. Use a square to make sure the fin ispositioned 90-degrees to the stabilizer. If not, lightlysand the exposed wood on the bottom of the fin tocorrect its alignment.7. Also apply a small amount of thin CA wherethe tab at the front of the vertical fin fits into thefuselage. It may be necessary to hold the fin tightlyagainst the fuselage until the CA fully cures.When cutting through the covering, use a new#11 blade and light pressure to avoid cuttinginto the underlying wood, which could weakenthe underlying structure, causing it to fail inflight. We also recommend using a hot knifeto melt through the covering to help reduce thechance of damaging the underlying wood.4. Remove the vertical fin from the fuselage. Usea hobby knife and #11 blade to trim the coveringbelow the lines drawn in the previous step by 1/16-inch (1.5mm). Remove the covering, exposing thebare wood. The lines can be removed using apaper towel and rubbing alcohol.Do not use CA accelerator when gluing thefin to the fuselage. The CA must be allowedto soak into the fuselage and fin for thebest bond between the two surfaces.6. Once aligned, wick thin CA into the jointbetween the fin and fuselage. Allow the CA to fullycure before proceeding.20 E-flite <strong>Cessna</strong> <strong>150</strong> <strong>Aerobat</strong> <strong>250</strong> <strong>ARF</strong> Assembly Manual