Cessna 150 Aerobat 250 ARF - Great Hobbies
Cessna 150 Aerobat 250 ARF - Great Hobbies
Cessna 150 Aerobat 250 ARF - Great Hobbies
- No tags were found...

Create successful ePaper yourself
Turn your PDF publications into a flip-book with our unique Google optimized e-Paper software.
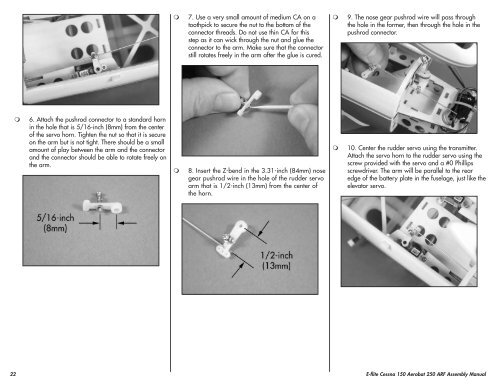
7. Use a very small amount of medium CA on atoothpick to secure the nut to the bottom of theconnector threads. Do not use thin CA for thisstep as it can wick through the nut and glue theconnector to the arm. Make sure that the connectorstill rotates freely in the arm after the glue is cured.9. The nose gear pushrod wire will pass throughthe hole in the former, then through the hole in thepushrod connector.6. Attach the pushrod connector to a standard hornin the hole that is 5/16-inch (8mm) from the centerof the servo horn. Tighten the nut so that it is secureon the arm but is not tight. There should be a smallamount of play between the arm and the connectorand the connector should be able to rotate freely onthe arm.8. Insert the Z-bend in the 3.31-inch (84mm) nosegear pushrod wire in the hole of the rudder servoarm that is 1/2-inch (13mm) from the center ofthe horn.10. Center the rudder servo using the transmitter.Attach the servo horn to the rudder servo using thescrew provided with the servo and a #0 Phillipsscrewdriver. The arm will be parallel to the rearedge of the battery plate in the fuselage, just like theelevator servo.22 E-flite <strong>Cessna</strong> <strong>150</strong> <strong>Aerobat</strong> <strong>250</strong> <strong>ARF</strong> Assembly Manual