Cessna 150 Aerobat 250 ARF - Great Hobbies
Cessna 150 Aerobat 250 ARF - Great Hobbies
Cessna 150 Aerobat 250 ARF - Great Hobbies
- No tags were found...

Create successful ePaper yourself
Turn your PDF publications into a flip-book with our unique Google optimized e-Paper software.
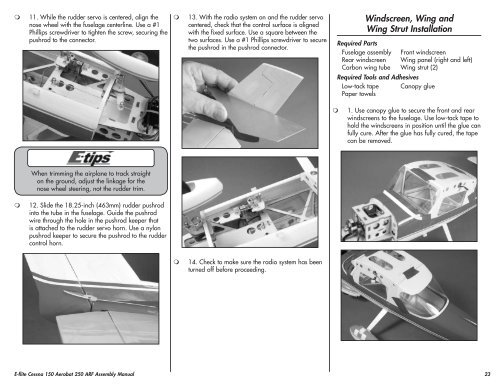
11. While the rudder servo is centered, align thenose wheel with the fuselage centerline. Use a #1Phillips screwdriver to tighten the screw, securing thepushrod to the connector.13. With the radio system on and the rudder servocentered, check that the control surface is alignedwith the fixed surface. Use a square between thetwo surfaces. Use a #1 Phillips screwdriver to securethe pushrod in the pushrod connector.Windscreen, Wing andWing Strut InstallationRequired PartsFuselage assembly Front windscreenRear windscreen Wing panel (right and left)Carbon wing tube Wing strut (2)Required Tools and AdhesivesLow-tack tape Canopy gluePaper towels1. Use canopy glue to secure the front and rearwindscreens to the fuselage. Use low-tack tape tohold the windscreens in position until the glue canfully cure. After the glue has fully cured, the tapecan be removed.When trimming the airplane to track straighton the ground, adjust the linkage for thenose wheel steering, not the rudder trim.12. Slide the 18.25-inch (463mm) rudder pushrodinto the tube in the fuselage. Guide the pushrodwire through the hole in the pushrod keeper thatis attached to the rudder servo horn. Use a nylonpushrod keeper to secure the pushrod to the ruddercontrol horn.14. Check to make sure the radio system has beenturned off before proceeding.E-flite <strong>Cessna</strong> <strong>150</strong> <strong>Aerobat</strong> <strong>250</strong> <strong>ARF</strong> Assembly Manual23