Cessna 150 Aerobat 250 ARF - Great Hobbies
Cessna 150 Aerobat 250 ARF - Great Hobbies
Cessna 150 Aerobat 250 ARF - Great Hobbies
- No tags were found...
You also want an ePaper? Increase the reach of your titles
YUMPU automatically turns print PDFs into web optimized ePapers that Google loves.
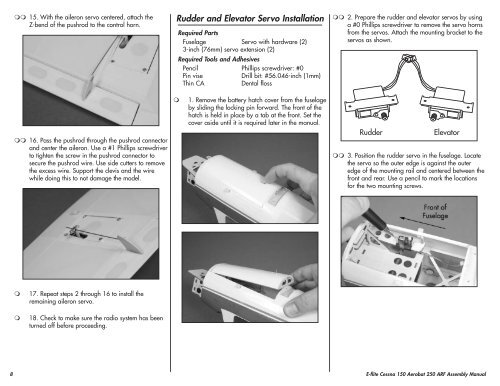
15. With the aileron servo centered, attach theZ-bend of the pushrod to the control horn.Rudder and Elevator Servo InstallationRequired PartsFuselage Servo with hardware (2)3-inch (76mm) servo extension (2)Required Tools and AdhesivesPencil Phillips screwdriver: #0Pin viseDrill bit: #56.046-inch (1mm)Thin CADental floss 2. Prepare the rudder and elevator servos by usinga #0 Phillips screwdriver to remove the servo hornsfrom the servos. Attach the mounting bracket to theservos as shown. 16. Pass the pushrod through the pushrod connectorand center the aileron. Use a #1 Phillips screwdriverto tighten the screw in the pushrod connector tosecure the pushrod wire. Use side cutters to removethe excess wire. Support the clevis and the wirewhile doing this to not damage the model.1. Remove the battery hatch cover from the fuselageby sliding the locking pin forward. The front of thehatch is held in place by a tab at the front. Set thecover aside until it is required later in the manual.RudderElevator 3. Position the rudder servo in the fuselage. Locatethe servo so the outer edge is against the outeredge of the mounting rail and centered between thefront and rear. Use a pencil to mark the locationsfor the two mounting screws.17. Repeat steps 2 through 16 to install theremaining aileron servo.18. Check to make sure the radio system has beenturned off before proceeding.8 E-flite <strong>Cessna</strong> <strong>150</strong> <strong>Aerobat</strong> <strong>250</strong> <strong>ARF</strong> Assembly Manual


