eTrans User Guide - Dentrix
eTrans User Guide - Dentrix
eTrans User Guide - Dentrix

Create successful ePaper yourself
Turn your PDF publications into a flip-book with our unique Google optimized e-Paper software.
<strong>eTrans</strong> 5.0/5.1/5.3 for <strong>Dentrix</strong>USER’S GUIDEwww.<strong>Dentrix</strong>.com/eservices | 1-800-734-5561
2PUBLICATION DATEOctober 2011COPYRIGHT©1987-2011 Henry Schein, Inc. <strong>Dentrix</strong>, Henry Schein, and the ‘S’ logo are registered trademarks of HenrySchein, Inc. All rights reserved. No part of this publication may be reproduced, transmitted, transcribed,stored in a retrieval system, or translated into any language in any form or by any means without the priorwritten permission of Henry Schein, Inc.SOFTWARE LICENSE NOTICEYour license agreement with Henry Schein, Inc., which is included with the product, specifies the permittedand prohibited uses of the product. Any unauthorized duplication or use of eClaims, in whole or in part, inprint or in any other storage and retrieval system is forbidden.LICENSES AND TRADEMARKSeClaims is a service provided by Henry Schein Practice Solutions, Inc. <strong>Dentrix</strong> is a registered trademark ofHenry Schein, Inc.; Microsoft, Windows, and Windows XP/Vista/7 are registered trademarks of MicrosoftCorporation.<strong>eTrans</strong> 5.0/5.1/5.3 for <strong>Dentrix</strong> <strong>User</strong>’s <strong>Guide</strong>
3ContentsIntroduction...................................................................................................4Minimum System Requirements.........................................................................................4Enrolling and enabling <strong>eTrans</strong>............................................................................................4Special Enrollment...............................................................................................................4Setting up <strong>eTrans</strong>..........................................................................................6Testing Your <strong>eTrans</strong> Server Connection.............................................................................8Specifying Direct Print Options........................................................................................10Downloading <strong>eTrans</strong> Updates.....................................................................11Updating Payor ID Numbers......................................................................12Sending Electronic Claims..........................................................................13Editing Electronic Claims............................................................................22<strong>eTrans</strong> reports.............................................................................................25Practice Organization List.................................................................................................25eClaims Pre-submission Summary Report.......................................................................26Transmission Report..........................................................................................................26Error Report........................................................................................................................27Frequently Asked Questions about <strong>eTrans</strong>................................................28Sending eClaims................................................................................................................28Changing Account Information........................................................................................29Billing..................................................................................................................................29Support...............................................................................................................................30Technical Troubleshooting................................................................................................30<strong>eTrans</strong> 5.0/5.1/5.3 for <strong>Dentrix</strong> <strong>User</strong>’s <strong>Guide</strong>
4IntroductionWelcome to <strong>eTrans</strong> for <strong>Dentrix</strong>. <strong>eTrans</strong> simplifies the complex and time consuming task of sending insuranceclaims by allowing you to send claims electronically through the Office Manager. Using <strong>eTrans</strong> will lead tofaster resolution of your claims and give you the time you need to interact with your patients.With <strong>eTrans</strong>, the cost of sending claims electronically is significantly lower than the cost of sending paperclaims. <strong>eTrans</strong> saves time, materials, and postage. And, if your claim cannot be sent to the payor electronically,the eServices department will print them and mail them for you, so you can send all of your claimselectronically, even if the payor doesn’t accept electronic claims.When you send e-claims through <strong>eTrans</strong>, your claims arrive at the insurance company faster and go directlyinto the insurance company’s computer. So, your office receives payment in about half the time it would takeyou to receive payment if you had mailed the claims.This guide includes all the information you need to use <strong>eTrans</strong> quickly and easily.Minimum System Requirements• <strong>Dentrix</strong> 11 or higher• Modem or Internet connection capabilitiesNote:• Software modems (also called “winmodems” or “softmodems”) are not recommended for use with thisprogram.• If you will be sending your existing paper documents electronically, you must have a 32-bit TWAINcompliantscanner.Enrolling and enabling <strong>eTrans</strong>To enroll in <strong>eTrans</strong>, you must do the following:• Obtain a registration form from eServices Sales (1-800-734-5561, option 2) and complete the registrationform.• Print the Practice Organization List (for more information, see “Practice Organization List” on page 25).• Send both documents to eServices Sales (for details, call 1-800-734-5561, option 2).Special EnrollmentSome insurance payors require notification before they will accept claims electronically from your office. Thesepayors are identified on the Electronic Payor List, which is included in your Welcome Kit and can be foundonline at www.dentrix.com/eservices (click Payer Search Tool).Until the insurance payors have received e-claims notification from your office, you must print these claimsand mail them to the payor. When you receive confirmation from the payor that the notification has beenreceived, you can enter the proper Payor ID and begin sending claims to that payor electronically.Note: Until confirmation is received from the insurance company, claims submitted electronically to thatinsurance company will be rejected.<strong>eTrans</strong> 5.0/5.1/5.3 for <strong>Dentrix</strong> <strong>User</strong>’s <strong>Guide</strong>
5Special Enrollment FormsSpecial Enrollment Forms and instructions for completion and processing of these enrollment forms areoutlined on the front page of each special enrollment packet. Contact the eServices Enrollment department(see “How to Get Help” below) for more information about these forms or to receive additional SpecialEnrollment forms.How to Get HelpShould you have questions about eClaims, the eServices department of Henry Schein Practice Solutions isavailable to provide you with exceptional customer service and support. You can reach the eServicesdepartment by calling 1-800-734-5561. When you call the eServices department of Henry Schein PracticeSolutions, you have the option to speak with technical support, sales, finance, or enrollment. Use thefollowing guidelines to decide which resource will be able to best help you:• Technical Support – Option 1• Installation, setup and use of eClaims• Reading or printing reports• Claim tracking• Sales – Option 2• New sales of <strong>eTrans</strong>• Billing – Option 3• Billing questions• Changing pre-authorized payment selection• Reconciling invoices to statements or reports• Enrollment – Option 4• Registration• Special Enrollment• Change in Federal Tax ID numbers• Adding new providers to your practiceeServices Customer SupportToll-free telephone support is available only to registered <strong>eTrans</strong> users. Support is limited to the currentversion of the software and one prior release. When calling Support, be near a computer running the <strong>Dentrix</strong>and <strong>eTrans</strong> software programs, and have a copy of the <strong>eTrans</strong> <strong>User</strong>’s <strong>Guide</strong> available. Be prepared to give thefollowing information:• Your name and the name of the practice• The <strong>Dentrix</strong> customer number assigned to the practice• The version number of the product(s) being used• The type of network being used, if any• The version of Windows installed on the computer• The exact wording of any messages that have appeared on the screen• The circumstances surrounding the question or problem• Steps that have been taken to reach a solution<strong>eTrans</strong> 5.0/5.1/5.3 for <strong>Dentrix</strong> <strong>User</strong>’s <strong>Guide</strong>
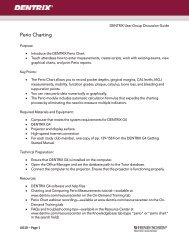
6The eServices Support department has training and experience in supporting the <strong>Dentrix</strong> software but are notauthorized to answer questions or solve problems relating to your hardware, network, or operating system.Operating system questions can sometimes be answered by reading the Windows documentation. For helpwith computer or network maintenance, please contact Henry Schein TechCentral (800-288-7691) or aqualified integration specialist who offers help with installation and ongoing service and support.Setting up <strong>eTrans</strong>Before you can use <strong>eTrans</strong> to send insurance claims electronically, you must set up <strong>eTrans</strong> in <strong>Dentrix</strong> and testthe connection to the <strong>eTrans</strong> server.To set up <strong>eTrans</strong>In the Office Manager, from the Maintenance menu, point to Practice Setup, and then click ElectronicClaims Setup.The <strong>eTrans</strong> Setup dialog box appears.The <strong>eTrans</strong> Setup dialog box is divided into these sections:• <strong>User</strong> Settings• File Transfer• Post Submission• Advanced OptionsThese are explained in the sections that follow.Note: All the setup options are workstation-specific (you must perform the setup on all computers fromwhich you plan to submit e-claims using <strong>eTrans</strong>).<strong>eTrans</strong> 5.0/5.1/5.3 for <strong>Dentrix</strong> <strong>User</strong>’s <strong>Guide</strong>
7Setting Up the <strong>User</strong> Account SettingsAs part of the set up, you can enter your user ID and password, and you can register to use <strong>eTrans</strong> (if you havenot already done so).To set up the user account settings1. In the <strong>User</strong> ID field, enter your user ID that was e-mailed to you with your <strong>eTrans</strong> Welcome Kit (forexample, 019036UTD).2. Click Change Password.3. In the New Password field, type the password that was e-mailed to you with your <strong>eTrans</strong> Welcome Kit.4. Type the password again in the Confirm Password field.5. Click OK.6. If you have not already registered using the registration form from eServices (see “Enrolling and enabling<strong>eTrans</strong>” on page 4), you can click Register to open the eServices Registration Wizard from which youcan register <strong>eTrans</strong>.Important: Do not use the Registration Wizard to register <strong>eTrans</strong> if you have already sent the registration form.Note: You must complete the <strong>eTrans</strong> Registration process before you can begin using <strong>eTrans</strong>.Setting the Connection MethodYou can specify the type of connection you are using to submit e-claims: dial-up or Internet.To specify the connection method1. Under Connection Method, select the connection method that applies to your office:• Internet – Select this connection method if you have any type of Internet connection in your office.• Dial-up – Select this connection method if you do not have any type of Internet connection in youroffice, and you are going to connect through an eServices department server.2. If you selected Dial-up as your connection method, click Dial-up Settings to open the <strong>eTrans</strong> Dial-upSettings dialog box.3. Enter your area code in the field provided, and then select the local phone number(s) for your area code.The number(s) you select will be used to connect to the <strong>eTrans</strong> Server when you send your e-claims.4. Click OK.<strong>eTrans</strong> 5.0/5.1/5.3 for <strong>Dentrix</strong> <strong>User</strong>’s <strong>Guide</strong>
8Setting the Post Submission OptionWhen you submit an electronic claim, the Error Report is automatically displayed when there are claims thathave errors or need attention. You can specify if you do not want this report to be displayed when there no areclaims that need attention.To specify whether the Error Report will appear if there no are claims that need attentionUnder Post Submission, clear the If no claims need attention, do not display Error Report check box.Setting Advanced OptionsTo set the Advanced setup optionsClick Show Advanced to display and change any of the following advanced <strong>eTrans</strong> transmission options:• Server - This field displays the name of the <strong>eTrans</strong> server to which you are connecting to send youre-claims. Do not change this information.• Port - This field displays the number through which you are connecting to the <strong>eTrans</strong> server to send youre-claims. Do not change this information.• eClaims Path - This is the path where your <strong>eTrans</strong> program files are saved on your computer.• Suppress warning messages on validation reports - When selected, this option suppresses warningmessages on Validation Reports so that you are not notified if there are problems with your e-claims.Click Hide Advanced to hide the advanced options.Saving ChangesClick OK to save your changes. Or, click Apply to save your changes but not exit the <strong>eTrans</strong> Setup dialog box.Testing Your <strong>eTrans</strong> Server ConnectionIt is important for you to test your <strong>eTrans</strong> connection to ensure that you are connecting to the <strong>eTrans</strong> serverproperly so that you can send your claims electronically.Note: If you are sending electronic claims over the Internet with a dial-up connection, you will usually needto connect to your ISP before testing your connection or sending claims.You can test your <strong>eTrans</strong> connection two different ways:To test your <strong>eTrans</strong> connection using the Test Connection button1. In the Office Manager, from the Maintenance menu, point to Practice Setup, and then click ElectronicClaims Setup.The <strong>eTrans</strong> Setup dialog box appears.2. Click Test Connection to test your <strong>eTrans</strong> Server connection.The Test <strong>eTrans</strong> Connection dialog box appears with the status of the connection test.<strong>eTrans</strong> 5.0/5.1/5.3 for <strong>Dentrix</strong> <strong>User</strong>’s <strong>Guide</strong>
9When the process has been completed successfully, a message appears and states that your reports have beenretrieved successfully.3. Click OK to close the message and return to the Test <strong>eTrans</strong> Connection dialog box.4. If you want to view a detailed log of the transmission, click Show Messages >>.The expanded dialog box, provides the following options for the log:• Copy to Clipboard – If you want to copy the output log to the Windows clipboard to be pasted into anotherprogram, click Copy to Clipboard.• Email – If you want to send a message containing the output log, click Email.5. Click Finish to close the Test <strong>eTrans</strong> Connection dialog box.To test your <strong>eTrans</strong> connection using the Retrieve Reports option1. From the <strong>Dentrix</strong> Office Manager toolbar, click the Electronic Claim Submission button.The Electronic Claims Submission dialog box appears.<strong>eTrans</strong> 5.0/5.1/5.3 for <strong>Dentrix</strong> <strong>User</strong>’s <strong>Guide</strong>
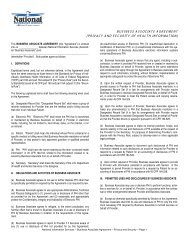
12Updating Payor ID NumbersThe eServices department assigns electronic payor numbers to the insurance providers that will receiveelectronic claims from your office. These numbers, called Payor ID numbers, act like an address that directsthe electronic claims to the correct insurance company.You can find a complete list of Payor ID numbers in the Insurance Data dialog box. If you have not usedeClaims before, this field may be blank. In order to send electronic claims, you must set up Payor ID numbersfor the insurance carriers to whom you will be sending electronic claims.It is recommended that you update your payor ID numbers after each installation. So, if you already havepayor ID numbers that were assigned during a previous <strong>eTrans</strong> installation, update your payor ID numbersfor each subsequent <strong>eTrans</strong> update. The eServices department maintains a list of payor ID numbers for mostavailable insurance companies. The information is available at www.dentrix.com/products/eservices/eclaims(click Payer Search Tool).To update Payor IDs1. Double-click the Insurance Information block in the Family File.The Insurance Information dialog box appears.2. With the appropriate Carrier selected, click Insurance Data.The Primary Dental Insurance Plan Information dialog box appears.<strong>eTrans</strong> 5.0/5.1/5.3 for <strong>Dentrix</strong> <strong>User</strong>’s <strong>Guide</strong>
133. Click the Payer ID search button to display a list of available Payor IDs. Select the appropriate payor IDfrom the list.Note:• If you cannot find the payor ID, enter 06126.• If there is a Payor ID on the eServices Electronic Payor List that is not listed in the Select Payor ID dialogbox, you can enter that number directly into the Payor ID field.• Do not contact the insurance company for a Payor ID number; these are assigned by the clearinghouse.Sending Electronic ClaimsUsing <strong>eTrans</strong>, you can transmit insurance claims electronically from your <strong>Dentrix</strong> practice managementsoftware to the insurance carriers. Electronic claims can only be sent from a computer with an Internetconnection and/or a modem.To send electronic claims1. In <strong>Dentrix</strong>, create an insurance claim and send it to the electronic claims batch.Note: For information about creating insurance claims, refer to the <strong>Dentrix</strong> Help or user’s guide.2. When you are ready to submit your claims, select the claims you want to send (if you want to send specificclaims), and then click the Electronic Claim Submission buttonon the Office Manager toolbar.<strong>eTrans</strong> 5.0/5.1/5.3 for <strong>Dentrix</strong> <strong>User</strong>’s <strong>Guide</strong>
14The Electronic Claims Submission dialog box appears.Under Send To Electronic Claims, select one of the following options:All Dental and Medical Claim Forms – To submit all dental and medical claims (electronic and nonelectronic).• Selected Dental Claim Forms – To submit only the dental claims you have selected in the BatchProcessor.• Selected Medical Claim Forms – To submit only the medical claims you have selected in the BatchProcessor.All Electronic Dental Claim Forms – To submit all the electronic dental claims.• All Electronic Medical Claim Forms – To submit all the electronic medical claims.All Dental Claim Forms – To submit all the dental claims (electronic and non-electronic).• All Medical Claim Forms – To submit all the medical claims (electronic and non-electronic).Retrieve Reports – To get reports regarding the claims currently listed in the Batch Processor.3. Click OK.The eClaims Pre-submission Summary dialog box appears.Note: You can specify selected claims to send by selecting those claims in the Batch Processor andselecting the Selected Dental Claim Forms or Selected Medical Claim Forms option.<strong>eTrans</strong> 5.0/5.1/5.3 for <strong>Dentrix</strong> <strong>User</strong>’s <strong>Guide</strong>
16Notes:• To conform to the new HIPAA 5010 standards, your provider address information must include your9-digit ZIP Code. You can look up your 9-digit ZIP Code on the U.S. Postal Service Web site. Go tozip4.usps.com, enter the address in the Required Fields, and click Submit.• If you don’t need to provide additional claims data, skip to step 6.• For medical claims, the Treatment Dates and Diagnostic Codes tabs will not appear.Review the claim information in the five tabs in the Add’l Claim Data for [patient] dialog box, andmake any needed corrections. (Changes you make in this dialog box are not saved in the <strong>Dentrix</strong>database.a. If you need to include treatment date information to successfully process the claim, on the TreatmentDates tab, enter the treatment Start Date and End Date (if known) for the procedures listed.b. Depending on the procedure, you may need to provide a diagnosis code for the claim. On theDiagnostic Codes tab, you can provide up to four diagnosis codes to associate with the claim procedures.Tip: If the listed procedures require more than four diagnosis codes, you should cancel the claim,divide it into multiple claims with fewer procedures per claim, and then resubmit them.<strong>eTrans</strong> 5.0/5.1/5.3 for <strong>Dentrix</strong> <strong>User</strong>’s <strong>Guide</strong>
17Note: Each time you successfully enter a Dx Code in one of the four fields, the next field becomesavailable. You can enter up to four diagnosis codes.If more than one diagnosis code is entered, for each listed procedure, under Diagnosis Code(s),select the diagnosis codes in descending order of importance.c. On the Provider tab, in the UPIN field, specify the Unique Physician Identification Number for thebilling provider and rendering provider. These will often be the same, but may be different if, forexample, the rendering provider is the hygienist and all insurance billing is done under the dentist’sUPIN. (If the UPINs were previously entered for the provider(s), the UPINs will automatically appear.)<strong>eTrans</strong> 5.0/5.1/5.3 for <strong>Dentrix</strong> <strong>User</strong>’s <strong>Guide</strong>
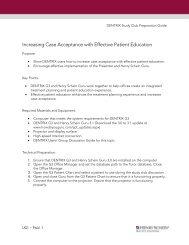
22Editing Electronic ClaimsYou can add missing information on claims submitted electronically through <strong>eTrans</strong>.Note: If the Place of Service code or Service Facility TIN is missing on a medical insurance claim, you mustfix the error from the Ledger.To add missing information on an electronic claim1. For each rejected claim in the eClaims Pre-submission Summary dialog box, there is an Edit link. Clickthe Edit link to edit patient, subscriber, provider, and insurance plan information.The Edit Missing Claim Information dialog box appears.<strong>eTrans</strong> 5.0/5.1/5.3 for <strong>Dentrix</strong> <strong>User</strong>’s <strong>Guide</strong>
232. Add the necessary information on each tabbed page (all fields that are not disabled are required except forthe second Street fields).Note: Changes you make in this dialog box are saved in the <strong>Dentrix</strong> database and reflected in the FamilyFile and other areas of <strong>Dentrix</strong> the next time you open those modules.• Patient tab – The patient’s Date of Birth and Address.If you want to use the subscriber’s address, select the Use Subscriber Address check box to populatethe fields with the claim subscriber’s address. This check box is unavailable if all the required fields ofthe Address are filled in, if Use Patient Address is selected on the Claim Subscriber or OtherSubscriber tab, or if there is no address for the claim subscriber.• Claim Subscriber tab – The Date of Birth, Address, and Subscriber ID # for the subscriber on theclaim (primary or secondary, whichever applies).If you want to use the patient’s address, select the Use Patient Address check box to populate thefields with the patient’s address. This check box is unavailable if all the required fields of the Addressare filled in, if Use Subscriber Address is selected on the Patient tab, or if there is no address for thepatient.<strong>eTrans</strong> 5.0/5.1/5.3 for <strong>Dentrix</strong> <strong>User</strong>’s <strong>Guide</strong>
24• Providers tab – The NPI and TIN# or SS# for the Billing Provider, Pay-To Provider, and ClaimRendering Provider. (You do not need to type the dashes (-) when putting in the numbers.)• Insurance Plan tab – The Address where claims are sent for the insurance plan.• Other Subscriber tab – The other subscriber is the secondary subscriber if this is a primary claim orthe primary subscriber if this is a secondary claim. The Date of Birth, Address, and Subscriber ID #for the subscriber on the claim (primary or secondary, whichever applies).If you want to use the patient’s address, select the Use Patient Address check box to populate thefields with the patient’s address. This check box is unavailable if all the required fields of the Addressare filled in, if Use Subscriber Address is selected on the Patient tab, or if there is no address for thepatient.<strong>eTrans</strong> 5.0/5.1/5.3 for <strong>Dentrix</strong> <strong>User</strong>’s <strong>Guide</strong>
253. Click OK to apply the changes to the <strong>Dentrix</strong> database, update the claim, and return to the eClaimsPre-submission Summary dialog box.Note: There will be more claims listed when you return to the eClaims Pre-submission Summarydialog box than previously if additional electronic claims were sent to the Batch processor from anotherworkstation while you were editing a claim.4. Repeat steps 1 – 3 for any other rejected claim(s).<strong>eTrans</strong> reportsWhen you send claims electronically, you receive reports containing important information about your claimsand your <strong>eTrans</strong> account. The information in these reports comes from three sources: Henry Schein PracticeSolutions, the secondary clearinghouses involved in processing your claims, and the insurance company/payor.Reading and understanding your <strong>eTrans</strong> reports will help you ensure that you receive payment in a timely manner.For steps on how to retrieve your <strong>eTrans</strong> reports, see “Testing Your <strong>eTrans</strong> Server Connection” on page 8.There are two reports that will appear in your Batch Processor when you send e-claims: the eClaims PresubmissionSummary Report and the <strong>eTrans</strong> Transmission report. These reports are discussed in detail in thesections that follow.Practice Organization ListWhen you enroll and enable <strong>eTrans</strong> (or any time changes are made in your practice organization), you mustprint and send a copy of the Practice Organization List to eServices Sales so that a representative can use yourpractice’s information to create (or update) an <strong>eTrans</strong> account.To print the Practice Organization List1. In the Office Manager, from the Reports menu, point to Reference, and then click PracticeOrganization List.2. Click OK to send it to the Batch Processor.3. From the Batch Processor, select the report you want to print.4. Click the Print Reports button.5. Please review the Tax Identification Number (TIN), 4-digit site ID, and provider name for any of theprimary providers before you send the report.<strong>eTrans</strong> 5.0/5.1/5.3 for <strong>Dentrix</strong> <strong>User</strong>’s <strong>Guide</strong>
26eClaims Pre-submission Summary ReportBefore claims are transmitted, the <strong>eTrans</strong> software performs over 250 checks to assure that the information inthe claims is complete and that the claims are ready to be sent to the insurance company/payor. The eClaimsPre-submission Summary Report shows you if your claims are Validated, Warning, or Rejected.• Validated – Claims with a Validated status contain all the necessary information and attachments and areready to be sent to the insurance company/payor.• Warning – Claims with a Warning status are missing information and/or attachments that should beincluded with the claim. You can send claims with a Warning status to the insurance company/payor, butyou should correct the information in the claim before you send it.• Rejected – Claims with a Rejected status are missing information that will cause the claim to be rejectedby the insurance company/payor. If the error is caused by information included on the claim, delete theclaim from both the Batch Processor and the Ledger. Correct the error(s), recreate the claim, and re-sendit to the Batch Processor for processing with your next batch of claims. You can send rejected claims byplacing a check mark in the box under the status column, but this is not recommended.A copy of the eClaims Pre-submission Summary Report will be placed in the Batch Processor after you sendyour electronic claims.Note: The eClaims Pre-submission Summary Report is not a transmission report and is not an indication thatyou have successfully submitted your claims.Transmission ReportThe Transmission Report is a compilation of reports from Henry Schein Practice Solutions that is deliveredafter you send electronic claims. This report may contain any the following reports: the Confirmation Report,the Payer/Clearinghouse Report, the Passthrough Report, the Attachment Status Report, and the BillingStatement. You can view each of these reports by previewing or printing the <strong>eTrans</strong> Transmission Report.Confirmation ReportThe Confirmation Report shows all the claims Henry Schein Practice Solutions received in a given transmission.Henry Schein Practice Solutions assigns a unique number to each claim on this report so that you can distinguishbetween the claims submitted for the same patient. The Confirmation Report also indicates whether each claimwas accepted for electronic processing or was rejected before being submitted to the insurance company/payor.If a claim is rejected, the report will include information about the reason for the rejection. You should receivethis report immediately after you submit claims. If you do not receive this report at the time of submission,resubmit the claims or contact eServices Support at 1-800- 734-5561 for further assistance.Attachment Status ReportThe Attachment Status Report contains information about the e-claim attachments your office has sent. Youshould receive this report immediately after you submit attachments. If you do not receive this report at thetime of submission, resubmit the attachments, or contact eServices Support at 1-800-734-5561 for assistance.You will also receive this report when a payor needs additional information about attachments you have sent.<strong>eTrans</strong> 5.0/5.1/5.3 for <strong>Dentrix</strong> <strong>User</strong>’s <strong>Guide</strong>
27Payer/Clearinghouse ReportThe Payer/Clearinghouse Report is a compilation of status messages received from either the clearinghouse orthe insurance companies that are processing the claims you previously submitted. Because a status messagecould be generated for each step of the submission process, a claim could appear on this report several times.To help you distinguish between different claims submitted for the same patient, some basic patientinformation and the Henry Schein Practice Solutions claim number (which can be found on the ConfirmationReport) is included with each message. You will only receive this report when new information is available.Passthrough ReportThe Passthrough Report contains information similar to information on the Payer/Clearinghouse Report.However, the Passthrough Report is more detailed and only contains information for each claim once. Thisreport does not contain the Henry Schein Practice Solutions claim number because that is created by the payoror clearinghouse and is merely transmitted to the Batch Processor through Henry Schein Practice Solutions.Billing StatementThe Billing Statement is sent to you at the beginning of each month. This report contains a complete list ofthe claims processed by Henry Schein Practice Solutions during the previous month, some basic statisticaldata about the number of claims you have submitted, and the total charges to be remitted to Henry ScheinPractice Solutions.Depending on the payment method you selected when you registered for <strong>eTrans</strong>, the charge may be deductedautomatically from a checking account or charged to a credit card.Error ReportThe Error Report appears after you send your claims electronically. This report only appears if one or more ofthe claims that you sent were rejected by the eServices department or by the payor. If you use eCentral, theError Report provides you with links to your eCentral account. If you click the eCentral link in the errorreport, your eCentral account is opened to the Reports Manager, where you can see all the reports for theclaim. If you click the claim number, your eCentral account is opened to the claim detail information. If youclick the Claims Search button, your eCentral account is opened to the Claims Manager.The top section of the Error Report displays claims and the statuses of those claims. The bottom sectiondisplays totals, such as the total number of claims rejected and dollar amount of those claims. The importantinformation area serves as a reminder that any claim listed on this report needs your attention.You can access the most recent Error Report that you received by right-clicking the eSync Reminder Iconand selecting eClaims Error Report.<strong>eTrans</strong> 5.0/5.1/5.3 for <strong>Dentrix</strong> <strong>User</strong>’s <strong>Guide</strong>
28Frequently Asked Questions about<strong>eTrans</strong>This section answers frequently asked question about <strong>eTrans</strong>. Read these questions and answers beforecontacting eServices Support.Sending eClaimsQ: When can I send claims?A: Claims can be sent 24 hours a day, seven days a week. However, the high-peak transmission time is from2:00 P.M. to 6:00 P.M. Mountain Time, Tuesday through Thursday. To avoid busy signals and connectiondifficulties, you may want to schedule your claims submission for the early morning hours.Note: Occasionally, enhancements and maintenance are performed on our computers and other systems thatmay cause you to be unable to send claims. You will be notified in advance when this will occur. Maintenancewill be done during non-peak hours.Q: How do I send a claim that requires X-Rays or other documentation?A: You can submit your attachments to the eServices department electronically along with the claim. See the<strong>Dentrix</strong> Help or user’s guide for instructions on how to include an attachment with a claim.Q: How many claims can/should I send at any given time?A: You can submit up to 100 claims per batch. The eServices department suggests that you submit all of yourclaims for any given day in one large batch, either at the end of your work day or at the beginning of thefollowing work day. Offices who submit one claim at a time frequently experience duplicate claim problemsand confusion trying to match up reports. Submitting one large batch per day keeps your reports consolidatedand easy to manage.Q: How do I know if a claim was submitted successfully?A: The status of each claim you send is listed on the Confirmation Report (part of the <strong>eTrans</strong> TransmissionReport) that is delivered to the Batch Processor immediately following your transmission. If you do notreceive this report, please contact eServices Customer Support at 1-800-734-5561, option 1.Q: How do I resubmit a claim?A: To resubmit a claim, you need to correct any erroneous information, delete and recreate the claim in theLedger, and re-send it to the Batch Processor to go with your daily batch of electronic claims. The eServicesdepartment does not have the ability to resubmit claims for your office.Q: How do I cancel or delete a claim once it has been transmitted?A: Claims are processed in “real-time.” That means as soon as your claim is received by the eServicesdepartment, processing begins. Therefore, we are unable to delete claims. Review your eClaims Pre-Submission Summary carefully before transmitting your claims to eliminate the possibility of sending claimsyou did not intend to send.<strong>eTrans</strong> 5.0/5.1/5.3 for <strong>Dentrix</strong> <strong>User</strong>’s <strong>Guide</strong>
29Q: Can I still submit a claim electronically if the insurance company is not found on the ElectronicPayor List?A: Yes. If a particular carrier does not accept claims electronically, use payor ID 06126 and the eServicesdepartment will print the claims to paper and mail it to them for you.Q: Now that I send claims electronically, does that mean I don’t have to follow up with insurancecompanies?A: We recommend that you follow up with insurance companies after 30-45 days about outstanding claimsthat have been submitted but not settled. <strong>eTrans</strong> claim submission is a service that provides you with fasterclaim submission and tracking information. The insurance companies are still responsible for processing andpaying your claims.Changing Account InformationQ: Do I need to notify anyone if I add a new dentist to my practice?A: Yes! It is extremely important that you notify the eServices Enrollment department prior to submittingclaims for a new dentist. Otherwise, all claims for this provider will be automatically rejected. eServicesEnrollment can be reached at 1-800-734-5561, option 4.Q: Do I need to notify anyone if I have a new address, telephone number, or tax identification number?A: Yes! It is extremely important that our records be as accurate as possible. So, it is important that you relayany changes made to your account to the eServices Enrollment department at 1-800-734-5561, option 4.Changes to your tax identification number must also be communicated directly to all insurance companies towhom you submit claims through <strong>eTrans</strong>. Changes made to your <strong>eTrans</strong> enrollment are not necessarily pickedup by the insurance companies. Therefore, they must be notified directly. Any changes not properlycommunicated to the eServices Enrollment department and/or the insurance companies can result in claimdelays and/or rejections.Q: What does the asterisk next to an insurance company found on the Electronic Payor List mean?A: Those insurance companies that are marked with an asterisk require notification that you are going to besubmitting claims to them electronically. Therefore, it is vital that you contact eServices Enrollment at 1-800-734-5561, option 4 and complete the proper paperwork before submitting claims to these companies. Formore information, see “Special Enrollment” on page 4.BillingQ: Am I charged for all claims transmitted? What claims am I charged for?A: You are not charged for any claims that are marked as Rejected on the eClaims Pre-submission SummaryReport, Confirmation Report, or Clearinghouse Report.Q: How often do I receive billing statements?A: Once a month, you will receive a billing statement as part of your <strong>eTrans</strong> Submission Report. This billingstatement will list the method of payment you selected when you signed up for electronic claims (draft fromchecking or charge to credit card). If checking or charge are noted on your billing statement, you will be billedautomatically on or around the 15 th of the month.<strong>eTrans</strong> 5.0/5.1/5.3 for <strong>Dentrix</strong> <strong>User</strong>’s <strong>Guide</strong>
30SupportQ: What if an insurance company says they never received my claim?A: Verify the claim information (name, Social Security number, date of birth, group ID, and so forth) withthe insurance company. If the correct information was submitted and the claim was submitted through<strong>eTrans</strong>, contact eServices Customer Support at 1-800-734-5561, option 1.Note: The eServices department is unable to research any claim that is older than six months from thesubmission date. Please run an Insurance Aging Report from <strong>Dentrix</strong> on a regular basis to ensure that claimsare not aging more than 45-60 days.Q: Who do I call if I have questions or concerns?A: Depending on the type of question you have, you can contact one of the Support teams listed below:• eServices Customer Support is available at 1-800-734-5561, option 1 to help you with installationand setup problems and software-related troubleshooting.• If you have questions regarding a charge to your account or any of the Henry Schein PracticeSolutions eServices, contact the Billing department at 1-800-734-5561, option 3.• If you have claims which are rejected because the “provider is not registered for ECS or is invalid,” orif you know you are going to need to request special enrollment with an insurance company, contactthe eServices Enrollment department at 1-800-734-5561, option 4.Henry Schein Practice Solutions hours of operation are Monday through Thursday from 6:00 A.M. to 6:00P.M. Mountain Standard/Daylight Time, and Friday from 6:00 A.M. to 5:00 P.M. Mountain Standard/Daylight Time.Q: What other services are available through the eServices department?A: Henry Schein Practice Solutions constantly reviews, updates, and creates services that can assist your office.For more information, visit www.dentrix.com/products/eservices or contact the eServices Sales department at1-800-734-5561, option 2.Technical TroubleshootingQ: When running the <strong>eTrans</strong> installation, I get the message, “Setup could not detect an installed TCP/IPprotocol. Your computer does not appear to be set up to connect to the Internet. Please make sure to getan Internet connection before trying to send claims.”A: When you tell the installation program that you want to send claims over the Internet, it tries to determinewhether or not your computer can connect to the Internet. If it can’t verify the connection, you get thiswarning. If you know that you have an Internet connection, you can safely ignore this message.Q: When I select a Dial-up install, the installation program displays a message asking me to insert myWindows CD. What should I do?A: If you have your Windows CD, insert it into the CD-ROM drive. The <strong>eTrans</strong> install is trying to installDial-up Networking, and it requires some files on the Windows CD. If your computer did not come with aWindows CD, the files are probably on your computer. If you do not feel comfortable installing operatingsystem components, have your technician help you with this part of the installation.Q: I installed <strong>eTrans</strong> to send claims over a dial-up connection, and now I want to send them over theInternet. What do I do?<strong>eTrans</strong> 5.0/5.1/5.3 for <strong>Dentrix</strong> <strong>User</strong>’s <strong>Guide</strong>
31A: In the Office Manager, from the Practice Setup menu, click Electronic Claims Setup. Change theConnection Method to Internet, and click OK.Q: Why is my dial-up networking or Internet connection suddenly unable to connect to the <strong>eTrans</strong>server to transmit my claims?A: If you are trying to submit claims during a high-peak time (between 2:00 P.M. and 6:00 P.M. MountainTime, Tuesdays through Thursdays) and receive an “unable to connect” message, you may be calling during anextremely busy time. Early morning is the best time to transmit easily and quickly.Q: What does the message “No Dial tone” mean?A: Your modem is not able to get a dial tone. Check all connections between your computer and thetelephone jack. Also, check the telephone line for a dial tone. If you still have no dial tone, contact yourtelephone company.Q: What does the message “Could not initialize modem” mean?A: For an unknown reason, your modem is not responding. You will need to reset your modem:• Internal modems (inside your computer) – Exit all running software programs, turn your computeroff, count to five, turn your computer back on, and try submitting claims again.• External modems (outside your computer) – Turn your modem off, count to three, turn yourmodem back on, and try submitting claims again.Note: Any problems with your modem or incorrect communication settings in your software or hardwaresetups will cause this message. If resetting the modem does not work, have it checked out or replaced by aprofessional technician.<strong>eTrans</strong> 5.0/5.1/5.3 for <strong>Dentrix</strong> <strong>User</strong>’s <strong>Guide</strong>