- Page 1 and 2: ^^. ^ ^s .y ^,-j?^ ^^w^-^>&i^^^V^?v
- Page 3 and 4: PROPHET-5 SYNTHESIZERTECHNICAL MANU
- Page 5 and 6: iJTable of ContentsISECTION 1MECHAN
- Page 7 and 8: '1SECTION 1MECHANICAL1-0 GENERALThi
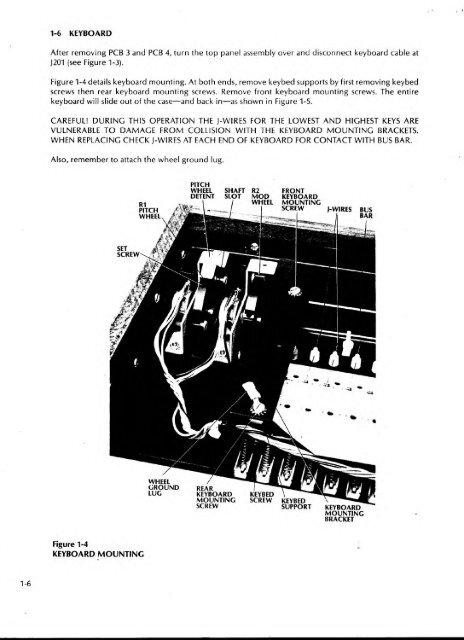
- Page 9 and 10: Raise the top panel assembly to ser
- Page 11: 1-5 PCB 1/2 CONTROL PANELSOnce PCB
- Page 15 and 16: TOADDITIONALVCOsTOADDITIONALENV GEN
- Page 17 and 18: 2-2 THE PROPHETThe Prophet is a sub
- Page 19 and 20: COMMON ANALOGVOICE(VOiCES e-5 ARE S
- Page 21 and 22: 'IAll processed CVs originate from
- Page 23 and 24: ajMim—2-8 AUDIO OUTPUTAs shown in
- Page 25 and 26: .'2-10 MICROPROCESSOR, MEMORY, AND
- Page 27 and 28: For troubleshooting, it should be e
- Page 29 and 30: 2-12 ADC, DAC, AND CV OUTPUTSThe DA
- Page 31 and 32: iirH- - jMg 1— -^ 'iVMUX, U201-3^
- Page 33 and 34: the same CV and trigger pattern to
- Page 35 and 36: SECTION 3DOCUMENTS3-0 DOCUMENT LIST
- Page 37 and 38: TOP PANEL ASSEMBLY1CHASSiSLAST \NOT
- Page 39 and 40: TB/0i/20f 32 22 30 20 19 25 233 2 I
- Page 41 and 42: TBZOf/^fOtP^2C20ZTBZOI/IOl17FUT ATK
- Page 43 and 44: OA* Y*tMOlooMtt'O o)i:i'^.^^.1 I5-
- Page 45 and 46: —' i+6V+5d^1—+I5V+ SV+ V ff^ U3
- Page 47 and 48: 1+ I5V£/JJiJ-5|T> -TUNEWBOtWfOiAMP
- Page 50 and 51: P40I+I6V(TUNE MUX)P40iP40f3ft wMIK
- Page 52 and 53: + I5VOSCP40i^Q ^ |PMOPFR£QASFINAL
- Page 54 and 55: M+I5VP40/ x|5v301 K|%34^fM0O£WASR4
- Page 56 and 57: IU504ft50647C5042Z00|iFMCTBMtZCT2 1
- Page 58 and 59: Inpreparation for service, set up t
- Page 60 and 61: 4-2 OSCILLATOR B TESTSTEP MODULE CO
- Page 62 and 63:
4-S FILTER TEST.STEP'MODULE CONTROL
- Page 64 and 65:
4-8 POLY-MOD TEST—A.STEP MODULE C
- Page 66 and 67:
i4-11 PITCH WHEEL TRIMThis trim rem
- Page 68 and 69:
A)I4-16 VCO SCALE TRIMBE SURE RECOR
- Page 70 and 71:
4-19 FILTER ENVELOPE AMOUNT VCA BAL
- Page 72 and 73:
4-21 FINAL VGA BAL1. Switch PRESET
- Page 74 and 75:
115-3 PCB 3BT301 E-040L-\:!Oi 0-U45
- Page 76 and 77:
I ]U374U375U376U377U37SU379U380U381
- Page 78 and 79:
1R419SR4199R4200R4201R4202R4203R420
- Page 80 and 81:
51» IR44S7/488 R-025R44S9 R-009R44
- Page 82 and 83:
kL096 E-066098 E-071100 E-078102 E-
- Page 84 and 85:
IJ310 M-156312 M-157314 M-158316 M-
- Page 86 and 87:
JJ51S R-161520 R--162522 R-163524 R
- Page 88 and 89:
FFFFDBKFETFFFILTFINFINEFOAFREQFSKFT
- Page 90 and 91:
11 IJSECTION 8THEORY8-0 INTRODUCTIO
- Page 92 and 93:
1 1for the 2 to 5-foot range. The c
- Page 94 and 95:
IiSECTION 9PRCX^RAMMING9-0 INTRODUC
- Page 96 and 97:
I3JIJThe Prophet will not accept st
- Page 98 and 99:
ByteByte 23Switch Bit (7)OSC A PULS
- Page 100 and 101:
t J IISECTION 10REVISION 3.1 and 3.
- Page 102 and 103:
I+ I5V+5dI^1-+5V 2'2pF+I6V+5V^^' U3
- Page 104 and 105:
T&=* PANEL ASSE^^mtYSAfKEYBOARD,'r-
- Page 106 and 107:
.^^'»_ u jj'/X H"r,P-*tQ( p5^f -^"
- Page 108 and 109:
4/J«-5[E> -TUNER57a12wzofwiOi^^^^^
- Page 110 and 111:
—T8502J/fRSOBWMfrS/IC5045.iiU502i
- Page 112 and 113:
^ 1 1 ;4 PINFigure II-OFigure11-TM1
- Page 114 and 115:
I 111-2 REVISION 3.0 MEMORY TESTRev
- Page 116 and 117:
Tr1 1-5 WHEEL BALANCE TRIM1. See pa
- Page 118 and 119:
SECTION 13PROPHET-5 REV 3.3 UPDATET
- Page 120 and 121:
iFigure 13-1PCB 3 TOP MODIFICATIONT
- Page 122 and 123:
T 1ttSillniiinMIttltltlltlillll^- ^
- Page 124 and 125:
i/*5-tft/jj4-y,6-C90H202 >7-CS0H5Q3
- Page 126 and 127:
'^'K'..v''
- Page 128 and 129:
tV t IEPROM1000.3.0V.8.0V.8.1V.8.21
- Page 130 and 131:
IJmemory interface1000.3.01000.3.11
- Page 132 and 133:
ittKRAM, non-volatile (NV)1000.3.01
- Page 134:
1voltage-current convertervoice ass