DTXPRESS IV Owner's Manual - MIDI Manuals
DTXPRESS IV Owner's Manual - MIDI Manuals
DTXPRESS IV Owner's Manual - MIDI Manuals
- No tags were found...

You also want an ePaper? Increase the reach of your titles
YUMPU automatically turns print PDFs into web optimized ePapers that Google loves.
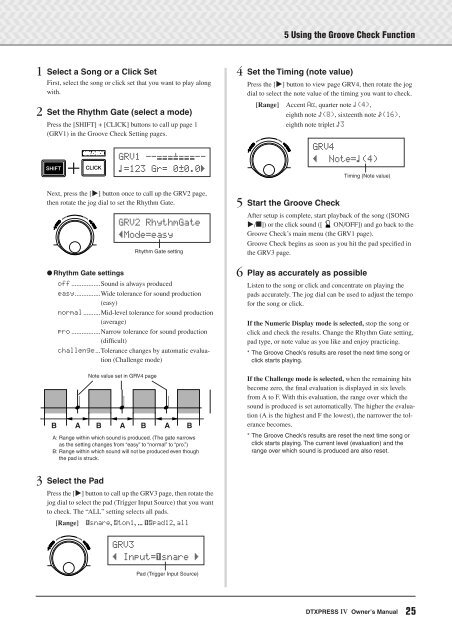
5 Using the Groove Check Function1 Select a Song or a Click SetFirst, select the song or click set that you want to play alongwith.2 Set the Rhythm Gate (select a mode)Press the [SHIFT] + [CLICK] buttons to call up page 1(GRV1) in the Groove Check Setting pages.GRV1~--æææ’æææ--⁄=123~Gr=~0œ0.0‚Next, press the [>] button once to call up the GRV2 page,then rotate the jog dial to set the Rhythm Gate.GRV2~RhythmGate”Mode=easy● Rhythm Gate settingsoff .................Sound is always producedeasy...............Wide tolerance for sound production(easy)normal ..........Mid-level tolerance for sound production(average)pro .................Narrow tolerance for sound production(difficult)challenge...Tolerance changes by automatic evaluation(Challenge mode)Note value set in GRV4 pageRhythm Gate settingB A B A B A BA: Range within which sound is produced. (The gate narrowsas the setting changes from “easy” to “normal” to “pro.”)B: Range within which sound will not be produced even thoughthe pad is struck.4 Set the Timing (note value)Press the [>] button to view page GRV4, then rotate the jogdial to select the note value of the timing you want to check.[Range] Accent A˘, quarter note ⁄(4),eighth note Ö(8), sixteenth note Ü(16),eighth note triplet Ö3GRV4”~~Note=⁄(4)Timing (Note value)5 Start the Groove CheckAfter setup is complete, start playback of the song ([SONG>/■]) or the click sound ([ ON/OFF]) and go back to theGroove Check’s main menu (the GRV1 page).Groove Check begins as soon as you hit the pad specified inthe GRV3 page.6 Play as accurately as possibleListen to the song or click and concentrate on playing thepads accurately. The jog dial can be used to adjust the tempofor the song or click.If the Numeric Display mode is selected, stop the song orclick and check the results. Change the Rhythm Gate setting,pad type, or note value as you like and enjoy practicing.* The Groove Check’s results are reset the next time song orclick starts playing.If the Challenge mode is selected, when the remaining hitsbecome zero, the final evaluation is displayed in six levelsfrom A to F. With this evaluation, the range over which thesound is produced is set automatically. The higher the evaluation(A is the highest and F the lowest), the narrower the tolerancebecomes.* The Groove Check’s results are reset the next time song orclick starts playing. The current level (evaluation) and therange over which sound is produced are also reset.3 Select the PadPress the [>] button to call up the GRV3 page, then rotate thejog dial to select the pad (Trigger Input Source) that you wantto check. The “ALL” setting selects all pads.[Range] ƒsnare, tom1, ... ƒpad12, allGRV3”~Input=ƒsnare~‚Pad (Trigger Input Source)<strong>DTXPRESS</strong> <strong>IV</strong> Owner’s <strong>Manual</strong>25