WL Circuit Breakers - Siemens
WL Circuit Breakers - Siemens
WL Circuit Breakers - Siemens

You also want an ePaper? Increase the reach of your titles
YUMPU automatically turns print PDFs into web optimized ePapers that Google loves.
Answers for industry.<br />
PROFIBUS and MODBUS Communication<br />
Application Guide<br />
<strong>WL</strong> <strong>Circuit</strong> <strong>Breakers</strong><br />
3
Usage and Guidelines<br />
<strong>WL</strong> <strong>Circuit</strong> <strong>Breakers</strong><br />
Safety Guidelines<br />
This manual contains notices which<br />
you should observe to ensure your own<br />
personal safety, as well as to protect the<br />
product and connected equipment. These<br />
notices are highlighted in the manual<br />
by a warning triangle and are marked as<br />
follows according to the level of danger.<br />
This equipment contains hazardous<br />
voltages. Death, serious personal injury,<br />
or property damage can result if safety<br />
instructions are not followed. Only<br />
qualified personnel should work on or<br />
around this equipment after becoming<br />
thoroughly familiar with all warnings,<br />
safety notices, and maintenance<br />
procedures contained herein. The<br />
successful and safe operation of this<br />
equipment is dependent upon proper<br />
handling, installation, operation<br />
and maintenance.<br />
Danger<br />
For the purpose of this manual and<br />
product labels, DANGER indicates an<br />
imminently hazardous situation which,<br />
if not avoided, will result in death or<br />
serious injury.<br />
Warning<br />
For the purpose of this manual and<br />
product labels, WARNING indicates a<br />
potentially hazardous situation which,<br />
if not avoided, could result in death or<br />
serious injury.<br />
Caution<br />
For the purpose of this manual and<br />
product labels, CAUTION indicates a<br />
potentially hazardous situation which,<br />
if not avoided, may result in minor or<br />
moderate injury.<br />
Attention<br />
Draws your attention to particularly<br />
important information on the product,<br />
handling the product, or to a particular<br />
part of the documentation.<br />
Qualified Personnel<br />
For the purpose of this manual and<br />
product labels, a qualified person is one<br />
who is familiar with the installation,<br />
construction and operation of the<br />
equipment, and the hazards involved.<br />
In addition, he or she has the following<br />
qualifications:<br />
(a) Is trained and authorized to energize,<br />
de-energize, clear, ground and tag<br />
circuits and equipment in accordance<br />
with established safety practices.<br />
(b) Is trained in the proper care and use<br />
of protective equipment, such as<br />
rubber gloves, hard hat, safety glasses<br />
or face shield, flash clothing, etc.,<br />
in accordance with established<br />
safety practices.<br />
(c) Is trained in rendering first aid.<br />
Correct Usage<br />
Note the following:<br />
Warning<br />
This device and its components<br />
may only be used for the<br />
applications described in<br />
the catalog or the technical<br />
descriptions, and only in<br />
connection with devices or<br />
components from other<br />
manufacturers which have<br />
been approved or recommended<br />
by <strong>Siemens</strong>.<br />
This product can only function correctly<br />
and safely if it is transported, stored, set<br />
up, and installed correctly, and operated<br />
and maintained as recommended.<br />
Registered Trademarks<br />
WinPM.Net is a registered trademark of<br />
<strong>Siemens</strong> Energy & Automation. MODBUS®<br />
is a registered trademark of Schneider<br />
Automation, Inc. Some other designations<br />
used in these documents are also brands;<br />
the owner’s rights may be violated if they<br />
are used by third parties for their own<br />
purposes. Excel and Internet Explorer are<br />
registered trademarks of Microsoft<br />
Corporation. Java is a registered trademark<br />
of Sun Microsystems. Netscape is a<br />
registered rademark of AOL Time Warner.
Communication-capable <strong>Circuit</strong> Breaker<br />
<strong>WL</strong> <strong>Circuit</strong> Breaker<br />
Introduction and Overview<br />
<strong>WL</strong> <strong>Circuit</strong> Breaker<br />
PROFIBUS Profile for <strong>WL</strong> <strong>Circuit</strong> Breaker<br />
MODBUS Profile for <strong>WL</strong> <strong>Circuit</strong> Breaker<br />
Breaker Data Adapter (BDA)<br />
Breaker Data Adapter Plus (BDA Plus)<br />
<strong>WL</strong> PROFIBUS/MODBUS Communication and Electronic Accessories<br />
1<br />
2<br />
3<br />
4<br />
5<br />
Sections
Introduction and Overview<br />
<strong>WL</strong> <strong>Circuit</strong> Breaker<br />
Introduction and Overview 1-2 – 1-3<br />
Overview of the Bus Systems 1-4 – 1-5<br />
Communicating with the <strong>Circuit</strong> Breaker 1-6 – 1-7<br />
<strong>WL</strong> PROFIBUS/MODBUS Communication and Electronic Accessories
Introduction and Overview<br />
<strong>WL</strong> <strong>Circuit</strong> Breaker<br />
This manual is aimed at those who<br />
want to find out more about the<br />
application benefits of communication-<br />
capable circuit breakers in power<br />
distribution systems. It also contains<br />
a detailed guide to commissioning,<br />
operating, diagnosing and maintaining<br />
communications. <strong>WL</strong> <strong>Circuit</strong> <strong>Breakers</strong>.<br />
<strong>WL</strong> PROFIBUS/MODBUS Communication and Electronic Accessories<br />
Introduction and overview<br />
Businesses are becoming increasingly more<br />
intelligent about the way they consume<br />
energy. Industrial and Commercial energy<br />
consumers are continuously looking for<br />
practical and efficient methods of<br />
measuring their energy usage while<br />
simultaneously that any possible<br />
downtime is minimized. At <strong>Siemens</strong> we<br />
understand those needs and we have<br />
developed products and solutions to<br />
help our customers exceed their goals.<br />
The heart of our solutions begins with<br />
our <strong>WL</strong> <strong>Circuit</strong> <strong>Breakers</strong>. The <strong>WL</strong> family<br />
of breakers is a <strong>Siemens</strong> design that<br />
combined decades of patented circuit<br />
breaker protection experience with the<br />
latest technology in circuit breaker<br />
performance and communication.<br />
A good example is our patented<br />
technology: Dynamic Arc-Flash Sentry®<br />
(DAS). DAS is an option that allows users<br />
the ability to automatically lower the<br />
down-stream available fault current<br />
when personnel are nearby the electrical<br />
equipment. Helping our customers provide<br />
a safer work place environment is an<br />
important part to our overall solutions.<br />
Another important aspect that<br />
complements our solutions is the <strong>WL</strong><br />
circuit breaker’s ability to gather power<br />
and environmental data and send it to<br />
central or remote monitoring devices or<br />
systems. You’ll find these capabilities and<br />
more when you take a closer look at our<br />
lineup of <strong>Siemens</strong> <strong>WL</strong> circuit breakers.<br />
SECTION 1<br />
Practical solution<br />
Power system protection is necessary<br />
to treat common types of abnormal<br />
occurrences, such as overloads or faults<br />
that can lead to power system failure.<br />
The methods for detecting and clearing<br />
such abnormalities and restore to normal<br />
operation is an engineered technique.<br />
Adequate protection requires constant<br />
measurements of certain system quantities,<br />
such as voltages and currents, comparing<br />
those system quantities, or some<br />
combination of the quantities, to a<br />
threshold setting computed by an engineer<br />
and set into an electronic trip unit like<br />
the ones available on the <strong>WL</strong> breakers.<br />
It’s equally important for power system<br />
protection to perform under normal<br />
operating conditions. If the above<br />
thresholds are set too low the power may<br />
be interrupted unnecessarily causing loss<br />
of productivity or safety provisions.<br />
The <strong>WL</strong> circuit breaker offers a practical<br />
means of setting power system protection<br />
through vast selectivity available in its<br />
Electronic Trip Unit (ETU). <strong>WL</strong> ETUs have<br />
a wide range of protective settings for<br />
engineering flexibility and reliable<br />
system protection.<br />
1/2
Introduction and Overview<br />
<strong>WL</strong> <strong>Circuit</strong> Breaker<br />
Efficient solution<br />
<strong>WL</strong> circuit breaker ratings range from 200-<br />
5000 amperes. Three Frame sizes are used<br />
to cover the entire range in order to allow<br />
users a common platform of breakers that<br />
are interchangeable and reconfigurable.<br />
Most of the options and accessories are<br />
also common between breakers providing<br />
a seamless means of system integration<br />
and expansion.<br />
Providing efficiency through modularity<br />
isn’t unique. But providing the right<br />
component technology that allows you<br />
to send PROFIBUS® or MODBUS® data over<br />
your network or the Internet for integrated<br />
power management and protection is.<br />
Options like:<br />
• Digital Input Module<br />
• Analog Output Module – provides four<br />
0-10V/4-20mA interface outputs to<br />
indicate measured values like power,<br />
current, voltage, frequency, etc.<br />
• Digital Output Module – Configurable<br />
digital logic output for switching six<br />
events or operations<br />
• Zone Inter-locking Module – used to<br />
provide coordinated clearing of faultcurrents<br />
with other upstream breakers<br />
can replace other auxiliary devices in the<br />
electrical system or provide a means of<br />
redundancy without the high cost of<br />
duplicating auxiliary devices.<br />
This manual is intended to provide you<br />
more details on implementing <strong>WL</strong> circuit<br />
breaker data and functionality into a<br />
MODBUS or PROFIBUS communication or<br />
control network.<br />
1/3 <strong>WL</strong> PROFIBUS/MODBUS Communication and Electronic Accessories
Overview of the Bus Systems<br />
<strong>WL</strong> <strong>Circuit</strong> Breaker<br />
Communication bus systems are used<br />
to connect distribution devices with<br />
varying levels of intelligence. With<br />
their different structures and<br />
mechanisms, certain bus systems<br />
are designed for highly specific<br />
applications, while others are better<br />
suited for more open applications.<br />
The following section describes bus<br />
systems used in automation and power<br />
distribution systems.<br />
Graphic<br />
1-1<br />
<strong>WL</strong> PROFIBUS/MODBUS Communication and Electronic Accessories<br />
PROFIBUS<br />
PROFIBUS-DP is an open, standardized,<br />
multi-vendor field bus system. Standardized<br />
to DIN (E) 19424 Part 3 / EN 50170, it<br />
is ideally suited to fulfill the stringent<br />
requirements for exchanging data in<br />
distributed peripheral and field devices.<br />
A PROFIBUS device can be easily integrated<br />
in and connected to standard automation<br />
systems. Many major manufacturers of<br />
programmable control systems offer<br />
PROFIBUS-DP master modules. The high<br />
transmission rates of up to 12 MBaud<br />
ensure virtually real-time system operation.<br />
The protocol used by the PROFIBUS-DP<br />
stations supports communication between<br />
the complex, equal-priority programmable<br />
Active Stations, master devices<br />
PROFIBUS<br />
M M<br />
<strong>WL</strong> <strong>Circuit</strong><br />
Breaker Sensor Actuator Actuator Sensor Actuator<br />
Passive Stations, slave devices<br />
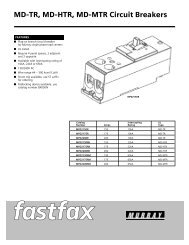
Communication on the PROFIBUS: token passing between the masters; polling between the master and slave stations<br />
SECTION 1<br />
controllers (masters). Each station completes<br />
its communication task within a defined<br />
time frame.<br />
In addition, straightforward, cyclic and<br />
acyclic data exchange is carried out for<br />
communication between a master and<br />
the simple peripheral devices (slaves)<br />
assigned to it.<br />
PROFIBUS-DP achieves this using a bus<br />
access control mechanism comprising a<br />
central token passing procedure between<br />
the active stations (masters) and a central<br />
master-slave procedure for exchanging data<br />
between the active and passive stations.<br />
Bus access control enables the following<br />
system configurations to be implemented:<br />
V<br />
Meas.<br />
Value<br />
Transmit<br />
1/4
Overview of the Bus Systems<br />
<strong>WL</strong> <strong>Circuit</strong> Breaker<br />
• Pure master-slave system<br />
• Pure master-slave system with<br />
token passing<br />
• A system combining both types<br />
Graphic 1-1 shows an example with three<br />
master modules and seven slaves. The<br />
three master devices form a logical ring.<br />
The MAC (medium access control) monitors<br />
the token, creates the token in the rampup<br />
phase, and monitors whether just one<br />
token is really circulating in the ring.<br />
Each slave that communicates cyclically via<br />
the PROFIBUS-DP is assigned a class one<br />
master. Cyclic data exchange is carried out<br />
to the standard DP profile (DPV0). A class<br />
one master is mainly used for automation<br />
tasks. In addition to cyclic data exchange,<br />
a class one master can also establish an<br />
acyclic communication connection to<br />
its slaves, which enables it to use the<br />
extended slave functionality.<br />
A class two master is particularly suitable<br />
for commissioning, diagnosis, and<br />
visualization tasks. In addition to the<br />
class one master, it is connected to the<br />
PROFIBUS-DP and can access slaves and<br />
exchange data using acyclic services<br />
(providing the slaves allows this).<br />
Acyclic data transmission is carried out via<br />
DPV1. The existing PROFIBUS standard<br />
has been extended to include DPV1 with<br />
a number of additional functions. This<br />
enables the slave to be reparameterized<br />
during operation, for example, an acyclic<br />
data transmission to be carried out. DPV1<br />
also allows data to be read directly from<br />
the slave by a class two master, even<br />
though this is still logically connected to<br />
a class one master. Both DPV1 and DP<br />
standard transmission takes places across<br />
one line.<br />
Acyclic data transmission can be used when<br />
an operator control and monitoring system,<br />
such as WinCC, is implemented. The PC<br />
used with an integrated PROFIBUS-DP<br />
interface card then takes on the role of<br />
the class two master, from which the data<br />
records are transmitted via DPV1 and new<br />
values set, for example, if the tripping<br />
current value is changed. Cyclic data<br />
exchange between the circuit breaker<br />
and the PLC continues as normal.<br />
1/5 <strong>WL</strong> PROFIBUS/MODBUS Communication and Electronic Accessories
Communicating with the <strong>Circuit</strong> Breaker<br />
<strong>WL</strong> <strong>Circuit</strong> Breaker<br />
Ethernet<br />
Industrial Ethernet is a high-performance<br />
network that conforms to IEE 802.3<br />
(ETHERNET). The highly successful<br />
10Mbit/s technology, which has been<br />
used for over a decade, and the new<br />
100Mbit/s technology (Fast Ethernet<br />
to IEEE 802.3U) in conjunction with<br />
Switching Full Duplex and Autosensing<br />
enable the required network performance<br />
to be adapted to different requirements.<br />
The appropriate data rates are selected as<br />
required because complete compatibility<br />
enables the technology to be implemented<br />
on a step-by-step basis.<br />
Used in 80% of networks, Ethernet<br />
is currently the best of its kind in<br />
LAN environments.<br />
Ethernet does not function according to a<br />
master-slave principle. All the stations have<br />
equal priority on the bus, which means that<br />
any station can be the sender or receiver.<br />
A sender can only send on the bus if no<br />
other station is sending at that time. This<br />
is due to the fact that the stations are<br />
always “listening in” to find out whether<br />
any messages are being sent to them or<br />
any senders are currently active. If a sender<br />
has started sending, it checks that the<br />
message it has sent is not corrupt. If the<br />
message is not changed, the send<br />
operation continues.<br />
<strong>WL</strong> PROFIBUS/MODBUS Communication and Electronic Accessories<br />
If the sender detects that its data is corrupt,<br />
another sender must have already started<br />
sending data. In this case both senders<br />
abort their respective send operations.<br />
After a random time has elapsed, the<br />
sender restarts the send operation. This<br />
is known as CSMA/CD and, as a “random”<br />
access procedure, does not guarantee a<br />
response within a certain time frame. This<br />
largely depends on the bus load, which<br />
means that real-time applications cannot<br />
yet be implemented with Ethernet.3<br />
MODBUS<br />
MODBUS is an open, serial communications<br />
protocol based on a master-slave<br />
architecture. Since it is very easy to<br />
implement on any kind of serial interface,<br />
it can be used in a wide range of<br />
applications. MODBUS comprises a<br />
master and several slaves, whereby<br />
communication is controlled exclusively<br />
by the master. MODBUS features two basic<br />
communication mechanisms.<br />
• Question/answer (polling): The master<br />
sends an inquiry to a station and waits<br />
for a response<br />
• Broadcast: The master sends a command<br />
to all the network stations, which execute<br />
the command without confirmation<br />
SECTION 1<br />
The messages enable process data (input/<br />
output data) to be written and read from<br />
the slaves either individually or in groups.<br />
The data can either be transmitted in ASCII<br />
or as a package in RTU format. MODBUS<br />
can be used over a wide range of RS485<br />
physical bus, a twisted, shielded two-wire<br />
cable with terminating resistors.<br />
The MODBUS protocol was originally<br />
developed for networking control systems,<br />
and is often used for connecting input/<br />
output modules to a central PLC. Due to<br />
the low transmission rate of 38.4 kBaud<br />
max., MODBUS is recommended for<br />
applications with a low number of stations<br />
or low response time requirements.<br />
1/6
Communicating with the <strong>Circuit</strong> Breaker<br />
<strong>WL</strong> <strong>Circuit</strong> Breaker<br />
1 2<br />
3 2<br />
5 6<br />
Serial or Ethernet<br />
Connected PC<br />
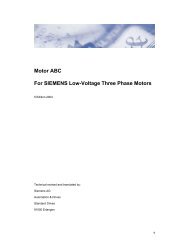
A spectrum of power distribution communication<br />
1 WinPM.Net software<br />
2 Server or desktop PC<br />
3 Switch ES power software<br />
4 PLC<br />
5 BDA web server<br />
6 Portable PC<br />
7 Breaker data adapter (BDA)<br />
8 COM10 PROFIBUS module or COM11 MODBUS module<br />
9 Power metering device<br />
10 Zone selective interlock<br />
11 Digital input module<br />
Serial or Ethernet<br />
Connected PC<br />
PROFIBUS<br />
Connected PC<br />
7<br />
15<br />
16<br />
MODBUS / Ethernet<br />
PROFIBUS<br />
12 Analog output module<br />
13 Digital output module<br />
14 Relay output module<br />
15 VL CubicleBus network<br />
16 VL feeder breaker<br />
17 Input power and communication terminals<br />
18 Breaker status sensor (BSS)<br />
19 Trip unit display<br />
20 Metering function<br />
21 <strong>WL</strong> power breaker<br />
4<br />
8 9 10 11 12 13 14 7<br />
17<br />
18<br />
19<br />
20<br />
Internet<br />
1/7 <strong>WL</strong> PROFIBUS/MODBUS Communication and Electronic Accessories<br />
21
<strong>WL</strong> <strong>Circuit</strong> Breaker<br />
General Description of <strong>WL</strong> <strong>Circuit</strong> Breaker 2-1<br />
The CubicleBUS 2-2<br />
Communication Function of the Trip Units 2-3 – 2-7<br />
The COM15/COM16 2-8 – 2-12<br />
PROFIBUS/MODBUS Modules<br />
Metering Fuction 2-13 – 2-17<br />
Description of Important 2-18 – 2-19<br />
Functions/Parameters for Communication<br />
External CubicleBUS Modules 2-20 – 2-32<br />
External Power Consumption of a<br />
<strong>WL</strong> <strong>Circuit</strong> Breaker with CubicleBUS 2-33 – 2-34<br />
<strong>WL</strong> PROFIBUS/MODBUS Communication and Electronic Accessories<br />
SECTION 2
Description of <strong>WL</strong> <strong>Circuit</strong> Breaker<br />
<strong>WL</strong> <strong>Circuit</strong> Breaker<br />
The demands regarding communications<br />
capability, data transparency, flexibility<br />
and integration in power distribution<br />
systems are increasing all the time. The<br />
<strong>WL</strong> <strong>Circuit</strong> Breaker is a modular circuit<br />
breaker that fulfills the requirements<br />
of the future today.<br />
2/1<br />
Brief Description of the <strong>WL</strong><br />
<strong>Circuit</strong> Breaker<br />
<strong>Circuit</strong> breakers today are no longer<br />
simply devices for protecting equipment,<br />
transformers, generators and motors.<br />
Many users now require a complete<br />
overview of the plant from a central<br />
control room and round-the-clock access<br />
to all available information. Modern power<br />
distribution systems are characterized by<br />
the methods used to network circuit<br />
breakers – both with each other and other<br />
components. The circuit breakers in the <strong>WL</strong><br />
<strong>Circuit</strong> Breaker family have a lot to offer:<br />
it is possible to carry out analysis and<br />
maintenance procedures remotely via<br />
the Internet. Operating staff can be<br />
given immediate access to information<br />
on system status and alarms.<br />
The <strong>WL</strong> <strong>Circuit</strong> Breaker covers a protection<br />
range from 200A to 5000A. The devices are<br />
available with different interrupting ratings,<br />
allowing short-circuit currents of up to 200kA<br />
to be interrupted reliably.<br />
<strong>WL</strong> <strong>Circuit</strong> <strong>Breakers</strong> can be adapted to<br />
different system conditions, which means<br />
that a rating plug can be used to adapt<br />
each circuit breaker to the appropriate<br />
rated current. This ensures that optimum<br />
protection is provided, even if changes<br />
have been made in the system.<br />
<strong>WL</strong> PROFIBUS/MODBUS Communication and Electronic Accessories
The CubicleBUS<br />
<strong>WL</strong> <strong>Circuit</strong> Breaker<br />
The ability to change between two different<br />
parameter sets is also possible. This function<br />
is particularly useful in the event of a<br />
power failure when an automatic transfer<br />
is made from utility to generator power, a<br />
process which can involve changing many<br />
of the trip unit parameters. This function<br />
can also be used for the Dynamic Arc<br />
Flash Sentry capability offered with the<br />
<strong>WL</strong> <strong>Breakers</strong>.<br />
A wide range of lock-out systems are<br />
available to improve reliability during<br />
critical processes. All accessories, such<br />
as shunt trips, motor operators and<br />
communication components, can be<br />
installed quickly and easily; this is<br />
made easier because the accessories are<br />
identical across the entire product line.<br />
The commitment to reducing the overall<br />
number of parts results in fewer spares to<br />
be ordered and lower inventory costs.<br />
The heart of each circuit breaker is the<br />
electronic trip unit (ETU). Several versions<br />
are available to adapt the protective,<br />
metering, and alarm functions to the system<br />
requirements: from simple overload and<br />
short-circuit protection to trip units that<br />
can be configured remotely and which<br />
feature a wide range of metering and<br />
alarm functions.<br />
All circuit breakers with ETU745, ETU748,<br />
ETU755 and ETU776 trip units are<br />
communications capable, and allow<br />
additional components to be internally<br />
networked via the CubicleBUS.<br />
The circuit breaker is connected to<br />
PROFIBUS/MODBUS via the DB-9 port<br />
interface on the COM15/COM16 module.<br />
The breaker data adapter (BDA or BDA Plus)<br />
(see Chapter 5) also supports higher-level<br />
networking/communication (Intranet/<br />
Internet/Ethernet).<br />
<strong>WL</strong> PROFIBUS/MODBUS Communication and Electronic Accessories<br />
The CubicleBUS<br />
The CubicleBUS, which connects all the<br />
intelligent components within the <strong>WL</strong><br />
<strong>Circuit</strong> Breaker and enables additional<br />
external components to be connected<br />
quickly and reliably, forms the backbone<br />
of the modular architecture of the <strong>WL</strong>. The<br />
CubicleBUS is already integrated in the<br />
ETU745, ETU748, ETU755, and ETU776<br />
trip units. If metering function is required,<br />
the ETU745-776 must be exchanged with<br />
an ETU equipped with the metering function.<br />
All CubicleBUS modules can access the<br />
data of the circuit breaker directly, thereby<br />
ensuring instant access to data and rapid<br />
responses to events being communicated<br />
between the breaker and external devices.<br />
Communications Capability of the<br />
Electronic Trip Units (ETUs)<br />
The electronic trip units ETU745, ETU748,<br />
ETU755, and ETU776 are all communications<br />
capable. The CubicleBUS is connected to the<br />
circuit breaker terminals X8.1(-) to X8.2(+)<br />
The front of the ETU745 has rotary switches<br />
for setting protective parameters. These can<br />
be read via the communication device. The<br />
ETU745 can also be installed with a fourline<br />
display to view the measured values.<br />
The ETU755 does not have rotary switches<br />
or a display. The protective parameters<br />
can only be changed via communications.<br />
This trip unit with remote-only parameter<br />
setting is for special application demands.<br />
The ETU776 features a graphical display<br />
with a clearly structured, key-driven menu.<br />
This not only enables operators to display<br />
measured values, status information, and<br />
maintenance information, but also to read<br />
all the existing parameters and make<br />
password-protected changes.<br />
SECTION 2<br />
2/2
Functional Overview of Trip Unit System<br />
<strong>WL</strong> <strong>Circuit</strong> Breaker<br />
Basic Functions ETU725 ETU727 ETU745<br />
Long-time overcurrent protection P P P<br />
Function can be switched ON/OFF – – –<br />
Setting range IR = In x … 0.4, 0.45, 0.5, 0.55, 0.4, 0.45, 0.5, 0.55, 0.4, 0.45, 0.5, 0.55, 0.6,<br />
0.6, 0.65, 0.7, 0.8, 0.6, 0.65, 0.7, 0.8, 0.65, 0.7, 0.8, 0.9, 1<br />
0.9, 1 0.9, 1<br />
Switch-selectable overload protection<br />
(I 2t or I 4t dependent function)<br />
Setting range of time delay class tR at I<br />
– – P<br />
2t (seconds)<br />
Setting range of time delay tR at I<br />
10s, set at 6 x Ir 10s, set at 6 x Ir 2, 3.5, 5.5, 8, 10,<br />
14, 17, 21, 25, 30<br />
4t (seconds) – – 1, 2, 3, 4, 5<br />
Thermal memory – – P (via slide switch)<br />
Phase loss sensitivity<br />
Neutral protection<br />
at tsd =20 ms (M)<br />
–<br />
at tsd =20 ms (M)<br />
P<br />
at tsd =20 ms (M)<br />
P<br />
Function can be switched ON/OFF – P (via slide switch) P (via slide switch)<br />
N-conductor setting range IN = In x … – 1 0.5 … 1<br />
Short-time delayed overcurrent protection P P P<br />
Function can be switched ON/OFF – – P (via rotary switch)<br />
Setting range Isd = In x … 1.25, 1.5, 2, 2.5, 1.25, 1.5, 2, 2.5, 1.25, 1.5, 2, 2.5,<br />
3, 4, 6, 8, 10, 12 3, 4, 6, 8, 10, 12 3, 4, 6, 8, 10, 12<br />
Setting range of time delay tsd , fixed<br />
(seconds) 0, 0.02 (M), 0.1, 0, 0.02 (M), 0.1, 0.02 (M), 0.1, 0.2,<br />
Switch-selectable short-time delay<br />
short-circuit protection<br />
0.2, 0.3, 0.4 0.2, 0.3, 0.4 0.3, 0.4, OFF<br />
(I 2t dependent function) – fixed only – fixed only P (via rotary switch)<br />
Setting range of time delay tsd at I 2t (seconds) – – 0.1, 0.2, 0.3, 0.4<br />
Zone Selective Interlocking (ZSI) function – – per CubicleBUS module<br />
Instantaneous overcurrent protection<br />
Function can be switched ON/OFF,<br />
P P P<br />
Extended Instantaneous Protection<br />
is enabled when OFF – – P (via rotary switch)<br />
Setting range Ii = In x … Ii = 0.8 x Icw 50kA max<br />
Ii = 0.8 x Icw 50kA max<br />
OFF=I cw=EIP<br />
1.5, 2.2, 3, 4, 6, 8, 10, 12<br />
0.8 x Icw = max,<br />
1<br />
Ground fault protection 2 – P (standard) O (field installable module)<br />
Trip and alarm function<br />
Detection of the ground fault current<br />
– – P<br />
by residual summing method<br />
Detection of the ground fault current<br />
– P P<br />
by direct sensing method<br />
Setting range of the Ig for trip<br />
Setting range of the Igfor alarm<br />
Setting range of the time delay tg –<br />
–<br />
–<br />
–<br />
A, B, C, D, E<br />
–<br />
P<br />
A, B, C, D, E<br />
A, B, C, D, E<br />
(seconds)<br />
Switch-selectable<br />
ground fault protection<br />
– 0.1, 0.2, 0.3, 0.4, 0.5 0.1, 0.2, 0.3, 0.4, 0.5<br />
(I 2t / fixed) – – P<br />
Setting range time delay tg at I 2 In L<br />
N<br />
S<br />
I<br />
G<br />
t – – 0.4, 0., 0.3, 0.4, 0.5<br />
ZSI ground function – – per CubicleBUS module<br />
2/3<br />
1Extended Instantaneous Protection (EIP) allows the <strong>WL</strong> breaker to be applied at the withstand rating<br />
of the breaker with minus 0% tolerance; that means no instantaneous override whatsoever. EIP further<br />
enables the circuit breaker to be applied up to the full instantaneous rating of the breaker on systems<br />
where the available fault current exceeds the withstand rating.<br />
2 Ground Fault Module cannot be removed after installation.<br />
P available<br />
– not available<br />
O optional<br />
<strong>WL</strong> PROFIBUS/MODBUS Communication and Electronic Accessories
Functional Overview of Trip Unit System<br />
<strong>WL</strong> <strong>Circuit</strong> Breaker<br />
Basic Functions ETU725 ETU727 ETU745<br />
Parameter sets<br />
Selectable between<br />
parameter set A and B – – –<br />
LCD<br />
LCD, alphanumeric (4-line) – – O<br />
LCD, graphic – – –<br />
Communication<br />
CubicleBUS integrated – – P<br />
Communication capability via<br />
PROFIBUS/MODBUS – – P<br />
Metering function<br />
Voltage, Power, Harmonics<br />
and Parameterization – – P<br />
Display by LED<br />
Trip unit active P P P<br />
Alarm P P P<br />
ETU error P P P<br />
L trip P P P<br />
S trip P P P<br />
I trip P P P<br />
N trip – P P<br />
G trip – P P (only with ground fault module)<br />
G alarm – – P (only with ground fault module)<br />
Tripped by extended protection or<br />
protective relay function – – P<br />
Communication – – P<br />
Signal contacts with external CubicleBUS modules<br />
(Opto or relay)<br />
Overcurrent warning – – P<br />
Load shedding ON/OFF – – P<br />
Early signal of long-time trip (200 ms) – – P<br />
Temperature alarm – – P<br />
Phase unbalance – – P<br />
Instantaneous trip – – P<br />
Short-time trip – – P<br />
Long-time trip – – P<br />
Neutral conductor trip – – P<br />
Ground fault protection trip – – P (only with ground fault module)<br />
Ground fault alarm – – P (only with ground fault module)<br />
Auxiliary relay – – P<br />
ETU error – – P<br />
Step for Settings via Communications or<br />
ETU Key Pad<br />
from … to step<br />
0 … 1 0.1<br />
1 … 100 1<br />
100 … 500 5<br />
500 … 1000 10<br />
1000 … 1600 50<br />
1600 … 10000 100<br />
10000 … max 1000<br />
<strong>WL</strong> PROFIBUS/MODBUS Communication and Electronic Accessories<br />
Setting range of the Ig<br />
Frame Size II Frame Size III<br />
A 100 A 400 A<br />
B 300 A 600 A<br />
C 600 A 800 A<br />
D 900 A 1000 A<br />
E 1200 A 1200 A<br />
P available<br />
– not available<br />
O optional<br />
SECTION 2<br />
2/4
Functional Overview of Trip Unit System<br />
<strong>WL</strong> <strong>Circuit</strong> Breaker<br />
Basic Functions ETU748 ETU755 ETU776<br />
Long-time overcurrent protection P P P<br />
Function can be switched ON/OFF – – –<br />
Setting range IR = In x … 0.4, 0.45, 0.5, 0.55,<br />
0.6, 0.65, 0.7, 0.8,<br />
0.9, 1<br />
0.4 … 1 (step: 1A) 0.4 … 1 (step: 1A)<br />
In L<br />
Switch-selectable overload<br />
protection<br />
(I<br />
N<br />
S<br />
I<br />
G<br />
2t or I 4t dependent function) P P(via communications) P<br />
Setting range of time delay class 2, 3.5, 5.5, 8, 10, 2 … 30 (step: 0.1s) 2 … 30 (step: 0.1s)<br />
tR at I 2t (seconds) 14, 17, 21, 25, 30<br />
Setting range of time delay tR at I 4t (seconds) 1, 2, 3, 4, 5 1 … 5 (step: 0.1s) 1 … 5 (step: 0.1s)<br />
Thermal memory P (via slide switch) P (on/off via<br />
communications)<br />
P (on/off via key pad<br />
or communications)<br />
Phase loss sensitivity at tsd =20ms (M) P (on/off via<br />
communications)<br />
P (on/off via key pad<br />
or communications)<br />
Neutral protection – P P<br />
Function can be switched ON/OFF<br />
N-conductor setting range<br />
P (via slide switch) P (via communications) P (via keypad or communications)<br />
IN = In x …<br />
Short-time delayed overcurrent<br />
0.5, 1, OFF 0.5, 1, OFF 0.5 … 2, OFF<br />
protection P P P<br />
Function can be switched ON/OFF – P (via communications) P(via key pad or communications)<br />
Setting range Isd = In x … 1.25, 1.5, 2, 2.5,<br />
3, 4, 6, 8, 10, 12<br />
1.25 … 0.8 x Icw = max<br />
(step: 10A)<br />
1.25 … 0.8 x Icw = max<br />
(step: 10A)<br />
Setting range of time delay<br />
tsd , fixed (seconds)<br />
Switch-selectable short-time delay<br />
short-circuit protection<br />
M, 0.1, 0.2, 0.3, 0.4 M,0.08 … 0.4,OFF<br />
(step:0.001s)<br />
M,0.08… 0.4,OFF (step:0.001s)<br />
(I 2t dependent function)<br />
Setting range of time delay<br />
P (via rotary switch) P (via communications) P(via key pad or communications)<br />
tsd at I 2t (seconds)<br />
Zone Selective Interlocking<br />
(ZSI) function<br />
Instantaneous overcurrent<br />
0.1, 0.2, 0.3, 0.4<br />
per CubicleBUS module<br />
0.1 … 0.4 (step: 0.001s)<br />
per CubicleBUS module<br />
0.1 … 0.4 (step: 0.001s)<br />
per CubicleBUS module<br />
protection P P P<br />
Function can be switched ON/OFF,<br />
Extended Instantaneous Protection<br />
is enabled when OFF – P (via communications) P (via key pad or communications)<br />
Setting range Ii = In x … – Ii = Icw = EIP 1 1.5 xIn…0.8 x Ics = max,<br />
OFF=Icw=EIP<br />
1.5 xIn…0.8 x Ics = max,<br />
1 OFF=Icw=EIP<br />
Ground fault protection 2 O (field install. module) O (field install.module) O (field install.module)<br />
Trip and alarm function P P (via communications) P(via key pad or communications)<br />
Detection of the ground fault current<br />
by residual summing method<br />
Detection of the ground fault current<br />
P P P<br />
by direct sensing method P P P<br />
Setting range of the Ig for trip<br />
Setting range of the Ig for alarm<br />
Setting range of the time delay tg (seconds)<br />
Switch-selectable<br />
A, B, C, D, E<br />
A, B, C, D, E<br />
0.1, 0.2, 0.3, 0.4, 0.5<br />
A … E (step: 1A)<br />
A … E (step: 1A)<br />
0.1 … 0.5 (step: 0.001s)<br />
A … E (step: 1A)<br />
A … E (step: 1A)<br />
0.1 … 0.5 (step: 0.001s)<br />
ground fault protection<br />
( I 2t / fixed) P P P<br />
Setting range time delay tg at I 2t 0.1, 0.2, 0.3, 0.4, 0.5 0.1 … 0.5 (step: 0.001s) 0.1 … 0.5 (step: 0.001s)<br />
`ZSI ground function per CubicleBUS module per CubicleBUS module per CubicleBUS module<br />
1 Extended Instantaneous Protection (EIP) allows the <strong>WL</strong> breaker to be applied at the withstand rating of the breaker with minus<br />
0% tolerance; that means no instantaneous override whatsoever. EIP further enables the circuit breaker to be applied up to the<br />
full instantaneous rating of the breaker on systems where the available fault current exceeds the withstand rating.<br />
2 Ground Fault Module cannot be removed after installation.<br />
Notes: M = Indicates phase loss sensitivity is enabled. LT pickup reduced 80% when phase unbalance > 50%. ST delay = 20ms<br />
Communications = Setting the parameters of the trip unit via the Breaker Data Adapter, PROFIBUS/MODBUS<br />
Key pad = Direct input at the trip unit<br />
2/5<br />
P available<br />
– not available<br />
O optional<br />
<strong>WL</strong> PROFIBUS/MODBUS Communication and Electronic Accessories
Functional Overview of Trip Unit System<br />
<strong>WL</strong> <strong>Circuit</strong> Breaker<br />
<strong>WL</strong> PROFIBUS/MODBUS Communication and Electronic Accessories<br />
P available<br />
– not available<br />
O optional<br />
SECTION 2<br />
Basic Functions ETU748 ETU755 ETU776<br />
Parameter sets<br />
Selectable between<br />
parameter set A and B – P P<br />
LCD<br />
LCD, alphanumeric (4-line) O – –<br />
LCD, graphic – – P<br />
Communication<br />
CubicleBUS integrated P P P<br />
Communication capability via<br />
PROFIBUS/MODBUS P P P<br />
Metering function<br />
Voltage, Power, Harmonics<br />
and Parameterization P P P<br />
Display by LED<br />
Trip unit active P P P<br />
Alarm P P P<br />
ETU error P P P<br />
L trip P P P<br />
S trip P P P<br />
I trip – P P<br />
N trip P P P<br />
G trip P (only with ground fault module) P (only with ground fault module) P (only with ground fault module)<br />
G alarm P (only with ground fault module) P (only with ground fault module) P (only with ground fault module)<br />
Tripped by extended protection or<br />
protective relay function P P P<br />
Communication P P P<br />
Signal contacts with external CubicleBUS modules<br />
(Opto or relay)<br />
Overcurrent warning P P P<br />
Load shedding ON/OFF P P P<br />
Early signal of long-time trip (200 ms) P P P<br />
Temperature alarm P P P<br />
Phase unbalance P P P<br />
Instantaneous trip P P P<br />
Short-time trip P P P<br />
Long-time trip P P P<br />
Neutral conductor trip P P P<br />
Ground fault protection trip P (only with ground fault module) P (only with ground fault module) P (only with ground fault module)<br />
Ground fault alarm P (only with ground fault module) P (only with ground fault module) P (only with ground fault module)<br />
Auxiliary relay P P P<br />
ETU error P P P<br />
2/6
Functional Overview of Trip Unit System<br />
<strong>WL</strong> <strong>Circuit</strong> Breaker<br />
Data Availability on the CubicleBUS<br />
All modules connected to the CubicleBUS can request data from<br />
other modules via the bus and generate data themselves that can<br />
be read by other modules.<br />
Each data point in the comprehensive <strong>WL</strong> <strong>Circuit</strong> Breaker data<br />
dictionary can only be generated by a single module — the data<br />
source. If this data source (module) exists, the data points assigned<br />
to it also exist.<br />
This information is described and communicated in the<br />
property bytes.<br />
2/7<br />
If a data source (module) does not exist, the data point does not<br />
exist either.<br />
Again, the relevant property byte contains this information.<br />
The following table provides an overview of the internal CubicleBUS<br />
modules and the data point groups (collection of several data<br />
points) assigned to them.<br />
The complete Data Dictionary with a detailed description of the<br />
individual data points is available upon request. Contact your local<br />
sales office.<br />
CubicleBUS Modules<br />
ETU745, 748, BSS COM15/ Metering<br />
Data point group 755 or 776 COM16 Function<br />
Protection parameter set A P<br />
Protection parameter set B (N/A for ETU745 or 748) P<br />
Extended protection parameters P<br />
Parameter for setpoints P<br />
PROFIBUS/MODBUS communication parameters P<br />
Parameters for metering settings P<br />
Device identification data P P<br />
<strong>Circuit</strong> breaker position specifications<br />
Status info. (circuit breaker ON/OFF, open/closed,<br />
P<br />
storage spring, etc.) P<br />
Alarms P<br />
Trip log P P<br />
Setpoint messages P<br />
Maintenance information P P<br />
<strong>Circuit</strong> breaker temperature P<br />
Temperature in the cubicle P<br />
3-phase currents P<br />
Current in neutral, ground-fault current; equip. spec. P<br />
3-phase voltage P<br />
Power KW, KVAR, KVA P<br />
Power factor P<br />
Frequency, total harm. distortion, form factor, crest factor P<br />
Harmonic analysis P<br />
Waveform buffer P<br />
Event log P<br />
System time P<br />
Table The table shows which data points from the data dictionary are generated by which CubicleBUS module, enabling you to quickly find out<br />
2-1 which modules are required for which system.<br />
<strong>WL</strong> PROFIBUS/MODBUS Communication and Electronic Accessories
COM15 (PROFIBUS) / COM16 (MODBUS)Module<br />
<strong>WL</strong> <strong>Circuit</strong> Breaker<br />
The COM15/COM16 module enables the<br />
<strong>WL</strong> <strong>Circuit</strong> Breaker to exchange data<br />
via PROFIBUS/MODBUS to supervisory<br />
systems and PROFIBUS/MODBUS masters.<br />
The COM15/COM16 module retrieves<br />
some of the key data on the status of<br />
the circuit breaker (circuit breaker<br />
open/closed, closing spring charged,<br />
ready-to-close, etc.) via the CubicleBUS<br />
from the BSS (breaker status sensor).<br />
Both modules are, therefore, offered<br />
together as a PROFIBUS/MODBUS<br />
communication package.<br />
PROFIBUS Module COM15<br />
The COM15 module for the <strong>WL</strong> enables<br />
the circuit breaker to be connected to any<br />
PROFIBUS-DP system. It supports the DP<br />
and DPV1 PROFIBUS protocols, which means<br />
that it can communicate with two masters<br />
simultaneously. This makes it easier, for<br />
example, to commission parameterization<br />
and diagnostic tools and operator control<br />
and monitoring systems for the <strong>WL</strong>.<br />
CubicleBUS<br />
Graphic<br />
2-2<br />
MODBUS Module (COM16)<br />
The COM16 module enables the <strong>WL</strong> circuit<br />
breakers to be connected to any MODBUS<br />
master network.<br />
Remote control or monitoring access to<br />
the circuit breaker can be locked using<br />
hardware and software that prevents<br />
any switching operations taking place<br />
via PROFIBUS/MODBUS (manual or<br />
automatic operation) or parameters<br />
from being changed.<br />
All key events are assigned a time stamp<br />
from the integrated clock to enable<br />
operators to keep track of alarms. This<br />
device clock can be synchronized with<br />
the clock in the automation system.<br />
A temperature sensor integrated in the<br />
COM15/COM16 module measures the<br />
temperature surrounding the breaker in<br />
the switchgear cubicle.<br />
Three integrated microswitches located on<br />
the bottom of the COM15/COM16 module<br />
are used to detect the position of the circuit<br />
breaker (connect, test, disconnect and<br />
not present) and communicate the position<br />
status via PROFIBUS/MODBUS. The circuit<br />
breaker can be remotely operated only in<br />
the test or connect position.<br />
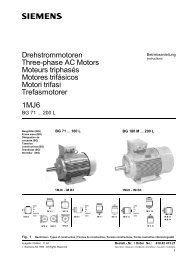
The text on the COM15/COM16 module shows the external pin configuration for closing solenoid<br />
(Y1) and the shunt trips (F1,2) as well as the PROFIBUS/MODBUS write protection function and<br />
the unassigned input/output.<br />
<strong>WL</strong> PROFIBUS/MODBUS Communication and Electronic Accessories<br />
SECTION 2<br />
Pin Configuration<br />
The COM15/COM16 module is connected<br />
to the secondary terminal block slot X8.<br />
The electrical connections to the circuit<br />
breaker and the CubicleBUS connection<br />
to the internal CubicleBUS modules (ETU,<br />
BSS, metering function, etc.) are defined<br />
in the Operator's Manual. Interposing relays<br />
must be used if the opening and closing<br />
solenoids are used with control voltages<br />
other than 24V DC.<br />
Terminals X9.1 and X9.2 must be used if<br />
the second shunt trip instead of the first<br />
shunt trip is used to open the circuit<br />
breaker via communication.<br />
Interposing relays can be used as required<br />
and must be connected in the same way as<br />
a shunt trip / closing coil (see Graphic 2-4).<br />
It can be used, for example, to reset the trip<br />
indicator if the remote reset option has<br />
been installed. As with Open and Close,<br />
only voltages of up to 24V DC are permitted<br />
(note the polarity); interposing relays must<br />
be used for higher voltage coils.<br />
The user communication port is through<br />
the 9-pin interface on the front of the<br />
COM15/COM16 module. The CubicleBUS<br />
connection for a RJ45 plug is located<br />
at the rear and is used to connect the<br />
external CubicleBUS modules. If no external<br />
CubicleBUS module is connected, the<br />
terminating resistor supplied must be<br />
used as an RJ45 plug.<br />
2/8
COM15 (PROFIBUS) / COM16 (MODBUS) Module<br />
<strong>WL</strong> <strong>Circuit</strong> Breaker<br />
PROFIBUS Installation Guide<br />
The COM15 must be assembled and connected to PROFIBUS industry<br />
standards. Of particular importance, is the requirement to ground the<br />
shield of the PROFIBUS cable.<br />
MODBUS Installation Guide<br />
The COM16 must be assembled and connected as described in this<br />
manual. Of particular importance, is the requirement to ground the<br />
shield of the MODBUS R5485 cable.<br />
PROFIBUS/MODBUS Write Protection (DPWriteEnable)<br />
Write access via communications can be blocked either temporarily<br />
or permanently by bridging a jumper across the DP writeenabled<br />
connection.<br />
If this input is not bridged, write access and control is disabled.<br />
The following actions are blocked if the input of the<br />
write-protect function has not been enabled:<br />
• Breaker open/close<br />
• Reset the last trip<br />
• Change the protective parameters<br />
• Change the parameters for the extended protection function<br />
(metering function)<br />
• Change the communication parameters<br />
• Settings of the metering options<br />
• Reset maintenance information (counters)<br />
• Force the digital outputs<br />
The following control functions are available even if the write<br />
protection function has not been enabled:<br />
• Change and set the trigger functions for the<br />
waveform buffer<br />
• Read the content of the waveform buffer<br />
• Change the setpoint parameters<br />
• Set/change the system time<br />
• Change the free texts (comments, system IDs)<br />
• Reset the min./max. values<br />
• Change the unassigned user output<br />
2/9<br />
Graphic<br />
2-2<br />
Graphic<br />
2-3<br />
X8-4<br />
X8-3<br />
X8-2<br />
X8-1<br />
ETU<br />
X8-4<br />
X8-3<br />
X8-2<br />
X8-1<br />
ETU<br />
6<br />
7<br />
8<br />
9<br />
COM16 Close Open<br />
24V DC<br />
K1 K2<br />
6<br />
7<br />
8<br />
9<br />
24V DC<br />
COM16 Close Open<br />
X8-14<br />
X8-13<br />
1 st Shunt<br />
Trip<br />
X8-14<br />
X8-13<br />
1 st Shunt<br />
Trip<br />
X8-8<br />
X8-7<br />
Closing<br />
Coil<br />
This diagram illustrates how to wire the COM15/COM16 module<br />
if PROFIBUS/MODBUS is to be used to open and close the device.<br />
This diagram only applies to 24V DC control voltage.<br />
X8-8<br />
X8-7<br />
L N<br />
Closing<br />
Coil<br />
Interposing relays are required if a control voltage different than<br />
24V DC is used. If the 1st shunt trip is not used to switch off the<br />
device, use terminals X9.1 and X9.2 to utilize the 2nd shunt trip.<br />
<strong>WL</strong> PROFIBUS/MODBUS Communication and Electronic Accessories
COM15 (PROFIBUS) / COM16 (MODBUS) Module<br />
<strong>WL</strong> <strong>Circuit</strong> Breaker<br />
The write-protect function ensures that all the required information can be<br />
transmitted, but prevents any remote changes to the configuration of the<br />
circuit breaker. Changes can only then be made locally.<br />
Why does the write protection function permit certain actions?<br />
All actions that are not blocked are for remote analysis only and do not<br />
have any effect on the current status.<br />
Data Exchange via the COM15/COM16 Module<br />
When the COM15/COM16 module is configured to exchange data, it is<br />
important to note that it is shipped with a factory set address 126. This<br />
can be changed during system configuration (e.g. with the BDA, BDA Plus,<br />
WinPM.Net, <strong>WL</strong> Config software, Switch ES Power or ETU776 menu).<br />
The COM15/COM16 module has two LEDs (PROFIBUS/MODBUS and<br />
CubicleBUS) for diagnostic purposes. These indicate the operating status<br />
of the communication line and the CubicleBUS network.<br />
Two LEDs are used to determine whether a CubicleBUS module in the circuit<br />
breaker is operational. First, the “COMM” LED on the trip unit must be green,<br />
that is, the trip unit has recognized at least one other CubicleBUS module.<br />
At a minimum, this would only be the Metering Function if the CubicleBUS<br />
was then interrupted. Second, the CubicleBUS LED on the COM15/COM16<br />
module must be taken into account. If this is lit with a steady green light,<br />
a connection exists from the COM15/COM16 module to at least the<br />
metering function module.<br />
If both LEDs are green (steady light for CubicleBUS on the COM15/COM16<br />
module and COMM on the trip unit), communication is fully established<br />
between the trip unit and the COM15/COM16 module.<br />
Data is exchanged according to the following principle: an up-to-date copy<br />
of all <strong>WL</strong> <strong>Circuit</strong> Breaker data (apart from the waveform buffer) is always<br />
stored in the COM15/COM16 module. A response to a data query from<br />
the COM15/COM16 module to the supervisory system can, be typically<br />
transmitted in just a few milliseconds. Write data from the supervisory<br />
system is forwarded to the appropriate addressee on the CubicleBUS.<br />
<strong>WL</strong> PROFIBUS/MODBUS Communication and Electronic Accessories<br />
Figure<br />
2-1<br />
Figure<br />
2-2<br />
Rear view of the COM15/COM16 module. The RJ45 connection<br />
for the external CubicleBUS modules can be clearly seen here.<br />
If no external CubicleBUS module is connected, the bus must<br />
be terminated with the terminating resistor.<br />
Meaning Position and text on the cable<br />
CubicleBUS - X8.1<br />
CubicleBUS + X8.2<br />
24V DC + X8.3<br />
24V DC ground X8.4<br />
Table<br />
2-3<br />
SECTION 2<br />
Terminals<br />
PROFIBUS LED<br />
CubicleBUS LED<br />
Communication LED<br />
on the trip unit<br />
Front view of the PROFIBUS module for the <strong>WL</strong> <strong>Circuit</strong><br />
Breaker with the PROFIBUS connection and the two LEDs.<br />
The figure below shows a section of the ETU745 and its<br />
LEDs for displaying status. MODBUS module is identical<br />
except labeling reads “MODBUS” and “COM16” instead of<br />
“PROFIBUS” and “COM15” respectively.<br />
Terminating resistor<br />
The 4 black cables from the COM15/COM16 module<br />
must be connected to terminal strip X8, which is used<br />
to connect the COM15/COM16 module to the CubicleBUS<br />
in the circuit breaker.<br />
2/10
COM15 (PROFIBUS) / COM16 (MODBUS) Module<br />
<strong>WL</strong> <strong>Circuit</strong> Breaker<br />
PROFIBUS/MODBUS LED Meaning<br />
Off No voltage on the COM15/COM16 module<br />
Red Bus error<br />
Communication not possible<br />
No communication with class 1 master<br />
Green PROFIBUS/MODBUS communication OK<br />
Cyclic data transmission with class 1 master<br />
Table<br />
2-4<br />
CubicleBUS LED Meaning<br />
Off No CubicleBUS modules found<br />
Red CubicleBUS error<br />
Green flashing CubicleBUS module found, but no metering<br />
function or trip unit<br />
Steady green light CubicleBUS module found and connection with<br />
the metering function and/or trip unit<br />
Table<br />
2-5<br />
Position Rear Middle Front<br />
microswitch microswitch microswitch<br />
(S46) (S47) (S48)<br />
Connect position 1 0 0<br />
Test position 0 1 0<br />
Disconnect position 0 0 1<br />
<strong>Circuit</strong> breaker fully removed 0 0 0<br />
Table<br />
2-6<br />
Three microswitches located on the bottom<br />
of the COM15/COM16 module can determine<br />
the position of a drawout circuit breaker<br />
in the guide frame, which is then<br />
communicated via the COM15/COM16<br />
module. The positions are defined in Table<br />
2-6. When the position of the circuit breaker<br />
has changed, the microswitch that has<br />
been actuated is opened before the next<br />
microswitch is actuated. No microswitches<br />
are actuated if the breaker is between two<br />
of the three positions. The previous state is<br />
communicated until the new position is<br />
reached (see Table 2-6).<br />
2/11<br />
The PROFIBUS/MODBUS LED provides information on the state of PROFIBUS communication in the<br />
COM15/COM16 module.<br />
The CubicleBUS LED provides information on the state of CubicleBUS communication in the<br />
COM15/COM16 module.<br />
The COM15/COM16 module has 3 microswitches for determining the position of the circuit breaker<br />
in the guide frame. Depending on which switch is actuated, the position described above is<br />
communicated via the comm. system (1=contact closed, 0=contact open).<br />
There is no way of determining the direction<br />
in which the circuit breaker is being moved<br />
once the “disconnect position” microswitch<br />
has been opened.<br />
When the circuit breaker is initially racked<br />
in, the next microswitch to be actuated is<br />
the “test position.” The COM15/COM16<br />
module communicates “circuit breaker<br />
not present” until the “test position” key<br />
is actuated. The new event message is<br />
delayed by 10 seconds to ensure that the<br />
breaker is firmly seated.<br />
When the circuit breaker is fully withdrawn,<br />
no further microswitches are actuated.<br />
“<strong>Circuit</strong> breaker fully withdrawn” is<br />
communicated immediately on the cyclic<br />
channel and in the PROFIBUS/MODBUS<br />
data sets.<br />
The sequence described above provides<br />
hysterisis for communicating contact position<br />
and avoids intermittent contact positions<br />
from being communicated.<br />
With UL489 fixed-mounted circuit breakers,<br />
a heel plate is screwed to the COM15/COM16<br />
module to transmit operating position.<br />
The COM15/COM16 module features a<br />
built-in temperature sensor, which is<br />
installed outside the circuit breaker, and<br />
measures the temperature surrounding the<br />
breaker. It also contains a clock that<br />
provides a time stamp for all events, such<br />
as minimum and maximum measured<br />
values, as well as warnings and trips.<br />
<strong>WL</strong> PROFIBUS/MODBUS Communication and Electronic Accessories
COM15 (PROFIBUS) / COM16 (MODBUS) Module<br />
<strong>WL</strong> <strong>Circuit</strong> Breaker<br />
Breaker Status Sensor (BSS)<br />
BSS stands for “breaker status sensor.” All<br />
microswitches that contain information on<br />
the state of the circuit breaker are either<br />
installed directly to the BSS or connected<br />
to it. The BSS makes this digital information<br />
available on the CubicleBUS.<br />
Bell alarm switch<br />
on ETU<br />
Ready-toclose<br />
signal<br />
Figure<br />
2-3<br />
Closing spring charged<br />
Breaker Open/<br />
Closed Signal<br />
This picture shows the BSS signaling contacts and how they have to be connected. The BSS is<br />
factory installed when the communications option is ordered with the assembled breaker.<br />
<strong>WL</strong> PROFIBUS/MODBUS Communication and Electronic Accessories<br />
If the status of the circuit breaker in the<br />
switchgear is to be displayed or read via<br />
communications, the BSS module and<br />
the appropriate signaling switch must<br />
be installed (if they are not already).<br />
The circuit breaker must be installed<br />
with an electronic trip unit of type<br />
ETU745 or higher.<br />
CubicleBUS to X.7 or<br />
terminating resistor<br />
Shunt trip<br />
signal switch<br />
CubicleBUS to the<br />
metering function<br />
on ETU<br />
SECTION 2<br />
The BSS can also be field installed.<br />
The BSS indicates the following<br />
information:<br />
• Closing spring (charged/discharged)<br />
• Position of the main contacts<br />
(open/closed)<br />
• Ready-to-close signal<br />
• Bell Alarm switch on the trip unit<br />
(connected to the red mechanical<br />
trip indicator)<br />
• Signaling switch on the first shunt trip<br />
• Signaling switch on the second shunt trip<br />
The BSS is included when you order the<br />
communications option with the assembled<br />
circuit breaker.<br />
If a BSS is required without communication<br />
(e.g. for operating the BDA), it can be<br />
ordered separately.<br />
2/12
Metering Function<br />
<strong>WL</strong> <strong>Circuit</strong> Breaker<br />
The integrated Metering Function<br />
extends the range of protection and<br />
provides additional warnings and<br />
diagnostic options. With its<br />
comprehensive range of measured<br />
values, the integrated Metering<br />
Function is an excellent alternative<br />
to external multi-function<br />
metering devices.<br />
Figure<br />
2-4<br />
2/13<br />
General<br />
In addition to the current values supplied<br />
by the trip unit, the metering function<br />
provides additional values required for<br />
power management (voltage, power,<br />
etc.). The metering function also provides<br />
further options for monitoring and<br />
protecting the power distribution system<br />
(undervoltage, breaker status, etc.).<br />
The option of generating warnings if<br />
setpoints are exceeded, speeds up response<br />
to system alerts. As a result, the metering<br />
function can significantly increase<br />
system up-time.<br />
The metering function module is factory<br />
installed on the back of the trip unit (ETU),<br />
as shown in Fig. 2-4. The trip unit and<br />
metering function module exchange all<br />
data via a high-speed synchronous<br />
interface. The metering function module<br />
Back of ETU<br />
The metering function is located on the back of the trip unit. When ordered as part of<br />
an assembled breaker catalog number, it is already installed and ready for operation.<br />
Metering function<br />
CubicleBUS<br />
CubicleBUS<br />
provides all the connected modules (e.g.<br />
the COM15/COM16 module or BDA) with<br />
the parameters for the protective relay<br />
functions, the setpoints, measured value<br />
settings, and the measured values via<br />
the CubicleBUS, so that they can be<br />
processed. The metering function module<br />
is connected to the trip unit and either the<br />
BSS or directly to X8.<br />
The metering function is available in all<br />
circuit breakers with ETU745, ETU755,<br />
ETU748 and ETU776. If the metering<br />
function is ordered with the circuit breaker,<br />
it will be installed and ready for operation.<br />
The metering function can only be fieldinstalled<br />
by changing the ETU with a new<br />
ETU containing the metering function.<br />
Voltage Transformer Specifications<br />
for Metering<br />
System Voltage Turns ITI VT<br />
Rating Rating Ratio Model # 1<br />
(or equivalent)<br />
600V 3P<br />
3W Delta<br />
600:120 5:1 450 - 600<br />
480V 3P<br />
3W Delta<br />
480:120 4:1 450 - 480<br />
240V 3P<br />
3W Delta<br />
240:120 2:1 450 - 240<br />
600Y/347V<br />
3P 4W<br />
346:120 2.88:1 450 - 36<br />
480Y/277V<br />
3P 4W<br />
288:120 2.4:1 450 - 288<br />
1<br />
External fuses are recommended with these VT’s.<br />
Chart 2-1<br />
<strong>WL</strong> PROFIBUS/MODBUS Communication and Electronic Accessories
Metering Function<br />
<strong>WL</strong> <strong>Circuit</strong> Breaker<br />
The metering function module also includes<br />
harmonic and waveform analysis.<br />
Harmonic analysis<br />
The Metering Function module senses the<br />
current and voltage, saves the measured<br />
values, and carries out a fast Fourier<br />
transformation. The result is the distribution<br />
of the harmonics (in %) up to the 29th<br />
harmonic. The calculated values are made<br />
available via the CubicleBUS and can be<br />
displayed via the PROFIBUS/MODBUS master,<br />
WinPM.Net, or the BDA (see Chapters 3, 4<br />
and 5). They can also be saved as an Excelcompatible<br />
*.csv file for subsequent<br />
diagnosis. On the ETU776 trip unit, the<br />
measured and calculated values can also<br />
be displayed on the LCD screen.<br />
Waveform buffer<br />
The Metering Function module features two<br />
independent waveform buffers (A and B).<br />
Each one has 8 channels, one each for<br />
currents I a , I b , I c , I N , and I g , and voltages V a ,<br />
V b , and V c . Each channel is sensed with a<br />
frequency of 1,649 kHz and the values are<br />
“pushed” through a shift register (length:<br />
1 second). The process of pushing data<br />
through the shift register can be aborted<br />
by a configurable trigger event. Trigger<br />
events include trips, warnings and setpoint<br />
alarms so that the voltage waveform, for<br />
example, can be recorded in the event of<br />
undervoltage tripping.<br />
<strong>WL</strong> PROFIBUS/MODBUS Communication and Electronic Accessories<br />
Figure<br />
2-5<br />
Figure<br />
2-6<br />
SECTION 2<br />
The Metering Function analyzes the harmonics. This screenshot from the BDA shows how<br />
the analysis results are displayed.<br />
Metering Function can record the current waveform. This can be displayed and exported<br />
using the BDA, WinPM.Net or Switch ES Power. A value of trip current is shown here.<br />
2/14
Metering Function<br />
<strong>WL</strong> <strong>Circuit</strong> Breaker<br />
The trigger event can be set individually for<br />
each waveform buffer. The point at which<br />
the trigger event is to take place in the<br />
waveform buffer can also be defined. This<br />
setting can be used to set the ratio of the<br />
pre-event history to the post-event history.<br />
If the pre-trigger event history is to be<br />
analyzed, the position can be set to 80%.<br />
When the event occurs, 0.8 seconds of<br />
pre-event history and 0.2 seconds of<br />
post-event history are available in the<br />
waveform buffer, and an existing<br />
COM15/COM16 module adds a time<br />
stamp to the trigger event.<br />
Each waveform buffer stops independently,<br />
depending on the trigger event and<br />
can be activated again once the analysis<br />
is complete.<br />
A large amount of data (approx. 25 kByte<br />
for each waveform) can be downloaded<br />
and analyzed using the BDA and the<br />
ETU776 display. Depending on the option,<br />
a range of zoom options and export<br />
functions are available.<br />
Voltage Transformers<br />
For isolation reasons, a voltage transformer<br />
is used in conjunction with the Metering<br />
Function module. This prevents voltage<br />
signals of up to 1kV from reaching the<br />
ETU directly via the auxiliary secondary<br />
connections.<br />
The metering module (“Metering Function”)<br />
can be set to expect 3W or 4W connections<br />
and will adjust the amplitude and phase of<br />
the signal as necessary.<br />
Three VTs must be used at all times. All<br />
three VTs should be rated for the nominal<br />
system L-L voltage (e.g. 480V) and may<br />
have either 100V, 110V or 120V secondary<br />
voltages.The following ratios and suggested<br />
VTs can be used:<br />
240:120 = 2:1<br />
(ITI Part # 460-240 or 468-240)<br />
480:120 = 4:1<br />
2/15<br />
(ITI Part # 460-480 or 468-480)<br />
600:120 = 5:1 (ITI Part # 460-600 or<br />
468-600)<br />
VT Accuracy<br />
Each Metering Module presents a purely<br />
resistive (unity power factor) load to the<br />
transformer. Assuming no other devices are<br />
connected to the VT, an ITI type 486 VT can<br />
safely feed ten metering modules and and<br />
still maintain 0.6% accuracy assuming<br />
the wiring from the VT to the individual<br />
metering modules is twisted pair and kept<br />
to a minimum length. This data applies to<br />
ambient temperatures from 30ºC to 50ºC<br />
and a primary voltage from 80% to 120% Vn.<br />
Maximum Distance From<br />
Voltage Transformer<br />
The maximum distance between the<br />
metering function and the voltage<br />
transformer depends on the cable size<br />
and the desired accuracy class.<br />
Graphic<br />
2-4<br />
For a 14AWG cable, the maximum distance<br />
should not exceed 50 m for class 0.5 and<br />
100 m for class 3. In areas with high EMC<br />
exposure, shielded cable should be used.<br />
Parameters for the Settings of the<br />
Metering Function<br />
The trip unit settings which must be<br />
made are:<br />
1) VT Primary Voltage (240V,<br />
480V, 600V)<br />
2) VT Secondary Voltage (100V,<br />
110V, 120V)<br />
3) VT Connection (Wye / LG, Delta / LL)<br />
The following tools and functions are<br />
available if the parameters have to<br />
be changed:<br />
• WinPM.Net<br />
• <strong>WL</strong> Config<br />
• BDA/BDA Plus<br />
• ETU776 display<br />
• Switch ES Power<br />
The diagram illustrates how the voltage transformer is connected for operation with metering<br />
function. The transformer can be wye or delta-connected on the primary side.<br />
<strong>WL</strong> PROFIBUS/MODBUS Communication and Electronic Accessories
Metering Function<br />
<strong>WL</strong> <strong>Circuit</strong> Breaker<br />
The metering function provides the following measured values for communication system:<br />
Measured value Value range Accuracy (with direct order: circuit breaker +<br />
trip unit + met. function or met. function Plus) 1<br />
Currents Ia, Ib, Ic, IN 30 ... 8000A ± 1%<br />
Ground-fault current Ig (measure with external G transformer) 100 ... 1200A ± 5%<br />
Line-to-line voltages Vab, Vbc, Vca 80 ... 120% Vn ± 1%<br />
Line-to-neutral voltages Van, Vbn, Vcn 80 ... 120% Vn ± 1%<br />
Average value of phase-to-phase voltages VLLAVG 80 ... 120% Vn ± 1%<br />
Apparent power kVA per phase 13 ... 8000kVA ± 2%<br />
Total apparent power KVA 13 ... 24000kVA ± 2%<br />
Active power kW per phase -8000 ... 8000kW ± 3% (power factor > 0.6)<br />
Total active power kWtotal -24000 ... 24000kVA ± 3% (power factor > 0.6)<br />
Reactive power kvar -6400 ... 6400kvar ± 4% (power factor > 0.6)<br />
Total reactive power kvar -20000 ... 20000kvar ± 4% (power factor > 0.6)<br />
Power factor per phase -0.6 ... 1 ... 0.6 ± 0.04<br />
Power factor total -0.6 ... 1 ... 0.6 ± 0.04<br />
Demand of currents Ia, Ib, Ic 30 ... 8000A ± 1%<br />
Average demand of 3-phase current 30 ... 8000A ± 1%<br />
Demand kWD per phase 13 ... 8000kW ± 3% (power factor > 0.6)<br />
kW demand 3-phase active power kWD total 13 ... 8000kW ± 3% (power factor > 0.6)<br />
kVA demand kVA total 13 ... 8000kVA ± 2%<br />
kVAR demand kVAR per phase 13 ... 8000kVA ± 2%<br />
kVAR demand total -24000 ... 24000kvar ± 4% (power factor > 0.6)<br />
kWhr imported 1 ... 10000MWh ± 2%<br />
kWhr exported 1 ... 10000MWh ± 2%<br />
kVARh imported 1 ... 10000Mvarh ± 4%<br />
kVARh exported 1 ... 10000Mvarh ± 4%<br />
Frequency 15 ... 440 Hz ± 0.1 Hz<br />
Total harmonic distortions for current and voltage 2 ... 100% ± 3% from the meas. range up to the 29th harmonic<br />
Phase unbalance for current and voltage 2 ... 150% ± 1%<br />
Table<br />
2-7<br />
The metering function provides a minimum and maximum measured value for each measured value specified above. If the metering function is retrofitted by<br />
the customer, the accuracy of the values specified cannot be ensured, since it will not have been calibrated with the trip unit.<br />
1. Accuracy is specified as follows: ± (x%) from the upper limit of effective range + 2 LSD (Least Significant Digit))<br />
as shipped from the factory<br />
Measurement conditions:<br />
Frequency f = 60 Hz<br />
Power factor cos ϕ = 1<br />
Waveform Total harmonic distortion≤ 5%; symmetrical load<br />
Ambient temperature 35°C ± 5°C<br />
Metering range:<br />
Current 0.2 ... 1.2 Inmax<br />
Voltage 0.8 ... 1.2 Vnmax<br />
<strong>WL</strong> PROFIBUS/MODBUS Communication and Electronic Accessories<br />
Power supply UL Listed 24V DC class 2<br />
Warm-up period 2 hours<br />
Relative air humidity Up to 90%<br />
SECTION 2<br />
2/16
Metering Function<br />
<strong>WL</strong> <strong>Circuit</strong> Breaker<br />
The extended protective relay functions of the metering function can monitor the following criteria and initiate a trip<br />
if values are exceeded.<br />
Protective Relay Function ANSI Device Number Setting range Possible delay<br />
Current unbalance 46 5 ... 50% 0 ...15 s<br />
Total harmonic distortion - current 81THDC 5 ... 50% 5 ...15 s<br />
Voltage unbalance 47 5 ... 50% 0 ...15 s<br />
Undervoltage 27 100 ... 1100V 0 ...15 s<br />
Overvoltage 59 200 ... 1200V 0 ...15 s<br />
Total harmonic distortion - voltage 81THDV 5 ... 50% 5 ...15 s<br />
Direction of phase rotation 47N — —<br />
Active power in normal direction 32 13 ... 4000kW 0 ...15 s<br />
Active power in reverse direction 32R 13 ... 4000kW 0 ...15 s<br />
Under frequency 81U 40 ... 70 Hz 0 ...15 s<br />
Over frequency 81O 40 ... 70 Hz 0 ...15 s<br />
Table<br />
2-8<br />
Table<br />
2-9<br />
2/17<br />
Additional trip criteria can be set using the extended protective relay functions. A delay time can be set to prevent transient events from causing<br />
nuisance trips: the circuit breaker will not trip unless the condition is present for longer than the delay time.<br />
The metering function supplies the following Alarm Setpoint Functions:<br />
Alarm Function Setting range Possible delay<br />
Over current 30 ... 10000A 0 ... 255 s<br />
Over current – ground fault 30 ... 10000A 0 ... 255 s<br />
Over current – N-conductor 30 ... 10000A 0 ... 255 s<br />
Phase unbalance – current 5 ... 50% 0 ... 255 s<br />
Demand – current 30 ... 10000A 0 ... 255 s<br />
Total harmonic distortion - current 5 ... 50% 5 ... 255 s<br />
Undervoltage 15 ... 1200V 0 ... 255 s<br />
Overvoltage 200 ... 1200V 0 ... 255 s<br />
Phase unbalance - voltage 5 ... 50% 0 ... 255 s<br />
Total harmonic distortion - voltage 5 ... 50% 5 ... 255 s<br />
Crest factor 1 ... 3,000 0 ... 255 s<br />
Form factor 1 ... 3,000 0 ... 255 s<br />
Active power in normal direction 13 ... 10000kW 0 ... 255 s<br />
Active power in reverse direction 13 ... 10000kW 0 ... 255 s<br />
Leading power factor 0 ... -0.99 0 ... 255 s<br />
Lagging power factor 0 ... 0.99 0 ... 255 s<br />
Demand - active power -10000 ... 10000kW 0 ... 255 s<br />
Apparent power 13 ... 10000kVA 0 ... 255 s<br />
Reactive power in normal direction 13 ... 10000kvar 0 ... 255 s<br />
Reactive power in reverse direction 13 ... 10000kvar 0 ... 255 s<br />
Demand - apparent power 13 ... 10000kVA 0 ... 255 s<br />
Demand - reactive power 13 ... 10000kvar 0 ... 255 s<br />
Underfrequency 40 ... 70 Hz 0 ... 255 s<br />
Overfrequency 40 ... 70 Hz 0 ... 255 s<br />
Alarm and setpoint functions allow events to be generated when system conditions deviate from their nominal values. The generation of the events can be<br />
delayed to prevent transient conditions from “chattering.” These alarms are communicated via CubicleBUS and can cause output contacts to close in the<br />
configurable output module and can freeze the waveform buffer in the metering function. Alarms are communicated to the COM15/COM16 where they can be<br />
transmitted to the master.<br />
<strong>WL</strong> PROFIBUS/MODBUS Communication and Electronic Accessories
Functions/Parameters for Communications<br />
<strong>WL</strong> <strong>Circuit</strong> Breaker<br />
The <strong>WL</strong> breaker can help facilitate your<br />
load management scheme and integrate<br />
it into your communication network<br />
directly from the breakers trip unit.<br />
1000A<br />
800A<br />
600A<br />
400A<br />
200A<br />
Graphic<br />
2-5<br />
0A<br />
Load shedding signal<br />
ON OFF<br />
t x<br />
Current of one phase<br />
Load shedding setpoint 200A<br />
t x<br />
Load shedding setpoint 800A<br />
t x<br />
t x<br />
ON OFF<br />
Load restore signal<br />
Load shedding and restore are explained in this graphic. It’s based on the assumption of a<br />
<strong>WL</strong> <strong>Circuit</strong> Breaker with an overload setpoint of 1000 A.<br />
<strong>WL</strong> PROFIBUS/MODBUS Communication and Electronic Accessories<br />
Load Management<br />
A circuit breaker with an ETU745 trip unit<br />
or higher, offers two current setpoint values<br />
for local load management, the upper<br />
setpoint being that for load shedding, the<br />
lower setpoint being that for load restore.<br />
Note: These setpoints will not effect the<br />
circuit breaker tripping function. If the<br />
current exceeds the set load shedding value<br />
in one phase, a load shedding warning will<br />
be generated. A load restore will only be<br />
generated when this value drops below the<br />
setpoint in all three phases. The warning<br />
messages are directly displayed by the BDA.<br />
They are also stored in the event log where<br />
they are labeled with a time stamp.<br />
Note: The event log is only available with<br />
the COM15/COM16.<br />
t<br />
SECTION 2<br />
The respective process for the load restore<br />
threshold is reversed if all three phases<br />
fall short of the setpoint, and a load shed<br />
warning is generated. If only one of the<br />
three currents exceeds the setpoint, a load<br />
restore event will not be generated.<br />
In order to avoid load shedding on the basis<br />
of short-time current peaks and valleys,<br />
they can be delayed by a delay time t x<br />
which can be set from between 1 s and 15 s.<br />
The load management parameters can be<br />
found in the parameter tree of the BDA.<br />
The load shedding/load restore signals are<br />
available as outputs from the digital output<br />
module, which is provided with a rotary<br />
selection switch.<br />
Extended Protective Function<br />
The extended protective function of<br />
the metering modules adds additional<br />
tripping functions. The options listed in<br />
table 2-8 can be used as additional<br />
monitoring functions.<br />
2/18
Functions/Parameters for Communications<br />
<strong>WL</strong> <strong>Circuit</strong> Breaker<br />
Setpoints<br />
In addition to the load management option<br />
(load shedding/load restore), the metering<br />
module offers an option for automatic<br />
monitoring of operating data and the<br />
generation of an alarm.<br />
Two setpoints can be defined (e.g., for<br />
overvoltage). With the lower setpoint, an<br />
alarm can be generated via the setpoint<br />
value (e.g. > 480V), whereas, with a<br />
voltage increase, a tripping event (e.g. ><br />
528V) can be generated.<br />
Minimum for Communicated Currents<br />
In order to avoid the detection, display<br />
and communication of very low currents<br />
generated by system noise, even with the<br />
circuit breaker in the disconnect position,<br />
the “Minimum for Communicated Currents”<br />
parameter offers the option of setting all<br />
detected current values smaller than this<br />
parameter to zero. The factory setting is<br />
50A. This means that all values smaller<br />
than 50A are displayed as “0” on the<br />
display, interpreted as “0” for internal<br />
calculations (power) and also transmitted<br />
as “0” via the communications. If this<br />
parameter is changed to “0”, this function<br />
is deactivated and all detected current<br />
measuring values will be directly used.<br />
2/19<br />
The parameter can be found in the parameter<br />
tree of the BDA.<br />
Normal Positive Power Flow Direction<br />
The current direction of the energy “flow”<br />
and the question, “How much energy has,<br />
up to now, flowed in both directions?” is of<br />
particular interest for tie breaker applications.<br />
For a determination, it is important to<br />
define a “normal direction.” This direction<br />
can either be “from top to bottom” or “from<br />
bottom to top.”The measured real power is<br />
either assigned a positive polarity (in<br />
normal direction) or a negative polarity<br />
(opposite of normal direction). In contrast,<br />
the measured currents are always assigned<br />
a positive polarity.<br />
With energy, the transmitted energy values<br />
are incorporated in two counters, real<br />
energy and real energy opposite to normal<br />
direction. The two energy counters are not<br />
assigned a polarity.<br />
Figure<br />
2-7<br />
Event and Trip Log<br />
All events (except for tripping events) are<br />
labeled with a time stamp and an ON (+)<br />
or OFF (-) indication and entered in the<br />
event log.<br />
The event log has a depth of 10 events<br />
and works like a FiFo memory (first in,<br />
first out), i.e. the oldest event is deleted<br />
from the event log upon the occurrence<br />
of a new event.<br />
The trip log is similar to the event log,<br />
however, only the last 5 trips are recorded<br />
with a time stamp and entered in the<br />
trip log.<br />
Note: The event and the trip log are only<br />
available with the COM15/COM16 module.<br />
In the event log the last 10 events on the CubicleBUS are listed. The trip log contains the last 5 trips.<br />
Both of them can be displayed with the BDA.<br />
<strong>WL</strong> PROFIBUS/MODBUS Communication and Electronic Accessories
External CubicleBUS Modules<br />
<strong>WL</strong> <strong>Circuit</strong> Breaker<br />
By connecting additional, external<br />
modules to the CubicleBUS, breaker<br />
status information can be displayed<br />
and data read from the switchgear.<br />
This enables cost-effective solutions<br />
to be implemented for automating other<br />
devices in the switchgear or system.<br />
General<br />
External CubicleBUS modules enable the<br />
<strong>WL</strong> <strong>Circuit</strong> Breaker to communicate with<br />
secondary devices in the switchgear. They<br />
can be used, for example, to activate analog<br />
displays, transmit circuit breaker status and<br />
cause of trip, and read additional control<br />
signals. One module is also available for<br />
zone-selective interlocking.<br />
Five different CubicleBUS modules can<br />
output data from the CubicleBUS system<br />
(four digital output modules and one<br />
analog output module). A digital input<br />
module can transmit data from the<br />
switchgear or system to the PROFIBUS/<br />
MODBUS master, and a ZSI module<br />
enables zone-selective interlocking<br />
among the circuit breakers.<br />
Graphic<br />
2-6<br />
2<br />
1<br />
.5<br />
.2<br />
0<br />
.2<br />
.5<br />
0 2 1<br />
In this example, the rotary switch has been<br />
set to function “0.2”.<br />
Figure<br />
2-8<br />
<strong>WL</strong> PROFIBUS/MODBUS Communication and Electronic Accessories<br />
Rotary Switches<br />
With the exception of the configurable<br />
output module, all external CubicleBUS<br />
modules are configured using<br />
rotary switches.<br />
The arrow on the rotary switch points<br />
to the function that is currently active.<br />
With certain modules (e.g. digital output<br />
modules), the group selection (e.g., “1st<br />
Module” left; highlighted) and then any<br />
other settings (e.g., time delay) must be<br />
taken into account. More information<br />
on this is provided with the individual<br />
module instruction sheets and the <strong>WL</strong><br />
Instruction Manual.<br />
Test button<br />
LED indicator<br />
Rotary Switch<br />
X1: CubicleBUS<br />
X2: CubicleBUS<br />
X3: CubicleBUS<br />
SECTION 2<br />
Installation<br />
The external CubicleBUS modules can be<br />
installed onto standard 35mm DIN rail. The<br />
cable for connecting the first module to the<br />
circuit breaker must be no longer than 2m.<br />
Prefabricated cables, which can be ordered<br />
separately in different lengths, must be<br />
used to connect the CubicleBUS modules to<br />
each other and to the circuit breaker. These<br />
cables enable the various components to<br />
communicate and supply the CubicleBUS<br />
modules with 24V DC.<br />
X5: Inputs/outputs<br />
X4: Inputs/outputs<br />
All external CubicleBUS modules have the same housing. The CubicleBUS can be connected to X1 and<br />
X2 with an RJ45 plug or a terminal connection made to X3. This depends on whether a COM15/COM<br />
16 module is available.<br />
2/20
External CubicleBUS Modules<br />
<strong>WL</strong> <strong>Circuit</strong> Breaker<br />
Power Supply<br />
The CubicleBUS must be supplied with a UL<br />
Listed 24V DC class 2 power supply across<br />
its entire length. Reference pages 2/33 and<br />
2/34 of this manual for details pertaining<br />
to the requirements of this power supply.<br />
Terminals X8.3 and X8.4 or the 4-pin plug<br />
for the external CubicleBUS modules (X3)<br />
are available for this purpose. As previously<br />
mentioned, the 24V is conducted via the<br />
CubicleBUS cables.<br />
The power required for the 24V DC supply<br />
depends on the CubicleBUS configuration.<br />
The technical data for the external<br />
CubicleBUS modules is provided later in<br />
this chapter.<br />
The control system (of the CubicleBUS)<br />
must be connected to a fused power supply<br />
(class 2), since the system voltage drops<br />
to an unspecified value in the event of a<br />
short-circuit.<br />
Attention: Connecting and disconnecting<br />
CubicleBUS modules when energized is not<br />
recommended and can cause erroneous<br />
inputs or outputs to be generated.<br />
Figure<br />
2-9<br />
2/21<br />
Maximum CubicleBUS Configuration<br />
The CubicleBUS can comprise up to<br />
thirteen modules:<br />
• Electronic Trip Unit (ETU)<br />
• Metering Function<br />
• Breaker Status Sensor (BSS)<br />
• COM15/COM16<br />
• BDA or BDA Plus<br />
• ZSI module<br />
• Digital output module with switch<br />
position to the left (1st module)<br />
• Digital output module with switch<br />
position to the right (2nd module)<br />
• Digital configurable output module<br />
• Digital input module with switch<br />
position to the left<br />
• Digital input module with switch<br />
position to the right<br />
• Analog output module with switch<br />
position to the left (1st module)<br />
• Analog output module with switch<br />
position to the right (2nd module)<br />
In practice, however, not all of the<br />
modules may be required.<br />
CubicleBUS Installation Guidelines<br />
• Total length of the CubicleBUS cables:<br />
max. 10 m<br />
• Prefabricated cables must be used to<br />
connect the CubicleBUS modules.<br />
• The last module on the line must<br />
be terminated with a 120 Ω terminating<br />
resistor (supplied with each module).<br />
• The cables must always be connected<br />
from module to module. Star connection<br />
is not permitted.<br />
• The power supply must be provided by a<br />
UL Listed 24V DC class 2 power supply<br />
with standard-tolerance and the<br />
properties described on page 2/33<br />
and 2/34.<br />
Pin Configuration of the X3 on the<br />
CubicleBUS Module<br />
X3.1 24V DC common<br />
X3.2 CubicleBUS<br />
Communications line -<br />
X3.3 CubicleBUS<br />
Communications line +<br />
X3.4 24V DC +<br />
If external CubicleBUS modules are to be connected to the <strong>WL</strong> <strong>Circuit</strong> Breaker and a COM15/COM16 module is not available, the first<br />
connection must be made with four wires. The CubicleBUS can then be connected with the supplied CubicleBUS lines with RJ45 plugs, and<br />
the power supply connected to X3, as shown.<br />
Table<br />
2-10<br />
X8 on the breaker CubicleBUS lines CubicleBUS input<br />
Terminating<br />
with K145 plugs<br />
resistor<br />
At X3, the CubicleBUS can be supplied<br />
with 24V DC.<br />
Power supply<br />
<strong>WL</strong> PROFIBUS/MODBUS Communication and Electronic Accessories
External CubicleBUS Modules<br />
<strong>WL</strong> <strong>Circuit</strong> Breaker<br />
• The ZSI module must be the first external<br />
module to be connected, if used.<br />
• If the BDA is connected to the front<br />
interface of the trip unit, the cable must<br />
be no longer than 0.5 m.<br />
LED Display<br />
The LEDs on the external CubicleBUS<br />
modules enable straightforward module<br />
diagnosis and testing. As explained in<br />
Tables 2-11 to 2-13, the internal status<br />
and the communications connection can<br />
be diagnosed to ensure that they have<br />
been wired correctly.<br />
Figure<br />
2-10<br />
DEVICE LED Meaning<br />
Red Internal error in the CubicleBUS module<br />
Yellow CubicleBUS module in test mode<br />
Green Module in operation<br />
Table<br />
2-11<br />
CubicleBUS LED Meaning<br />
Green Connection exists to a different module<br />
Off No other CubicleBUS module detected<br />
Table<br />
2-12<br />
All other LEDs Meaning<br />
Yellow On the input module, this indicates an ON<br />
signal at the corresponding input. With digital<br />
output modules, the output is active when the<br />
contact closed. With analog output modules,<br />
a yellow LED indicates that the full-scale<br />
deflection value has been exceeded by 20%.<br />
Off The LED is off if none of the abovementioned<br />
conditions are present<br />
Table<br />
2-13<br />
If a COM15/COM16 module is available, the external CubicleBUS modules can be integrated in the system by connecting them to the CubicleBUS cables<br />
supplied. The end of the CubicleBUS must be installed with a terminating resistor. The power supply unit can simply be connected via the X3 interface.<br />
<strong>WL</strong> PROFIBUS/MODBUS Communication and Electronic Accessories<br />
The DEVICE LED indicates the state of the external CubicleBUS module.<br />
The CubicleBUS LEDs on the external CubicleBUS modules indicate whether communication is<br />
taking place with other modules. This enables straightforward diagnosis.<br />
The LEDs indicate whether the outputs are set or the inputs are supplied with 24V DC<br />
and have been activated.<br />
SECTION 2<br />
X8 on the breaker CubicleBUS lines COM15 CubicleBUS lines with RJ45 plugs Terminating resistor Power supply<br />
2/22
External CubicleBUS Modules<br />
<strong>WL</strong> <strong>Circuit</strong> Breaker<br />
Testing the Digital Input and<br />
Output Modules<br />
The test should be performed prior to any<br />
commissioning work to determine whether<br />
the circuit breaker and its components<br />
function properly.<br />
The test mode can be used to check that<br />
the CubicleBUS modules function properly.<br />
A distinction must be made between the<br />
individual modules.<br />
Pressing the “Test” key on the CubicleBUS<br />
module starts the test mode, and all the<br />
inputs, outputs, and associated LEDs are<br />
deactivated. The DEVICE LED changes from<br />
green to yellow.<br />
Pressing the “Test” key several times<br />
in quick succession then switches the<br />
corresponding input or output ON and<br />
OFF alternately.<br />
With the input module, the input signals<br />
are also transmitted via the CubicleBUS and<br />
via the COM15/COM16 if connected.<br />
With the digital output modules, the<br />
associated outputs are also switched,<br />
thereby enabling the system to be checked.<br />
The test mode of the analog output module<br />
and the ZSI module is described in the<br />
section for the appropriate module.<br />
Checking the inputs and outputs on the digital input/output modules<br />
Normal operation<br />
After a pause of more than 2 s,<br />
press the "Test" key.<br />
After a pause of more than 2 s,<br />
press the "Test" key.<br />
After a pause of more than 2 s,<br />
press the "Test" key.<br />
After a pause of more than 2 s,<br />
press the "Test" key.<br />
After a pause of more than 2 s,<br />
press the "Test" key.<br />
After a pause of more than 2 s,<br />
press the "Test" key.<br />
After a pause of more than 2 s,<br />
press the "Test" key.<br />
After a pause of more than 2 s,<br />
press the "Test" key.<br />
After a pause of more than 2 s,<br />
press the "Test" key.<br />
Table<br />
2-14<br />
2/23<br />
DEVICE<br />
DEVICE<br />
DEVICE<br />
DEVICE<br />
DEVICE<br />
DEVICE<br />
DEVICE<br />
DEVICE<br />
DEVICE<br />
DEVICE<br />
The inputs on the input module, outputs on<br />
the output module, the ZSI input, and the<br />
ZSI output can be ”forced‘’ via the BDA.<br />
The test mode can be activated via the<br />
communication system and the inputs and<br />
outputs overwritten for test purposes.<br />
The system exits the test mode<br />
automatically after 30 seconds if the test<br />
key is not actuated or no changes have<br />
been made via the communication system.<br />
The test scenarios for the analog output<br />
module and ZSI are explained in their<br />
respective sections.<br />
Normal operating condition of the input/output module. The<br />
inputs/outputs are either ON or OFF depending on the wiring<br />
or communications.<br />
The module switches to the test mode, as indicated by the<br />
yellow DEVICE LED.<br />
Pressing once selects input or output 1, as indicated by the green LED<br />
1. The output can then be switched on or off, and the ON or OFF signal<br />
of the input can be transmitted by pressing the "Test" key quickly (1 s).<br />
Input or output 2 selected. As with 1, the output can be<br />
switched by pressing the key quickly. With relay modules, you<br />
will be able to hear a click.<br />
Input or output 3 selected. With input modules, the presence of<br />
24V DC at the corresponding input is simulated and transmitted<br />
via the CubicleBUS.<br />
Input or output 4 selected. The selected input or output can be<br />
tested by quickly pressing the "Test" key.<br />
Input or output 5 selected. The selected input or output can be<br />
tested by quickly pressing the "Test" key.<br />
Input or output 6 selected. The selected input or output can be<br />
tested by quickly pressing the "Test" key.<br />
Overall LED test. If the "Test" key is not pressed within 30<br />
seconds, the system exits test mode.<br />
The test procedure can now start from the beginning.<br />
The table shows the test procedure for checking the digital inputs and outputs on the CubicleBUS. If the “Test” key is not pressed within 30 seconds, the<br />
system exits test mode automatically.<br />
<strong>WL</strong> PROFIBUS/MODBUS Communication and Electronic Accessories
External CubicleBUS Modules<br />
<strong>WL</strong> <strong>Circuit</strong> Breaker<br />
Digital Input Module<br />
Functional description<br />
The digital input module enables up to six<br />
additional binary signals (24V DC) to be<br />
connected. Signals, such as the status of<br />
the breaker, the status of the switchgear<br />
cabinet door, or a signal indicating that<br />
a pre-defined temperature has been<br />
exceeded, can be transmitted directly<br />
and processed at the field bus level.<br />
A total of 6 inputs are available in the “BUS<br />
Input” Switch position. Six inputs are also<br />
available if the rotary switch is in the<br />
“Parameter Switch” position, although the<br />
first input causes the active parameter set<br />
to change. If the connected ETU does not<br />
have two parameter set capability (e.g.<br />
ETU745 or ETU748), this input can also<br />
be used without any restrictions.<br />
Figure<br />
2-11<br />
<strong>WL</strong> PROFIBUS/MODBUS Communication and Electronic Accessories<br />
Functional Description for<br />
Changing Parameter Sets<br />
Trip units ETU755 and ETU776 have two<br />
different parameter sets for the protection<br />
function. This function is particularly useful<br />
in the event of a power failure when an<br />
automatic transfer is made from utility to<br />
generator, a process which may require that<br />
all the protective settings change.<br />
The PROFIBUS/MODBUS communication<br />
system, the BDA, the ETU776 display, or the<br />
digital input module can be used to switch<br />
between the two parameter sets.<br />
For this purpose, the first module input is<br />
used in the “Parameter Switch” position on<br />
the rotary switch. If a “1” signal is detected<br />
(LED on input 1 is yellow), the switchover<br />
to parameter set B is communicated to the<br />
trip unit. If the input signal switches back to<br />
“0”, the switchover to parameter set A is<br />
communicated, and the LED on input 1 is<br />
de-energized.<br />
Technical data for the digital input module<br />
Operating voltage min./max. 19.2V / 28.8V<br />
Operating current min./max. 29mA / 43mA<br />
No. of channels per digital input module 6<br />
Min. voltage value for detecting a “1” signal >16V<br />
Current per input for a “1” signal 7.5mA<br />
Max. voltage value for detecting a “0” signal
External CubicleBUS Modules<br />
<strong>WL</strong> <strong>Circuit</strong> Breaker<br />
Digital Output Module with<br />
Rotary Switch<br />
The digital output module can be used to<br />
output six events. These events can be<br />
warnings or trips and can be used for<br />
external annunciation or control.<br />
The load shedding and load restoring<br />
signals can enable a load to be switched<br />
ON or OFF automatically.<br />
The digital output module is available in<br />
two versions. The “optocoupler” version<br />
features solid state outputs. The current<br />
carrying capacity of this output is 150mA,<br />
and the nominal voltage is 24V DC. Only<br />
DC voltage can be switched. The “relay”<br />
version, uses a relay contact with a<br />
maximum load of 12A. Voltages of up<br />
250V AC/DC are possible. The relay contacts<br />
are isolated.<br />
The module is configured using a rotary<br />
switch, which not only selects one of the<br />
two output module versions, but also sets<br />
the appropriate delay time.<br />
2/25<br />
Selector Switch Position to the Left<br />
If the rotary switch is positioned to the left,<br />
outputs 1 through 6 are assigned the<br />
following events:<br />
• Output 1: Long-time trip (L)<br />
• Output 2: Short-time trip (S)<br />
• Output 3: Instantaneous trip (I)<br />
• Output 4: Ground fault trip (G)<br />
• Output 5: Ground fault alarm signal<br />
• Output 6: Trip as a result of overload in<br />
the neutral conductor (N)<br />
Selector Switch Position to the Right<br />
If the rotary switch is positioned to the<br />
right, outputs 1 through 6 are assigned<br />
the following events:<br />
• Output 1: Leading overload trip signal<br />
(delay time 0s)<br />
• Output 2: Trip unit error (ETU)<br />
• Output 3: Load shedding<br />
• Output 4: Load restoring<br />
• Output 5: Temperature alarm<br />
• Output 6: Current phase unbalance<br />
Technical data for the digital output module with a rotary selection switch<br />
Operating voltage min./max. 19.2V / 28.8V<br />
Operating current min./max. optocoupler 29mA / 63mA<br />
Operating current min./max. relay 29mA / 250mA<br />
No. of isolated channels per digital output module 6<br />
Max. current rating for optocoupler output with 24V DC 100mA<br />
Max. current rating for relay output with 24V DC / 250 V AC / 250V DC 5A / 5A / 0.25A<br />
Max. no. of digital output modules on one CubicleBUS 2<br />
Power loss min./max. 0.74W / 5.4W<br />
Dimensions W/H/D 70mm / 86mm /95mm<br />
Weight (optocoupler/relay) 0.223 kg / 0.321 kg<br />
Temperature range -20°C / 60°C<br />
Table<br />
2-16<br />
This table provides technical data for the digital output module with rotary switch on the CubicleBUS.<br />
Delay Time<br />
The rotary switch can also be used<br />
to set an additional delay time. Available<br />
times are 0, 0.2 s, 0.5 s, 1 s, and 2 s. These<br />
can be used, for example, to suppress<br />
events that only last a short time and not<br />
output them until they have been present<br />
for a long period (e.g. phase unbalance).<br />
Irrespective of the delay time that has been<br />
set, the signal for the leading overload trip,<br />
which can be used to switch off and protect<br />
connected frequency converters, is<br />
always instantaneous.<br />
A maximum of two digital output modules<br />
with rotary switches can be operated<br />
simultaneously on one <strong>WL</strong> <strong>Circuit</strong> Breaker,<br />
otherwise erroneous outputs may occur.<br />
They must be configured opposite each<br />
other. One in the operating mode with<br />
the switch position to the left and one<br />
with the switch position to the right.<br />
The LEDs display the current state of the 6<br />
outputs. If the LED is OFF, corresponding<br />
output is OFF. If the LED is yellow, the<br />
output is ON.<br />
Figure<br />
2-12<br />
Switch positioned to left / right<br />
selects events in dark-gray /<br />
light-gray fields.<br />
<strong>WL</strong> PROFIBUS/MODBUS Communication and Electronic Accessories
External CubicleBUS Modules<br />
<strong>WL</strong> <strong>Circuit</strong> Breaker<br />
Digital Output Module without<br />
Rotary Switch<br />
The configurable digital output module<br />
also has six outputs. Like the digital output<br />
module with the rotary switch, it is available<br />
with optocoupler and relay outputs.<br />
Unlike the modules with the rotary switch,<br />
however, the outputs are assigned using a<br />
software tool rather than a selector switch.<br />
The outputs can be assigned the events in<br />
Table 2-17 and 2-18 using drop-down fields.<br />
The first three module outputs can be<br />
assigned up to six events. All of these<br />
events operate in parallel. This triggers,<br />
for example, a type of group signal when<br />
the circuit breaker is either impending<br />
trip mode or a phase unbalance warning<br />
is present.<br />
The last three outputs can only be assigned<br />
one of the events directly.<br />
Configuration events include status signals,<br />
warnings, tripped indication, over/under<br />
setpoint status, waveform buffer triggers,<br />
and the active parameter set.<br />
The module outputs can be set remotely<br />
using communications or the BDA/BDA Plus.<br />
Status<br />
Alarms<br />
Trips<br />
<strong>WL</strong> PROFIBUS/MODBUS Communication and Electronic Accessories<br />
These events are available for the digital, configurable output module (part 1)<br />
PROFIBUS output bits<br />
Table<br />
2-17<br />
<strong>Circuit</strong> breaker closed<br />
<strong>Circuit</strong> breaker open<br />
Storage spring charged<br />
Ready-to-close<br />
Group warning<br />
Group trip<br />
PROFIBUS/MODBUS write protection active<br />
PROFIBUS/MODBUS communication OK<br />
Overload<br />
Overload in N-conductor<br />
Load shedding<br />
Load restoring<br />
Ground fault alarm<br />
Overtemperature<br />
ETU error<br />
Phase unbalance - current<br />
Long-time (L)<br />
Short-time (S)<br />
Instantaneous short-circuit (I)<br />
Ground fault (G)<br />
Overload in neutral conductor<br />
Phase unbalance - current<br />
Phase unbalance - voltage<br />
Under frequency<br />
Over frequency<br />
Undervoltage<br />
Overvoltage<br />
Active power in normal direction<br />
Active power in reverse direction<br />
Total harmonic distortion - current<br />
Total harmonic distortion - voltage<br />
Reversal of phase rotation direction<br />
PROFIBUS/MODBUS bit 1<br />
PROFIBUS/MODBUS bit 2<br />
PROFIBUS/MODBUS bit 3<br />
PROFIBUS/MODBUS bit 4<br />
PROFIBUS/MODBUS bit 5<br />
PROFIBUS/MODBUS bit 6<br />
Parameter set A active<br />
Parameter set B active<br />
The events in this table (part 1) and the following table (part 2) are available on the<br />
CubicleBUS. These can be output via the configurable digital output module.<br />
SECTION 2<br />
2/26
External CubicleBUS Modules<br />
<strong>WL</strong> <strong>Circuit</strong> Breaker<br />
The status can be read via the input<br />
module, which means that a motor could<br />
be switched ON or OFF via the configurable<br />
digital output module.<br />
Many other applications are also possible.<br />
Unlike the digital output module with the<br />
rotary switch, a time delay cannot be added<br />
to the event. A setpoint can be output with<br />
a delay via the configurable digital output<br />
module, for example, if the setpoint itself is<br />
already delayed.<br />
Like the digital output module with the<br />
rotary switch, this module also indicates the<br />
status of the outputs via the associated LEDs.<br />
Attention: Do not power off configurable<br />
output module within 15 seconds of<br />
changing the configuration via BDA. This<br />
could result in a red DEVICE LED and all<br />
outputs will be deactivated indicating that<br />
the device is incompletely configured.<br />
2/27<br />
These events are available for the digital, configurable output module (part 2)<br />
Setpoints<br />
Trigger event<br />
Table<br />
2-18<br />
Over current<br />
Over current in neutral conductor<br />
Over current – ground fault<br />
Phase unbalance – current<br />
Phase unbalance – voltage<br />
Demand – current<br />
Undervoltage<br />
Overvoltage<br />
Total harmonic distortion – current<br />
Total harmonic distortion – voltage<br />
Crest factor<br />
Form factor<br />
Under frequency<br />
Over frequency<br />
Active power in normal direction<br />
Active power in reverse direction<br />
Apparent power<br />
Reactive power in normal direction<br />
Reactive power in reverse direction<br />
Power factor leading<br />
Power factor lagging<br />
Demand – active power<br />
Demand – reactive power<br />
Demand – apparent power<br />
Waveform buffer A<br />
Waveform buffer B<br />
Part 2 of the table shows all the events on the CubicleBUS that can be output via the<br />
digital configurable output module. Configuration can be carried out using the BDA.<br />
Technical data for the digital configurable output module<br />
Operating voltage min./max. 19.2V / 28.8V<br />
Operating current min./max. (excluding relay) 29mA / 39mA<br />
Operating current min./max. relay 29mA / 250mA<br />
No. of channels per digital output module 6<br />
Max. current rating for optocoupler output with 24V 100mA<br />
Max. current rating for for six relay outputs with 24V<br />
DC/250V AC/250V DC<br />
5A / 5A / 0.25A<br />
Max current rating for one relay output with 24V DC 2.7A<br />
Max. no. of digital configurable output modules on one <strong>WL</strong><br />
<strong>Circuit</strong> Breaker<br />
1<br />
Power loss min./max. 0.74W / 5.4W<br />
Dimensions W/H/D 70mm / 86mm / 95mm<br />
Weight (optocoupler/relay) 0.223 kg / 0.321 kg<br />
Operating temperature range -20°C / 60°C<br />
Table<br />
2-19<br />
This table provides technical data for the digital configurable output module on<br />
the CubicleBUS.<br />
<strong>WL</strong> PROFIBUS/MODBUS Communication and Electronic Accessories
External CubicleBUS Modules<br />
<strong>WL</strong> <strong>Circuit</strong> Breaker<br />
Analog Output Module<br />
The analog output module can be used<br />
to output the most important measured<br />
values sent via the CubicleBUS to analog<br />
indicators (e.g. analog meters) in the<br />
switchgear cubicle door. Each analog<br />
output module has four channels for<br />
this purpose. The signals are available at<br />
two physical interfaces: a 4 ... 20mA and<br />
a 0 ... 10V interface.<br />
The measured values are available as<br />
0 ... 10V via the X4 connector on the<br />
CubicleBUS module (the 4 ... 20mA<br />
interface is available at X5). Both outputs<br />
are always active at the same time, and<br />
can be used simultaneously.<br />
The measured values, which are output<br />
via the four channels, are selected using<br />
a rotary switch. The available outputs are<br />
current, voltage, power, frequency and<br />
power factor. Up to two analog output<br />
modules can be operated on one<br />
CubicleBUS. The selection panel on the<br />
rotary switch is divided vertically. If the<br />
switch is set to a value on the left, the<br />
module is automatically addressed as<br />
module 1.<br />
If a second module exists, it must be set<br />
to a value on the right. This is the only<br />
way that two analog output modules can<br />
operate simultaneously.<br />
All types of analog instruments with an<br />
internal resistance of more than 20kΩ (for<br />
the voltage output) and between 50Ω and<br />
250Ω (as a current output) can be used as<br />
an indicator.<br />
The LEDs for the channels are yellow if<br />
the current value exceeds the full-scale<br />
deflection by 20% (with V, I and P), power<br />
factor is greater than 0.8, or the frequency<br />
greater than 45Hz.<br />
Switch Position “I”<br />
In switch position “I”, the measured current<br />
values are output linearly:<br />
A01: Current in phase A<br />
A02: Current in phase B<br />
A03: Current in phase C<br />
A04: Current in the neutral conductor<br />
<strong>WL</strong> PROFIBUS/MODBUS Communication and Electronic Accessories<br />
Since the circuit breaker can be designed<br />
for different rated currents, the full-scale<br />
value must be scaled automatically and<br />
the maximum output value of the analog<br />
output module interpreted. The value of<br />
the rating plug is used for this purpose.<br />
The maximum value is calculated by<br />
multiplying the value of the rating plug by<br />
1.2 and then rounding the result up to the<br />
nearest 100. Example: With a rating plug of<br />
1600A, the full-scale value of the analog<br />
panel meter must be 2000A (1600 x 1.2 =<br />
1920 -> 2000A). In other words, 0V/4mA =<br />
0A, 10V/20mA = 2000A.<br />
Switch Position “U”<br />
When the rotary switch is in switch position<br />
“U”, the following voltages are applied to<br />
the four analog outputs:<br />
A01: Phase-to-phase voltage V ab<br />
A02: Phase-to-phase voltage V bc<br />
A03: Phase-to-phase voltage V ca<br />
A04: Phase voltage V N<br />
In most cases, the phase-to-phase voltage is<br />
output to the switchgear cubicle doors. This<br />
is why the first three channels are assigned<br />
these measured values. If the voltage is<br />
required between a phase and the neutral<br />
conductor, this is available via output A04.<br />
The full-scale deflection for the analog<br />
panel meter is calculated by multiplying<br />
the rated voltage of the network (primary<br />
voltage of the voltage transformer) by 1.1<br />
and then rounding the result up to the<br />
nearest 50.<br />
Example: If the rated voltage of the<br />
network is 480V, the full-scale value is<br />
550V (480V x 1.1 = 528V -> 550V).<br />
Switch Position “P”<br />
If the rotary switch is set to position “P”, the<br />
power measured values are output via the<br />
four channels:<br />
A01: Active power phase kW a<br />
A02: Active power phase kW b<br />
A03: Active power phase kW c<br />
A04: Total apparent power kVA TOT<br />
The full-scale deflection of the active power<br />
in each phase is calculated by multiplying<br />
the value of the rating plug by the rated<br />
voltage of the network. The full-scale<br />
deflection value is then classified in a<br />
value range, as shown in the table below.<br />
Before the full-scale deflection can be<br />
determined from the table, the calculated<br />
value must be multiplied by 3 for the total<br />
apparent power and the total active power<br />
(position f). Example: I R = 1600A, rated<br />
voltage = 480V; -> full-scale deflection =<br />
1,000,000 W<br />
Switch Position "f"<br />
Since it can generally be assumed that the<br />
frequency will be the same across the three<br />
phases in all the networks, switch position<br />
“f” is used to provide a general overview<br />
by outputting the most important<br />
measured values (with the exception of<br />
the current values). In conjunction with<br />
another module in position “I”, all the<br />
most important measured values can be<br />
displayed in this way.<br />
Power value ranges [W/VA]<br />
From To Full Scale<br />
Deflection<br />
0 50,000 50,000<br />
50,000 100,000 100,000<br />
100,000 200,000 200,000<br />
200,000 300,000 300,000<br />
300,000 500,000 500,000<br />
500,000 1,000,000 1,000,000<br />
1,000,000 2,000,000 2,000,000<br />
2,000,000 3,000,000 3,000,000<br />
3,000,000 5,000,000 5,000,000<br />
5,000,000 10,000,000 10,000,000<br />
10,000,000 20,000,000 20,000,000<br />
20,000,000 ∞ 30,000,000<br />
Table<br />
2-20<br />
SECTION 2<br />
After multiplication, the full-scale deflection<br />
of the power is sorted into ranges.<br />
2/28
External CubicleBUS Modules<br />
<strong>WL</strong> <strong>Circuit</strong> Breaker<br />
A01: Network frequency<br />
A02: Average value of the phase-to-phase<br />
voltages<br />
A03: Total active power<br />
A04: Average value of the power factors<br />
The scale for displaying the frequency must<br />
range from 45Hz to 65Hz. This enables the<br />
standard frequencies in countries where IEC<br />
and UL standards apply to be displayed.<br />
Example: 45Hz = 0 V/4mA and 65Hz =<br />
10V/20mA.<br />
The scalings of the other measured values<br />
can be read in the appropriate switch<br />
positions.<br />
Switch Position “cosϕ”<br />
The following measured values are output<br />
in switch position “cosΦ”:<br />
A01: Power factor cosϕL1<br />
A02: Power factor cosϕL2<br />
A03: Power factor cosϕL3<br />
A04: Phase unbalance – current (%)<br />
Figure<br />
2-13<br />
2/29<br />
The analog channels are selected<br />
using the Rotary Switch.<br />
The power factors are displayed from<br />
0.7 (leading) (= 0V/4mA) through 1<br />
(= 5V/12mA) to 0.7 (lagging) (= 10<br />
V/20mA). The phase unbalance of the three<br />
currents is displayed from 0% (0V/4mA) to<br />
50% (10V/20mA).<br />
Note: Ensure that the polarity is correct<br />
during connection.<br />
Test Function<br />
The test mode is started by pressing the<br />
“TEST” key and indicated by the yellow<br />
DEVICE LED. Although the measured values<br />
continue to be updated in the test mode,<br />
they are not output at their respective<br />
channels.<br />
• The test mode is started by pressing the<br />
“TEST” key.<br />
• Pressing the “TEST” key again selects<br />
output 1, which is indicated by LED A01.<br />
The test signal is output. For currents,<br />
voltages, and power rating values, this is<br />
equivalent to the full-scale value, with<br />
cosϕ 1 and with a frequency of 55Hz.<br />
Technical data for the analog output module<br />
Table<br />
2-21<br />
• Pressing the key again selects output 2,<br />
which is indicated by LED A02. This<br />
automatically deletes the value at output<br />
1 and sets the value at output 2.<br />
• By repeating the above steps, the output<br />
and scaling of all four outputs can be<br />
checked one after the other.<br />
• Selecting output A04 and pressing the<br />
“TEST” key activates all four LEDs, but<br />
does not activate an output. Pressing<br />
the key again selects output 1 again.<br />
• If the “TEST” key is not pressed within<br />
30 seconds after an output has been<br />
selected, the system exits the test mode<br />
automatically and returns to the standard<br />
operating mode. The values, which are<br />
constantly updated in the background,<br />
are then updated at the outputs again.<br />
Operating voltage min./max. 19.2V / 28.8V<br />
Operating current min./max. 63mA / 150mA<br />
Min. resistance connected to voltage output 20kΩ<br />
Resistance range for connection to current output - min./max. 20Ω / 250Ω<br />
Max. no. of analog output modules on one <strong>WL</strong> <strong>Circuit</strong> Breaker 2<br />
Power loss min./max. 0.74W / 5.4W<br />
Dimensions 70mm / 86mm / 95mm<br />
Weight 0.223kg<br />
Temperature range -20°C / 60°C<br />
This table provides technical data for the analog output module on the CubicleBUS.<br />
<strong>WL</strong> PROFIBUS/MODBUS Communication and Electronic Accessories
External CubicleBUS Modules<br />
<strong>WL</strong> <strong>Circuit</strong> Breaker<br />
ZSI Module<br />
To use the ZSI function with the <strong>WL</strong> <strong>Circuit</strong><br />
Breaker, the external CubicleBUS ZSI module<br />
must be implemented.<br />
The zone selective interlocking (ZSI)<br />
module provides the complete range of<br />
selectivity with the short delay time of<br />
t ZSI = 50 ms, irrespective of the number of<br />
levels and the location of the short-circuit<br />
in the distribution system. Its benefits<br />
become even more apparent, the higher<br />
the number of levels in large systems and<br />
the longer the resulting delay times. By<br />
shortening the time, the ZSI module<br />
significantly reduces stress and damage<br />
in the event of a short-circuit in the<br />
switchgear.<br />
Operating Principle<br />
If the ZSI module is used in a distribution<br />
system comprising several levels, each<br />
circuit breaker affected by a short-circuit<br />
interrogates the circuit breaker directly<br />
downstream, to ascertain whether the<br />
Graphic<br />
2-7<br />
<strong>WL</strong> PROFIBUS/MODBUS Communication and Electronic Accessories<br />
short-circuit also occurred in the next level<br />
below:<br />
• If the short-circuit did occur in the<br />
downstream level, the upstream circuit<br />
breaker delays tripping to ensure that the<br />
circuit breaker directly upstream of the<br />
short-circuit has enough time to<br />
interrupt the short-circuit.<br />
• If the circuit breakers in the downstream<br />
level do not report a short-circuit, the<br />
short-circuit occurred between the two<br />
levels in question. In this case, one<br />
of the two upstream circuit breakers<br />
interrupts the short-circuit once the<br />
programmed delay time of t ZSI = 50 ms<br />
has elapsed.<br />
Example as Illustrated in<br />
Graphic 2-7<br />
This shows a section of a power distribution<br />
system that has been installed with the<br />
ZSI module. <strong>WL</strong> <strong>Circuit</strong> <strong>Breakers</strong> are<br />
implemented at different levels.<br />
Short-circuit at 3:<br />
<strong>Circuit</strong> breakers -Q5, -Q3, and -Q1 establish<br />
that a short-circuit has occurred. -Q5 blocks<br />
-Q3 by means of the ZSI signal and, as a<br />
result, -Q1 too, so that they do not trip in<br />
50 ms. Since -Q5 does not receive a<br />
blocking signal from a subordinate circuit<br />
breaker, it is responsible for interrupting the<br />
short-circuit as quickly as possible. If this<br />
does not take place, because the circuit<br />
breaker is no longer operational due to an<br />
overcurrent, -Q3, as a backup, trips after<br />
the time-discriminating response time of<br />
150 ms.<br />
Short-circuit at 2:<br />
-Q1 and -Q3 establish that a short-circuit<br />
has occurred; -Q5 does not. For this reason,<br />
-Q3 does not receive a blocking signal from<br />
-Q5, but provides a blocking signal for<br />
-Q1. This information tells -Q3 that<br />
it is closest to the short-circuit and trips<br />
with a delay of tS = 50 ms instead of<br />
tsd = 150 ms. Time saved = 100 ms.<br />
This graphic illustrates the operating principle of the ZSI function using an example in a power distribution system. It is also a connection diagram<br />
that shows how the ZSI module must be wired if the <strong>WL</strong> <strong>Circuit</strong> <strong>Breakers</strong> are used.<br />
SECTION 2<br />
2/30
External CubicleBUS Modules<br />
<strong>WL</strong> <strong>Circuit</strong> Breaker<br />
Short-circuit at 1:<br />
Only -Q1 establishes that a short-circuit has<br />
occurred and does not receive a blocking<br />
signal from a subordinate level. For this<br />
reason, it trips after t ZSI = 50 ms. Time<br />
saved = 250 ms.<br />
The ZSI function can be used for shortcircuits<br />
between the phases (S), with<br />
respect to ground (G), or for both<br />
simultaneously (S+G). The operating<br />
mode is set using the rotary switch. If<br />
the switch is in the “OFF” position, the<br />
ZSI is deactivated.<br />
The ZSI module also provides the blocking<br />
signal for medium-voltage level breakers.<br />
If a tie breaker is used in the power<br />
distribution system, this can also be<br />
equipped with the ZSI function and<br />
integrated in the overall concept.<br />
Up to 8 circuit breakers can be connected<br />
to ZSI IN, and up to 20 to ZSI OUT.<br />
Figure<br />
2-14<br />
2/31<br />
The function of the ZSI module is<br />
selected using the rotary switch.<br />
Note: Proper performance cannot be<br />
guaranteed if these limits are exceeded.<br />
The ZSI module must always be the<br />
first external CubicleBUS module to be<br />
connected to the COM15/COM16 module<br />
or to X8.<br />
Test Function<br />
The outputs are set (i.e. a blocking signal<br />
is sent to other circuit breakers) when the<br />
rotary switch is set to “TEST.”<br />
Pressing the “TEST” key switches the ZSI<br />
module to test mode, which is indicated<br />
by the yellow DEVICE LED. The inputs and<br />
outputs are selected in the same way as the<br />
digital input/output modules. When the ZSI<br />
module input is selected, the input can be<br />
toggled internally by pressing and releasing<br />
the TEST key. When the outputs are<br />
selected, the outputs can be toggled by<br />
pressing and releasing the TEST key. This<br />
enables the circuit to be checked.<br />
Technical data for the ZSI module<br />
Operating voltage min./max. 19.2V / 28.8V<br />
Operating current min./max. 31mA / 61mA<br />
Automatic output reset after no more than... 3 s<br />
Shortest time blocking signal can be present at the outputs LV 100 ms<br />
Shortest time blocking signal can be present at the outputs MV 500 ms<br />
Standard trip time (incl. all delays) approx. 80 ms<br />
Max. no. of circuit breakers connectable to ZSI IN 8<br />
Max. no. of circuit breakers connectable to ZSI OUT 20<br />
Max. no. of modules on one <strong>WL</strong> <strong>Circuit</strong> Breaker 1<br />
Max. wire length for 2 x 18 AWG twisted pair 400 m<br />
Power loss min./max. 0.8W / 1.76W<br />
Dimensions W/H/D 70mm/86mm<br />
/95mm<br />
Weight 0.223 kg<br />
Operating temperature range -20°C / 60°C<br />
Table<br />
2-22<br />
This table provides technical data for the ZSI module on the CubicleBUS.<br />
Active inputs and outputs are indicated by a<br />
yellow LED.<br />
It is recommended that the ZSI signal be<br />
transmitted via a shielded twisted pair with<br />
a cross-section of at least 0.75 mm 2 (18<br />
AWG), and no more than 400 m long.<br />
<strong>WL</strong> PROFIBUS/MODBUS Communication and Electronic Accessories
External CubicleBUS Modules<br />
<strong>WL</strong> <strong>Circuit</strong> Breaker<br />
Graphic<br />
2-8<br />
This diagram consists of two parts: the top half is a connection diagram. The bottom half shows the circuitry when a tie breaker is used.<br />
<strong>WL</strong> PROFIBUS/MODBUS Communication and Electronic Accessories<br />
SECTION 2<br />
2/32
External Power Consumption<br />
<strong>WL</strong> <strong>Circuit</strong> Breaker<br />
<strong>WL</strong> <strong>Circuit</strong> <strong>Breakers</strong> with CubicleBUS<br />
are designed to provide internal and<br />
external communication when the<br />
main contacts are open. It is therefore<br />
necessary to connect an external<br />
power supply.<br />
2/33<br />
Table to calculate the power consumption of an CubicleBUS System<br />
CubicleBUS Modules # of CubicleBUS Max. continuous Max. peak inrush<br />
modules per current current for each<br />
breaker module<br />
Trip unit ETU745 1 120mA 2000mA<br />
Trip unit ETU755 1 120mA 2000mA<br />
Trip unit ETU776 1 170mA 2000mA<br />
Metering Function or Metering Function Plus 1 120mA 120mA<br />
Breaker Status Sensor BSS 1 40mA 110mA<br />
COM15/COM16 PROFIBUS/MODBUS communication module 1 125mA 280mA<br />
ZSI module 1 50mA 125mA<br />
Digital output module with rotary switch, relay output 1 - 2 180mA 125mA<br />
Digital output module with rotary switch, opto coupler 1 - 2 50mA 125mA<br />
Digital output module configurable, relay output 1 180mA 125mA<br />
Digital output module configurable, opto coupler 1 50mA 125mA<br />
Analog output module 1 - 2 110mA 800mA<br />
Digital input module 1 - 2 30mA 125mA<br />
BDA or BDA Plus 1<br />
Summary<br />
250mA 350mA<br />
Table<br />
2-23<br />
General Information<br />
The current sensing devices of <strong>WL</strong> <strong>Circuit</strong><br />
<strong>Breakers</strong> consist of two components.<br />
The Rogowski coils deliver the current<br />
measuring values, and the energy<br />
converters provide the trip units with<br />
power. For breakers without an additional<br />
external power supply, the trip units are<br />
already activated and monitor the current<br />
at minimum values of 80A for Frame Size II,<br />
and 150A for Frame Size III.<br />
The current from the sensors is sufficient to<br />
not only activate the protective functions of<br />
the ETU745 or ETU748 trip units, but also<br />
to activate the display. However, the backlighting<br />
requires an external power supply.<br />
If the CubicleBUS has been connected to a<br />
UL Listed 24V DC class 2 power supply, the<br />
display is fed with energy from this supply.<br />
To find a suitable external power supply for the <strong>WL</strong> <strong>Circuit</strong> Breaker with CubicleBUS the continuous current and the peak inrush current<br />
must be observed.<br />
The display of the ETU776 only functions<br />
when an external CubicleBUS power supply<br />
has been connected. The protective<br />
functions are fully operational when<br />
primary current is flowing even though the<br />
display is not active.<br />
If additional CubicleBUS components are<br />
applied on a <strong>WL</strong> <strong>Circuit</strong> Breaker, the breaker<br />
must be connected to an external UL Listed<br />
24V DC class 2 power supply.<br />
The CubicleBUS consists of four wires, two<br />
for the communications and two for the UL<br />
Listed 24V DC class 2 power supply. The<br />
CubicleBUS is connected to the external<br />
terminal X8.1 to X8.2.<br />
<strong>WL</strong> PROFIBUS/MODBUS Communication and Electronic Accessories
External Power Consumption<br />
<strong>WL</strong> <strong>Circuit</strong> Breaker<br />
The + 24V DC connection must be<br />
connected to X8.3 and the common of<br />
the 24V DC voltage supply must be<br />
connected to X8.4.<br />
Selection criteria for the external power<br />
supply:<br />
• First, the maximum continuous current<br />
which the CubicleBUS modules draw<br />
from the CubicleBUS supply must be<br />
calculated. (see Table 2-23)<br />
• Second, the peak inrush current of all<br />
modules must be calculated. The power<br />
supply must be capable of bearing the<br />
maximum peak inrush current for a<br />
period of 100 ms.<br />
A power supply must be selected in<br />
accordance with these two characteristic<br />
values. Several <strong>WL</strong> <strong>Circuit</strong> <strong>Breakers</strong> can<br />
be connected to one power supply. For<br />
this purpose, however, the total of the<br />
continuous currents must be considered.<br />
For example, the <strong>WL</strong>SITOP1 power supply<br />
can be used with up to 3 ETUs and up to<br />
16 CubicleBUS modules simultaneously.<br />
The <strong>WL</strong>SITOP25 power supply can be used<br />
with two ETUs and up to 8 CubicleBUS<br />
modules simultaneously.<br />
<strong>WL</strong> PROFIBUS/MODBUS Communication and Electronic Accessories<br />
Selecting a suitable power supply from the <strong>Siemens</strong> product line<br />
Output current Inrush current Type Order No.<br />
2.5 A < 30 A Logo! Power <strong>WL</strong>SITOP25<br />
3.8 A < 32 A SITOP Power <strong>WL</strong>SITOP1<br />
Table 2-24 A <strong>Siemens</strong> power supply can be selected for one or more <strong>WL</strong> <strong>Circuit</strong> <strong>Breakers</strong>.<br />
SECTION 2<br />
2/34
Notes<br />
<strong>WL</strong> PROFIBUS/MODBUS Communication and Electronic Accessories
PROFIBUS Communication<br />
with <strong>WL</strong> <strong>Circuit</strong> <strong>Breakers</strong><br />
How to Integrate the <strong>Circuit</strong> Breaker 3-1 – 3-7<br />
into PLC’s<br />
PROFIBUS Profile for the <strong>WL</strong> <strong>Circuit</strong> Breaker 3-8<br />
Data Transmission via DPV1 3-9 – 3-11<br />
Diagnostic 3-12 - 3-17<br />
Programming Samples 3-18 – 3-19<br />
Certification 3-20<br />
<strong>WL</strong> PROFIBUS/MODBUS Communication and Electronic Accessories<br />
SECTION 3
Integration into an Automation System<br />
<strong>WL</strong> <strong>Circuit</strong> Breaker<br />
A wide range of options are available<br />
for integrating <strong>WL</strong> circuit breakers in<br />
automation systems. New users will<br />
appreciate the straightforward and quick<br />
start-up options, while experienced<br />
users will find that the flexible options<br />
meet all their requirements.<br />
Graphic<br />
3-1<br />
3/1<br />
PROFIBUS-DP<br />
communication with<br />
<strong>WL</strong> circuit breakers<br />
Communication Options<br />
The PROFIBUS COM15 module acts as<br />
an interface between the circuit breakers<br />
and the information environment. A joint<br />
device master file (GSD) can be used for<br />
integration in PROFIBUS-DP systems for all<br />
<strong>WL</strong> circuit breakers. A distinction between<br />
individual breakers and/or frame ratings<br />
cannot and does not have to be drawn.<br />
Of course, with an identical PROFIBUS-DP<br />
profile, the circuit breaker that is addressed<br />
can be accurately identified (e.g. device<br />
description order number, inspection<br />
date, etc.).<br />
Communication<br />
with the PLC / PC<br />
(class 1 master)<br />
Communication<br />
with the PLC / PC<br />
(class 2 master)<br />
Connection as<br />
standard DP slave<br />
Parameterization,<br />
operation, monitoring,<br />
diagnosis via DPV1 C+M<br />
system (e.g. WinCC)<br />
Parameterization,<br />
operation, monitoring,<br />
diagnosis via DPV1 with<br />
an additional PLC<br />
Parameterization,<br />
operation, monitoring,<br />
diagnostic with Switch<br />
ES Power (STEP 7)<br />
Configuration with<br />
GSD file and<br />
master-specific tool<br />
Optional access<br />
via DPV1<br />
This diagram shows a chart of the different communication options. A class 1 master is the “configuration master,” which transmits either the settings from the<br />
GSD file to the slave during start-up.<br />
<strong>WL</strong> PROFIBUS/MODBUS Communication and Electronic Accessories
Integration into an Automation System<br />
<strong>WL</strong> <strong>Circuit</strong> Breaker<br />
Another advantage of a joint communication<br />
profile is that the same software can be<br />
used for the automation systems, PCs, and<br />
operator control and monitoring software<br />
(e.g. WinCC, STEP 7).<br />
The profile is based on the PROFIBUS<br />
profile for low voltage switchgear (LVSG)<br />
of the PROFIBUS user organization (order<br />
no. 3.122).<br />
Communication with a<br />
PROFIBUS-DP Class 1 Master<br />
A class 1 master is the “configuration master,”<br />
which, during start-up, determines the mode<br />
that the slave is to use for communication. In<br />
most cases, a class 1 master is a PLC, such as<br />
a SIMATIC S7 with a PROFIBUS-DP interface.<br />
It is possible to integrate an additional<br />
communication system at any point in<br />
time, with DPV1 and read or write data<br />
records acyclically.<br />
Communication with a PROFIBUS-DP<br />
Class 2 Master<br />
PCs with PROFIBUS-DP cards are usually class<br />
2 masters.<br />
Communication with a class 2 master always<br />
takes place via DPV1.<br />
Integration with the GSD file<br />
You can download the GSD file for <strong>WL</strong><br />
circuit breakers from the <strong>Siemens</strong> <strong>WL</strong><br />
breaker Support Homepage.<br />
www.sea.siemens.com/wldownload<br />
<strong>WL</strong> PROFIBUS/MODBUS Communication and Electronic Accessories<br />
Click “Search” in the blue header, type<br />
“sentron gsd” and click “go.”<br />
The device parameters are configured using<br />
a configuration tool, which is available with<br />
every PROFIBUS-DP master. If you are using<br />
a SIMATIC S7 as the master, this is the<br />
HWConfig tool provided with the SIMATIC<br />
STEP7 package. If you are not using a<br />
SIMATIC S7, configuration can be carried<br />
out, for example, with COM PROFIBUS,<br />
depending on the master.<br />
Installing the GSD file<br />
If you have not yet installed the GSD file,<br />
which contains the master data for the<br />
circuit breaker, you have to integrate it<br />
in the configuration tool beforehand.<br />
The “HWConfig“ hardware configuration<br />
editor can be used to integrate the GSD file<br />
in the SIMATIC development environment.<br />
To do so, open the “Hardware” object in<br />
the SIMATIC Manager and select “Install<br />
new GSD...” from “Extras.” You then have<br />
to select the source (e.g. disk) and the<br />
‘Siem80C0.gs*’ file. The placeholder (‘*’)<br />
stands for the relevant language index<br />
(g = German, e = English). Once you have<br />
completed this step, the <strong>WL</strong> breaker is<br />
available for further configuration in the<br />
hardware catalog under “PROFIBUS-<br />
DP\Other field devices\Switchgear.”<br />
Note: The GSD file can be used for both the<br />
DP standard and extended data exchange<br />
with DPV1. You cannot set device-specific<br />
parameters using PROFIBUS-DP during<br />
start-up.<br />
SECTION 3<br />
The parameter settings can also be<br />
controlled using the S7 program. A range<br />
of system functions are available here to<br />
transmit data records to the slave via the<br />
DPV1 channel.<br />
Creating a master system<br />
To create a DP master system using the<br />
HWConfig editor:<br />
•Assign a master address between<br />
1-125 (e.g. 11)<br />
• Select the required transmission<br />
rate (e.g. 1.5 Mbit/s)<br />
• Select the PROFIBUS-DP profile<br />
Note: Depending on the PROFIBUS-DP<br />
configuration, you may need to make<br />
further settings in the master system.<br />
Inserting and addressing the slave<br />
First, select “SENTRON <strong>WL</strong>/VL” in the<br />
“Hardware Catalog” and drag it to the<br />
master system.<br />
Note: When the ‘SENTRON <strong>WL</strong>/LV’ slave is<br />
selected, only a machine-readable product<br />
designation number (e.g. 3<strong>WL</strong>9111-0AT15-<br />
0AA0) is displayed for information purposes.<br />
This does not affect the system function.<br />
You then have to select a basic type, which<br />
you can confirm with OK.<br />
To run the slave on PROFIBUS-DP, you still<br />
have to assign and set a unique address on<br />
this PROFIBUS-DP line.<br />
If the properties are to be changed, select<br />
the slave and choose “Properties-DP slave.”<br />
3/2
Integration into an Automation System<br />
<strong>WL</strong> <strong>Circuit</strong> Breaker<br />
Figure<br />
3-1<br />
You can use the STEP7 hardware configuration tool to configure the S7 automation system and its field buses. To add a circuit breaker, you have to configure<br />
either a CPU with an integrated PROFIBUS-DP interface or a PROFIBUS-DP CP card in the rack and then assign it to the PROFIBUS-DP.<br />
Note: You do not have to take the settings<br />
on the “Hex parameterization” tab page<br />
into account here. You cannot assign the<br />
PROFIBUS-DP addresses 0 and 126. Address<br />
0 is for the PG (class 2 master), while 126 is<br />
mainly used for commissioning and as the<br />
“as shipped” status of DP slaves.<br />
Integrating a <strong>WL</strong> circuit breaker using the<br />
GSD file means that it is always integrated<br />
as a standard DP slave. You can, however,<br />
also transmit other data and change<br />
parameters quickly and easily via DPV1.<br />
Figure<br />
3-2<br />
After you have dragged and dropped the SENTRON VL/<strong>WL</strong> from the device library, the system<br />
displays this pop-up. You have to select the circuit breaker basic type which the PLC uses to<br />
configure the circuit breaker.<br />
3/3 <strong>WL</strong> PROFIBUS/MODBUS Communication and Electronic Accessories
Integration into an Automation System<br />
<strong>WL</strong> <strong>Circuit</strong> Breaker<br />
Figure<br />
3-3<br />
Once you have selected the basic type, a SENTRON circuit breaker icon appears next to the PROFIBUS-DP. In the lower part of the split window, you can/must<br />
set the S7 input/output address that can be accessed in the STEP7 program.<br />
<strong>WL</strong> PROFIBUS/MODBUS Communication and Electronic Accessories<br />
SECTION 3<br />
3/4
Integration into an Automation System<br />
<strong>WL</strong> <strong>Circuit</strong> Breaker<br />
Graphic<br />
3-2<br />
Stage 1<br />
Read and/or wirte<br />
data sets acyclically<br />
via DPV1 (optional)<br />
Class 1 master<br />
e.g. S7<br />
Stage 1 provides quick and easy access to<br />
the PROFIBUS-DP communication system.<br />
This stage already includes sufficient data to<br />
fulfill most requirements. Communication in<br />
stage 1 is always carried out with a class<br />
1 master.<br />
event driven<br />
diagnostic message<br />
DPV0 cyclic data transmission<br />
Control<br />
Basic type 1<br />
� � � �<br />
Basic type 2<br />
� � � � � � � �<br />
Basic type 3<br />
� � � � � � � � � � � �<br />
3 <strong>WL</strong> <strong>Circuit</strong> Breaker<br />
3<br />
1<br />
or<br />
Class 2 master<br />
e.g. PC<br />
DPV1 C1 channel DPV1 C2 channel Read and/or wirte<br />
data sets acyclically<br />
via DPV1 (optional)<br />
The 3-stage communication concept not only enables quick and easy access, but also ensures that the system can be adapted for more<br />
complex demands. Stage 1 is standard; stages 2 and 3 optional.<br />
The 3-Stage Communication Concept<br />
This concept provides quick and easy access to the PROFIBUS-DP communication system with <strong>WL</strong> circuit breakers.<br />
Stage 2 Stage 3<br />
The cyclic data contains certain predefined<br />
content. It can be changed in the three basic<br />
types and, therefore, easily adapted to<br />
prevailing requirements (e.g. replacing<br />
phase-to-phase voltage with the number of<br />
operating hours). This is an additional option<br />
to stage 1.<br />
or<br />
2<br />
In stage 3, acyclic data records can, if<br />
required, be read or written by a class 1 or<br />
class 2 master. This is useful for requesting<br />
a large volume of data so that it does not<br />
have to be read cyclically (e.g. waveform<br />
buffer data).<br />
3/5 <strong>WL</strong> PROFIBUS/MODBUS Communication and Electronic Accessories
Integration into an Automation System<br />
<strong>WL</strong> <strong>Circuit</strong> Breaker<br />
Setting the PROFIBUS Address for the<br />
COM15 Module<br />
The PROFIBUS-DP address is stored in the<br />
COM15 PROFIBUS-DP module on the circuit<br />
breaker. The system is shipped with the<br />
default address 126. All the stations on the<br />
PROFIBUS-DP must have a unique address,<br />
which means that a new address must be<br />
assigned when the PROFIBUS-DP modules<br />
are commissioned.<br />
The COM15 module adopts the new address,<br />
although it cannot be used until the 24V DC<br />
supply voltage for the CubicleBUS has been<br />
interrupted briefly. The address is not active<br />
until the voltage is restored.<br />
<strong>WL</strong> PROFIBUS/MODBUS Communication and Electronic Accessories<br />
Figure<br />
3-4<br />
Figure<br />
3-5<br />
SECTION 3<br />
You can also set the communication parameters using the BDA, as well as the parameters<br />
for operation on the Ethernet/intranet/Internet.<br />
You can also use STEP7 to change the PROFIBUS address. To do so, however, the PC with<br />
STEP7 must be connected to the slave by means of an MPI or PROFIBUS interface.<br />
3/6
Integration into an Automation System<br />
<strong>WL</strong> <strong>Circuit</strong> Breaker<br />
Changing the address via the BDA<br />
or BDA Plus (see also Chapter 5)<br />
Once a connection with the circuit breaker<br />
has been established (e.g. via a local pointto-point<br />
(PPP) communication system or<br />
the Ethernet), choose “Device parameters-<br />
Breaker - Communication” and change the<br />
address here. Unlike access via PROFIBUS-DP,<br />
it does not matter whether PROFIBUS-DP<br />
write protection is on or off. As described in<br />
Chapter 5, write actions from the BDA to the<br />
circuit breaker are password protected. The<br />
changes become effective when the correct<br />
password is entered.<br />
Changing the address via STEP7<br />
(Set_Slave_Address)<br />
The COM15 PROFIBUS module supports<br />
the PROFIBUS-DP function Set_Slave_Add.<br />
This class 2 master function can be used to<br />
change the address of a PROFIBUS-DP slave.<br />
The address can be changed either in the<br />
SIMATIC Manager (e.g. Switch ES Power) or<br />
in HWConfig in the STEP7 software package.<br />
To change the address, choose the “Assign<br />
PROFIBUS address” option in the “Target<br />
system” menu in either of the programs.<br />
A window is then displayed that enables<br />
you to change the DP salve addresses once<br />
the system has recognized the stations that<br />
are connected.<br />
The address can only be changed in the<br />
Wait_Prm status; in other words, the slave<br />
must not be cyclically connected to a class 1<br />
master. The address is changed immediately.<br />
Changing the Address Via DS160<br />
The PROFIBUS-DP address of the appropriate<br />
slave is located in data set 160 at byte<br />
position 5. This can not only be read but also<br />
changed by writing to DS160; in other words,<br />
the address can be changed by triggering a<br />
single command to write to DS160 acyclically<br />
in the PLC user program. See also the<br />
example at the end of this chapter.<br />
Changing the COM15 Module Address<br />
with the ETU776<br />
With its structured menu, the ETU776 can<br />
also be used to change the PROFIBUS-DP<br />
address. To do so, first exit the “screensaver”<br />
displaying the current values by pressing<br />
ESC twice. Pressing ESC once (or any one<br />
of the other three keys) activates the<br />
backlight, and pressing it twice calls up<br />
the main menu. You then use the Up/Down<br />
keys to choose the “Change parameters”<br />
option. Confirm your selection by<br />
pressing ENTER. Choose “Profibus” in<br />
the “Communication” sub-menu.<br />
The ETU776 display also enables<br />
you to change the communication<br />
parameters<br />
3/7 <strong>WL</strong> PROFIBUS/MODBUS Communication and Electronic Accessories<br />
Figure<br />
3-6
PROFIBUS Profile<br />
<strong>WL</strong> <strong>Circuit</strong> Breaker<br />
The PROFIBUS User Organization<br />
promotes the use of joint, multi-vendor<br />
profiles for different device classes,<br />
such as motor starters and<br />
measuring instruments.<br />
Cyclic Data Transmission<br />
With cyclic data transmission, a defined<br />
quantity of user data is transmitted with<br />
each message. When the slave (in this case,<br />
the <strong>WL</strong> circuit breaker) is parameterized,<br />
the quantity of data to be transmitted<br />
cyclically between the circuit breaker<br />
and PLC must be defined. Cyclic data<br />
transmission is the best method of<br />
transferring information that is needed<br />
quickly and on a continuous basis. The<br />
interval between two values depends<br />
on the number of stations involved,<br />
the quantity of data, and the baud rate.<br />
The quantity of data cannot be changed<br />
during operation. For this reason, data<br />
transmission that is exclusively cyclic is<br />
suitable for communication that generally<br />
handles small volumes of user data. Cyclic<br />
data transmission, however, is not suitable<br />
when larger data packages are to be<br />
transmitted, for example, for occasional<br />
setting and maintenance checks.<br />
<strong>WL</strong> PROFIBUS/MODBUS Communication and Electronic Accessories<br />
This type of transmission is only required<br />
occasionally and should be taken into<br />
account for each message, because the<br />
messages would become very long and<br />
take a long time to transmit.<br />
Basic Types for Cyclic Data Transmission<br />
Because of the large amount of data<br />
provided by <strong>WL</strong> circuit breakers, a<br />
compromise had to be reached between<br />
the data volume and performance on<br />
PROFIBUS-DP. If only a small amount of<br />
information is used every time a large<br />
amount of data is transmitted in each<br />
exchange (Data_Exchange), the<br />
performance of PROFIBUS-DP can<br />
be affected.<br />
For this reason, three base types are<br />
available to enable efficient and flexible<br />
data transmission. Depending on the<br />
application, the most suitable base type<br />
and accompanying bus configuration can<br />
be selected during configuration. This<br />
is carried out using a PROFIBUS-DP<br />
configuration tool, such as COM PROFIBUS<br />
or HWConfig in SIMATIC S7. The base<br />
types are pre-assigned and enable rapid<br />
commissioning without the need for<br />
additional configuration or parameterization.<br />
A user-defined configuration can also be<br />
created within a base type using the BDA.<br />
Note: Data that is not required all the time<br />
can also be transmitted via DPV1.<br />
PROFIBUS User Organization Profile<br />
The PROFIBUS-DP communication profile<br />
for <strong>WL</strong> circuit breakers was included in<br />
the profile for low-voltage switchgear<br />
and control gear (circuit breakers) by<br />
the PROFIBUS User Organization and<br />
adopted accordingly.<br />
As a result, <strong>WL</strong> circuit breakers communicate<br />
using state-of-the-art technology.<br />
The document can be downloaded from<br />
the PROFIBUS User Organization at:<br />
http://www.profibus.com<br />
Figure<br />
3-7<br />
SECTION 3<br />
<strong>WL</strong> circuit breakers conform to the<br />
PROFIBUS profile for circuit breakers.<br />
3/8
Data Transmission via DPV1<br />
<strong>WL</strong> <strong>Circuit</strong> Breaker<br />
Byte Definition of basic type 1<br />
0/1 Binary status information<br />
2/3 Data block 1<br />
4/5 Data block 2<br />
6/7 Data block 3<br />
8/9 Data block 4<br />
10 PB of data block 1<br />
11 PB of data block 2<br />
12 PB of data block 3<br />
13 PB of data block 4<br />
Table<br />
3-1<br />
Basic Type 1 comprises the binary status<br />
information and four data blocks<br />
Byte Definition of basic type 2<br />
0/1 Binary status information<br />
2/3 Data block 1<br />
4/5 Data block 2<br />
6/7 Data block 3<br />
8/9 Data block 4<br />
10/11 Data block 5<br />
12/13 Data block 6<br />
14/15 Data block 7<br />
16/17 Data block 8<br />
18 PB of data block 1<br />
19 PB of data block 2<br />
20 PB of data block 3<br />
21 PB of data block 4<br />
22 PB of data block 5<br />
23 PB of data block 6<br />
24 PB of data block 7<br />
25 PB of data block 8<br />
Table<br />
3-2<br />
Each data block has its own property byte<br />
Byte Definition of basic type 3<br />
0/1 Binary status information<br />
2/3 Data block 1<br />
4/5 Data block 2<br />
6/7 Data block 3<br />
8/9 Data block 4<br />
10/11 Data block 5<br />
12/13 Data block 6<br />
14/15 Data block 7<br />
16/17 Data block 8<br />
18/19 Data block 9<br />
20/21 Data block 10<br />
22/23 Data block 11<br />
24/25 Data block 12<br />
26/27 Data block 13<br />
28/29 Data block 14<br />
30 PB of data block 1<br />
31 PB of data block 2<br />
32 PB of data block 3<br />
33 PB of data block 4<br />
34 PB of data block 5<br />
35 PB of data block 6<br />
36 PB of data block 7<br />
37 PB of data block 8<br />
38 PB of data block 9<br />
39 PB of data block 10<br />
40 PB of data block 11<br />
41 PB of data block 12<br />
42 PB of data block 13<br />
43 PB of data block 14<br />
Table Byte 44 of basic type 3 contains PLC<br />
3-3<br />
input data<br />
3/9 <strong>WL</strong> PROFIBUS/MODBUS Communication and Electronic Accessories
Data Transmission via DPV1<br />
<strong>WL</strong> <strong>Circuit</strong> Breaker<br />
Byte Default assignment basic<br />
type 1<br />
0/1 Binary status information<br />
2/3 Current in Phase 1<br />
4/5 Current in Phase 2<br />
6/7 Current in Phase 3<br />
8/9<br />
Max. current in phase<br />
under highest load<br />
10 PB of current phase 1<br />
11 PB of current phase 2<br />
12 PB of current phase 3<br />
13<br />
Table<br />
3-4<br />
PB of max. current in phase<br />
under highest load<br />
The default selection of basic type 1<br />
is specially designed for current<br />
transmission<br />
Byte Default assignment basic<br />
type 2<br />
0/1 Binary status information<br />
2/3 Current in Phase 1<br />
4/5 Current in Phase 2<br />
6/7 Current in Phase 3<br />
8/9<br />
Max. current in phase<br />
under highest load<br />
10/11 Current in neutral conductor<br />
12/13<br />
Phase-to-phase voltage<br />
average value<br />
14/15<br />
Average value of power<br />
factors of 3 phases<br />
16/17 Total active energy of 3 phases<br />
18 PB of current phase 1<br />
19 PB of current phase 2<br />
20 PB of current phase 3<br />
21<br />
22<br />
23<br />
PB of max. current in phase<br />
under highest load<br />
PB of current in neutral<br />
conductor<br />
PB of phase-to-phase voltage<br />
average value<br />
24<br />
PB of average value of 3<br />
power factors<br />
25 PB of total active energy<br />
Table<br />
3-5<br />
<strong>WL</strong> PROFIBUS/MODBUS Communication and Electronic Accessories<br />
Basis type 2 with default<br />
selections<br />
Byte Default assignment basic<br />
type 3<br />
0/1 Binary status information<br />
2/3 Current in Phase 1<br />
4/5 Current in Phase 2<br />
6/7 Current in Phase 3<br />
8/9<br />
Max. current in phase under<br />
highest load<br />
10/11 Current in neutral conductor<br />
12/13 Phase-to-phase voltage L12 14/15 Phase-to-phase voltage L 23<br />
16/17 Phase-to-phase voltage L 31<br />
18/19 Neutral-point star voltage L 1N<br />
20/21 Neutral-point star voltage L 2N<br />
22/23 Neutral-point star voltage L 3N<br />
24/25<br />
Mean value of power factors<br />
of 3 phases<br />
26/27 Total active energy of 3 phases<br />
28/29<br />
Total apparent power of 3<br />
phases<br />
30 PB of current phase 1<br />
31 PB of current phase 2<br />
32 PB of current phase 3<br />
33<br />
Table<br />
3-6<br />
PB of max. current in phase under<br />
highest load<br />
34<br />
PB of current in neutral<br />
conductor<br />
35 PB of phase-to-phase voltage L12 36 PB of phase-to-phase voltage L 23<br />
37 PB of phase-to-phase voltage L 31<br />
38<br />
39<br />
40<br />
PB of neutral-point star<br />
voltage L 1N<br />
PB of neutral-point star<br />
voltage L 2N<br />
PB of neutral-point star<br />
voltage L 3N<br />
41<br />
PB of mean value of 3 power<br />
factors<br />
42 PB of total active energy<br />
43 PB of total apparent power<br />
The default selection for basic<br />
type 3 contains 14 measured<br />
values and their property bytes<br />
SECTION 3<br />
3/10
Data Transmission via DPV1<br />
<strong>WL</strong> <strong>Circuit</strong> Breaker<br />
Pre-Assignment of the Three Basic Types<br />
Once a basic type has been selected with<br />
the PROFIBUS-DP master configuration tool,<br />
the configured slave is requested by the<br />
master to communicate in this basic type<br />
at start-up.<br />
Each <strong>WL</strong> circuit breaker can be configured<br />
individually with a different basic type.<br />
Selecting the basic type first defines the<br />
quantity of data and, therefore, the length<br />
of the message.<br />
The key circuit breaker data can now be<br />
transmitted without the need to make any<br />
additional settings. The status of the circuit<br />
breaker is the same for all three basic types.<br />
This information field is 2 bytes in size and<br />
will be explained in more detail later. In<br />
line with the status field, the basic types<br />
comprise between 4 and 14 data blocks,<br />
which are all pre-assigned.<br />
The format for all the pre-assigned<br />
measured values is a one-word integer.<br />
This must be interpreted in Motorola<br />
format, which can be regarded as the<br />
“standard” for PROFIBUS-DP.<br />
Basic Type 1<br />
In line with the 2-byte status information,<br />
basic type 1 comprises four data blocks.<br />
These are pre-assigned in such a way that<br />
they are designed for use with a <strong>WL</strong><br />
circuit breaker without the Metering<br />
Function. The most important phase<br />
currents are transmitted here. This preassignment<br />
can be changed if necessary.<br />
The content can be reconfigured or the<br />
default values changed using the BDA. or<br />
Profibus DP configuration software (e.g.<br />
Switch ES Power).<br />
3/11<br />
Basic Type 2<br />
Basic type 2 comprises 8 data blocks, which<br />
are pre-assigned for a <strong>WL</strong> breaker with the<br />
Metering Function. Not all of the voltages are<br />
transmitted in full, only the main values are<br />
transmitted, which is sufficient in most cases.<br />
Basic Type 3<br />
With basic type 3, the 14 data blocks are<br />
assigned measured values. This basic type<br />
has also been pre-assigned in such a way that<br />
it is only practical to use it with the <strong>WL</strong> with<br />
a metering function if the pre-assigned<br />
values are not modified. As described<br />
above, however, basic type 3 can be<br />
selected and the pre-assigned measured<br />
values that are not available (e.g. phaseto-phase<br />
voltage) can be replaced by<br />
maintenance or parameter data as required.<br />
The pre-assigned data can be replaced with<br />
any information that is no more than 2<br />
bytes long. All the other values are ”cast,”<br />
or, truncated and adapted so that only the<br />
2 least significant bytes are transmitted.<br />
Definition of the Property Byte<br />
Value Data point is ...<br />
0x �0 Read and writable<br />
Least significant<br />
byte<br />
0x �1<br />
0x �2<br />
Read only, but can be reset (e.g. maintenance)<br />
Read only, writable in factory only<br />
0x �3 Read only<br />
0x0� Not available<br />
Most significant<br />
byte<br />
0x4�<br />
0x5�<br />
Available, but option deactivated<br />
Available, but option deactivated and outside the area<br />
0x6� Available and activated, but outside the area<br />
0x7� Available, activated, within the area, and valid<br />
Table<br />
3-7<br />
The property byte describes the properties of the accompanying data point.<br />
Property Byte (PB)<br />
In each of the basic types, the assigned data<br />
blocks are followed by the accompanying<br />
property bytes. Each data block has its own<br />
property byte.<br />
The property byte provides additional<br />
information on the accompanying data<br />
block. Although it does not have to be<br />
analyzed, it may contain important<br />
information for the application. A property<br />
byte is also available for each data point in<br />
the DPV1 data records. If the content of one<br />
or more data blocks in the cyclic message<br />
is replaced, the property byte is adapted<br />
automatically. Property bytes can be used<br />
to determine whether a value is available.<br />
<strong>WL</strong> PROFIBUS/MODBUS Communication and Electronic Accessories
Diagnostic<br />
<strong>WL</strong> <strong>Circuit</strong> Breaker<br />
Binary Status Information in the<br />
Cyclic Channel<br />
The binary status information in the cyclic<br />
channel is transmitted each time data is<br />
exchanged. The status information is<br />
always identical and always transmitted<br />
at the start of the data message, irrespective<br />
of the basic type that has been selected.<br />
Binary Status Information in the Cyclic Message<br />
Byte Bit <strong>WL</strong><br />
Position of circuit breaker<br />
0 = Disconnected position<br />
0/1 1 = Operating position<br />
2 = Test position<br />
3 = <strong>Circuit</strong> breaker not present<br />
Status of circuit breaker<br />
0 = Not ready<br />
Byte n<br />
2/3 1 = OPEN<br />
2 = CLOSED<br />
3 = Tripped<br />
4 Ready to close<br />
5 Voltage applied to undervoltage release<br />
6 Storage spring is charged<br />
7 Overload warning present<br />
0 An activated setpoint value has been exceeded<br />
1 An alarm signal is currently present<br />
2 PROFIBUS write protection block DPWriteEnable is<br />
activated; write operations are prohibited<br />
3 Status of the free user input on the COM15 module<br />
Reason for last trip<br />
Byte n+1<br />
0 = No trip / last trip acknowledged<br />
1 = Long time (L)<br />
4/5/6<br />
2 = Instantaneous (I)<br />
3 = Short-time (S)<br />
4 = Ground fault (G)<br />
5 = Trip as a result of extended protection function<br />
6 = Overload in neutral conductor<br />
7 Load Shedding warning<br />
Table<br />
3-8<br />
The binary status information is identical in all three basic types, and cannot be changed. It is<br />
transmitted with each message from the circuit breaker. Two bytes provide information on the<br />
most important circuit breaker-related status data.<br />
<strong>WL</strong> PROFIBUS/MODBUS Communication and Electronic Accessories<br />
The binary status information comprises<br />
two bytes (not one word, that is, the bytes<br />
do not have to be reversed so that they can<br />
be displayed in Motorola format).<br />
SECTION 3<br />
3/12
Diagnostic<br />
<strong>WL</strong> <strong>Circuit</strong> Breaker<br />
Control Bytes<br />
The three basic types differ with regard to the<br />
quantity and content of the data reported<br />
from the circuit breaker to the class 1<br />
master (e.g. PLC) with each Data_Exchange.<br />
By standard convention, this data refers<br />
to input data from the point of view of<br />
the PLC.<br />
The output data of the class 1 master<br />
is identical in all three basic types. The<br />
control bytes to the circuit breaker are<br />
always two bytes long. These control bytes<br />
can be used to switch the circuit breaker<br />
(open/close), acknowledge trips, and reset<br />
memory contents.<br />
It is sufficient to set the bits for all the<br />
controllers to between 0.5 and 5 seconds<br />
because setting the output is edge triggered.<br />
The control bits must then be reset to<br />
prevent any unwanted actions from<br />
subsequently being triggered.<br />
PROFIBUS Write Protection<br />
(DPWriteEnable)<br />
Important write accesses can be blocked<br />
from the PROFIBUS-DP. For this purpose,<br />
a hardware input is available on the<br />
COM15 module.<br />
If this input is not bridged (active release),<br />
write access is not possible, with noted<br />
exceptions for remote diagnostics. For<br />
additional information on the precise<br />
Control bytes to the circuit breaker<br />
Byte Bit <strong>WL</strong><br />
Switch circuit breaker<br />
0 = Not defined (no action)<br />
0/1 1 = Switch off (open the main contacts)<br />
2 = Switch on (close the main contacts)<br />
3 = Not defined (no action)<br />
Byte n<br />
2<br />
3<br />
A current trip is acknowledged and reset<br />
Not used<br />
4 Activate the free user output on the COM15 module<br />
5 Not used<br />
6 Not used<br />
7 Not used<br />
0/1 Not used<br />
2 Delete trip and event log<br />
3 Reset all min./max. value memories<br />
(except temperature)<br />
Byte n+1<br />
4<br />
5<br />
Reset min./max. temperatures<br />
Not used<br />
6 Reset all resettable maintenance information<br />
and counters<br />
7 Bit for synchronizing the system time to the current<br />
half hour<br />
Table<br />
3-9<br />
All three basic types contain a 2-byte block featuring the most important binary<br />
information transmitted with the message for controlling the circuit breaker<br />
assignment of the write protection inputs<br />
(DPWriteEnable), reference Chapter 2.<br />
The following actions are blocked if the<br />
protection function has not been disabled:<br />
• Open /Close<br />
• Reset the current trip<br />
• Change the protection parameters<br />
• Change the parameters for the<br />
extended protection function<br />
(metering function)<br />
• Change the communication<br />
parameters<br />
• Change the parameters for<br />
the measured value setting<br />
(metering function)<br />
• Reset maintenance information<br />
(counters)<br />
3/13 <strong>WL</strong> PROFIBUS/MODBUS Communication and Electronic Accessories
Diagnostic<br />
<strong>WL</strong> <strong>Circuit</strong> Breaker<br />
The following control functions are<br />
available even without a bridge:<br />
• Change and set the trigger<br />
functions for the waveform buffer<br />
• Read the content of the waveform buffer<br />
• Change the setpoint parameter<br />
• Set/change system time<br />
• Change the free texts (comments,<br />
system IDs)<br />
• Reset the min./max. values<br />
• Change the free user output on the<br />
COM15 module<br />
Write protection ensures that all the<br />
required information is available at the<br />
automation level, but prevents any changes<br />
to the status of the circuit breaker. Changes<br />
can only be made by the operator of the<br />
power distribution system.<br />
Why does the write protection function<br />
permit certain actions?<br />
All actions that are not blocked are for<br />
remote diagnosis only and do not have any<br />
effect on the breaker status. Trips and<br />
curves can, however, be diagnosed more<br />
accurately, even using remote methods.<br />
SYNC and FREEZE<br />
The PROFIBUS-DP features the control<br />
commands SYNC (synchronize outputs)<br />
and FREEZE (freeze inputs) to enable data<br />
exchange to be coordinated.<br />
A DP master with the appropriate<br />
functionality can send the SYNC and/or<br />
FREEZE control commands (broadcast<br />
messages) to a group of DP slaves<br />
simultaneously. For this purpose, the DP<br />
slaves are arranged in SYNC and FREEZE<br />
groups. A maximum of 8 groups can be<br />
created for a master system. Each DP slave,<br />
however, cannot be assigned to more than<br />
one group. SFC11 DPSYNC_FR is used to<br />
trigger the control commands from the S7<br />
user program. Not every master supports<br />
this function.<br />
<strong>WL</strong> PROFIBUS/MODBUS Communication and Electronic Accessories<br />
The SYNC control command enables users<br />
to synchronize the outputs on several<br />
slaves simultaneously. When the control<br />
command SYNC is received, the addressed<br />
DP slaves switch the data from the last<br />
Data_Exchange message from the DP<br />
master in their transfer buffer to the<br />
outputs. This enables output data to be<br />
activated (synchronized) simultaneously<br />
on several DP slaves.<br />
The UNSYNC control command cancels the<br />
SYNC mode of the addressed DP slaves.<br />
The DP slave then resumes cyclic data<br />
transmission, that is, the data sent from<br />
the DP master is immediately switched to<br />
the outputs.<br />
The FREEZE control command enables the<br />
user to “freeze” the input data of DP slaves.<br />
If a FREEZE command is sent to a group of<br />
DP slaves, all of these slaves simultaneously<br />
freeze the signals currently present at their<br />
inputs. These can then be read by the DP<br />
master. The input data in the DP slaves is<br />
not updated until a new FREEZE command<br />
has been received.<br />
The UNFREEZE control command cancels<br />
the FREEZE mode of the addressed DP<br />
slaves so that they resume cyclic data<br />
transmission with the DP master. The<br />
input data is immediately updated by<br />
the DP slave and can then be read by<br />
the DP master.<br />
SECTION 3<br />
Note that once a DP slave has been<br />
restarted or is started for the first time, it<br />
does not switch to SYNC or FREEZE mode<br />
until it has received the first SYNC or<br />
FREEZE command from the DP master.<br />
The <strong>WL</strong> circuit breaker supports both SYNC<br />
and FREEZE mode.<br />
Time Synchronization<br />
Each <strong>WL</strong> circuit breaker is equipped with an<br />
internal clock integrated in the COM15<br />
PROFIBUS-DP module. The system time<br />
cannot be buffered during a power failure.<br />
This internal clock must be set accurately<br />
and synchronized with all other devices in<br />
the system so that if several trips occur,<br />
the source of error can be identified. For<br />
example, the saved messages and the<br />
minimum/maximum values are also<br />
assigned a time stamp and saved. Without<br />
an accurate system time in the COM15,<br />
events could only be assigned time stamps<br />
by a connected PLC with limited accuracy.<br />
To ensure that an accurate time stamp is<br />
provided in conjunction with all the other<br />
circuit breakers, the clock in each device<br />
must be synchronized periodically with the<br />
other circuit breakers to the correct time.<br />
This is carried out as follows:<br />
First import the current time from the<br />
PLC to each circuit breaker. To do so, send<br />
data set 68 with the current system time<br />
to all the circuit breakers via the acyclic<br />
DPV1 channel services. At this point,<br />
the time does not have to be precisely<br />
accurate because it will be corrected<br />
during synchronization.<br />
3/14
Diagnostic<br />
<strong>WL</strong> <strong>Circuit</strong> Breaker<br />
Shortly before 30 minutes have elapsed<br />
(29:50), a SYNC command is sent to all the<br />
devices in question. The bit for synchronizing<br />
the clocks (bit 7 of byte 1 of the control byte)<br />
is then set (29:55). With millisecond<br />
accuracy, a SYNC command is sent again<br />
on the half hour (30:00). In this way, the<br />
clocks for all the devices within the SYNC<br />
group are rounded up or down to the half<br />
hour. Synchronization is not carried out<br />
on the hour because clocks that are fast<br />
would then be one hour ahead of clocks<br />
that are slow.An UNSYNC command must<br />
then be sent and the synchronization bit<br />
(bit 7 of byte 1 of the control byte) reset<br />
so that data exchange can continue. This<br />
procedure should be carried out regularly<br />
on a time-controlled basis, for example, by<br />
GPS in an S7.<br />
Diagnostic Message<br />
By requesting the diagnostic data, the<br />
DP master checks at start-up whether<br />
the DP slave exists and is ready to be<br />
parameterized. The diagnostic data from<br />
the DP slave comprises a diagnostic data<br />
part defined in EN50170 and specific DP<br />
slave diagnostic information. The DP<br />
slave uses the diagnostic data to report<br />
its operating status (PROFIBUS-DP) to the<br />
DP master and, in the event of a diagnosis,<br />
the reason for the diagnostic message. A DP<br />
slave can report a local diagnostic event to<br />
the DP master via the layer-2 message<br />
priority “high prio” of the Data_Exchange<br />
response message in layer 2. The DP<br />
master then requests the diagnostic<br />
data from the DP slave for analysis. If no<br />
current diagnostic events are present, the<br />
Data_Exchange response message is “low<br />
prio.” The diagnostic data of a DP slave<br />
can be requested at any time by a DP<br />
master without necessarily reporting<br />
diagnostic events.<br />
Diagnostic Message for S7 Stations<br />
Diagnostics-capable modules in distributed<br />
peripheral devices can report events, such<br />
as a partial station failure, wire breakage in<br />
a signal module, periphery channel shortcircuit/overload,<br />
or a load voltage supply<br />
failure, using a diagnostic alarm. With an<br />
incoming and outgoing diagnostic alarm,<br />
the organizational block for diagnostic<br />
alarm OB82 is called by the CPU operating<br />
system. If a diagnostic alarm occurs and<br />
OB82 is not programmed, the CPU switches<br />
to the STOP status.<br />
A failure (incoming event) or restoration<br />
(outgoing event) of a DP slave is reported<br />
by the operating system of the S7 CPU via<br />
OB86. If OB86 has not been programmed,<br />
the S7 CPU switches to the STOP status if<br />
an event occurs.<br />
Diagnosing the <strong>WL</strong> <strong>Circuit</strong> Breaker<br />
In accordance with the relevant standards,<br />
the slave reports an external diagnostic<br />
message to the PLC master when it sets<br />
byte 0 to “08” instead of “00.” This is<br />
generated automatically by the ASIC.<br />
If an external diagnostic message is<br />
present, byte 7 is set to “01” instead of<br />
“00” to indicate that an external diagnosis<br />
is present.<br />
The external diagnosis in the <strong>WL</strong> is only<br />
triggered in one of the following statuses:<br />
• The COM15 module is not ready<br />
for operation<br />
• Bit 18.2 and/or 18.3 report a number<br />
that is not 0 (a maintenance message)<br />
• Bit 18.4 is set, indicating the circuit<br />
breaker is not present<br />
• One of the bits in byte 19 = “1”<br />
In bytes 24 to 27, the presence of a module<br />
is entered on the CubicleBUS. If a module is<br />
added, removed, or identified as faulty, the<br />
corresponding bit in byte 19 (19.2, 19.3,<br />
19.4) is set and the affected module<br />
indicated in bytes 20 to 23. An incoming<br />
(i.e. 08 0C 00 xx 80 C0 42 01 05 82 00 00<br />
00 0F 81 01 00...)diagnostic message is<br />
then triggered on the PROFIBUS-DP. If the<br />
module that triggered the diagnosis does<br />
not change in any other way, the message<br />
becomes an outgoing message after 10<br />
seconds (provided that no other reasons<br />
for a diagnosis exist: 00 0C 00 xx 80 C0<br />
42 00 05 82 00 00 00 0F 81 01 00...).<br />
The information on the last change (19.2,<br />
19.3, or 19.4 plus module number bytes<br />
20 to 24) remains until another message<br />
is received. If a module is added, the<br />
corresponding module is indicated in bytes<br />
20 to 24. In the list of modules present,<br />
the module that has been added will not<br />
appear until after the outgoing diagnostic<br />
message has been processed (10 seconds).<br />
The user can always see which module was<br />
last added to the CubicleBUS.<br />
3/15 <strong>WL</strong> PROFIBUS/MODBUS Communication and Electronic Accessories
Diagnostic<br />
<strong>WL</strong> <strong>Circuit</strong> Breaker<br />
Structure of the PROFIBUS Diagnostic Function<br />
Part of the diagnosis Byte.Bit Meaning for <strong>WL</strong><br />
0 Station status 1<br />
1 Station status 2<br />
DP Standard<br />
2 Station status 3<br />
3 PROFIBUS master address<br />
4 ID no. of high byte (0x80)<br />
5 ID no. of low byte (0xC0)<br />
6 0x42 fixed<br />
ID-related diagnosis<br />
Additional header<br />
Device-specific diagnosis<br />
Table<br />
3-10<br />
<strong>WL</strong> PROFIBUS/MODBUS Communication and Electronic Accessories<br />
7<br />
0x00 when no device-specific diagnosis is present<br />
0x01 when a device-specific diagnosis is present<br />
8 0x05 fixed<br />
9 0x82 fixed<br />
10 0x00 fixed<br />
11 0x00 fixed<br />
12 0x00 fixed<br />
13 0x0F fixed<br />
14 0x81 fixed<br />
15 0x01 fixed<br />
16 0x00 fixed<br />
17 0x00 not used<br />
18.0 The COM15 module is not ready for operation<br />
18.1 Not used<br />
State of the main contacts<br />
0= OK<br />
18.2 / 18.3 1 = Perform visual inspection on main contacts<br />
2 = Immediate inspection on main contacts<br />
3 = Not used<br />
18.4 <strong>Circuit</strong> breaker is not present<br />
18.5 –<br />
18.7<br />
Not used<br />
19.0 CubicleBUS not connected<br />
19.1 Not used<br />
19.2 Last action on the CubicleBUS: Module removed<br />
19.3 Last action on the CubicleBUS: Module added<br />
19.4 Last action on the CubicleBUS: Fault detected<br />
19.5 –<br />
19.7<br />
Not used<br />
20.0 – CubicleBUS module, which is removed, added or reports fault<br />
23.7 (19.2 to 19.4)<br />
24.0 –<br />
27.7<br />
Module presence list of the CubicleBUS<br />
SECTION 3<br />
3/16
Diagnostic<br />
<strong>WL</strong> <strong>Circuit</strong> Breaker<br />
Explanation of bytes 20 to 27 in the <strong>WL</strong> diagnostic message<br />
Byte/Bit 7 6 5 4 3 2 1 0<br />
20/24 Not assigned Not assigned Not assigned Not assigned Not assigned Not assigned Not assigned Not assigned<br />
Metering Analog Analog ETU776<br />
21/25 Not assigned<br />
function or<br />
metering<br />
output<br />
module<br />
output<br />
module<br />
graphic<br />
display<br />
Not assigned BDA/BDA Plus Not assigned<br />
function Plus Module #1 Module #2<br />
22/26 Not assigned<br />
inputs<br />
Digital input<br />
module<br />
position<br />
PROFIBUS<br />
Module #1<br />
Digital output<br />
module rotary<br />
coding switch<br />
Breaker<br />
status sensor<br />
switchover<br />
Digital input<br />
module<br />
position<br />
parameter set<br />
Module #2<br />
Digital output<br />
module<br />
rotary coding<br />
switch<br />
Not assigned<br />
Configurable output<br />
module<br />
23/27 Not assigned Not assigned Not assigned Not assigned Not assigned ZSI module ETU COM15<br />
Table<br />
3-11<br />
This table explains bytes 20 to 23 and 24 to 27 of the device-specific diagnosis of the <strong>WL</strong>. Bytes 20 to 23 indicate the module that is referenced for<br />
diagnostic message 19.2 to 19.4 The bytes indicate all of the modules connected to the CubicleBUS.<br />
The same applies to removing modules,<br />
except here, modules that are to be<br />
removed are not removed until the outgoing<br />
diagnostic message has been deleted from<br />
the list of modules present.<br />
If a fault is reported on a module, the<br />
CubicleBUS module remains in the list of<br />
modules present.<br />
Figure<br />
3-8<br />
Outline diagnosis in the STEP7 HWConfig tool displays the diagnostic information in text form.<br />
The modules recognized on the CubicleBUS and the last action on the CubicleBUS are<br />
indicated. Maintenance information is also available.<br />
3/17 <strong>WL</strong> PROFIBUS/MODBUS Communication and Electronic Accessories
Programming Samples<br />
<strong>WL</strong> <strong>Circuit</strong> Breaker<br />
Data Exchange via DPV1<br />
PROFIBUS-DPV1 (DPV1) is an enhancement<br />
of the PROFIBUS-DP protocol. PROFIBUS-DP<br />
and DPV1 devices can be connected to one<br />
line. Being downwards compatible, the<br />
PROFIBUS-DP and DPV1 protocol can run on<br />
the same line. With DPV1, additional data<br />
records with up to 240 bytes of user data<br />
can be transmitted acyclically by means<br />
of user programs, such as STEP7 Switch ES<br />
Power, or WinCC.<br />
In this way, the DPV1 protocol can be used<br />
to transmit parameter, diagnostic, control,<br />
and test data quickly and easily.<br />
One prerequisite here is that a DPV1capable<br />
class 1 master or class 2 master is<br />
available. These can be used to transmit<br />
the above data via an additional channel.<br />
Figure<br />
3-9<br />
<strong>WL</strong> PROFIBUS/MODBUS Communication and Electronic Accessories<br />
With the class 2 master, a communication<br />
link can even be established to slaves that<br />
have not been configured or parameterized<br />
by this master and are still connected<br />
to a class 1 master. A class 2 master is<br />
particularly suitable for commissioning,<br />
diagnosis, and visualization tasks with a<br />
program such as WinCC, for example.<br />
Special system functions that enable<br />
data records to be sent and received are<br />
available in SIMATIC S7 for enhanced<br />
data transmission via DPV1. The following<br />
example illustrates how a data record is read<br />
and written from the <strong>WL</strong> breaker. System<br />
functions SFC58 (write) and SFC59 (read)<br />
are used.<br />
The <strong>WL</strong> diagnostic information is currently in the S7 diagnosis buffer. An incoming<br />
diagnostic message is not present.<br />
SECTION 3<br />
3/18
Programming Samples<br />
<strong>WL</strong> <strong>Circuit</strong> Breaker<br />
Example: Reading and Writing Data<br />
Records with an S7<br />
This example is based on an S7-300 CPU with<br />
an integrated DP interface and STEP7 Version<br />
5.1 or later.<br />
Writing Data Records<br />
In this example, SFC58 is used to write the<br />
protection parameters to DS129. The data is<br />
stored in DB 129 and contains the current<br />
parameters, which are to be sent to the<br />
circuit breaker. In this example, the logical<br />
base address is the same for the inputs and<br />
outputs, this is, ID ‘W#16#54’ is specified. The<br />
request is triggered with an edge on marker<br />
M20.0 and reset with an edge on M20.1 once<br />
it has been processed successfully, enabling<br />
the user to control how the data record is<br />
written. The time required to process the<br />
request depends on the system configuration<br />
and may take several CPU cycles.<br />
If a fault occurs, MW22 is available for<br />
information purposes. For more information,<br />
refer to the reference manual “System<br />
Manual for S7 300/400 System and<br />
Standard Functions.”<br />
Recording Data Records<br />
In this example, DR94 (operating data) is<br />
read using SFC59. The data is stored in DB<br />
94 and contains the current circuit breaker<br />
operating data.<br />
Since the operating principle and<br />
parameters are identical to system function<br />
SFC58, it will not be discussed in any<br />
further detail here.<br />
Figure<br />
3-10<br />
The STEP7 program code shows how the<br />
entire DR129 is written from DB129 to the<br />
device. The write process is triggered once<br />
by marker M20.0<br />
Note: The value specified for parameter<br />
“IOID” depends on the logical base address<br />
“LADDR.” The smaller input or output<br />
address, which is displayed or was entered<br />
under DP Slave Properties on the “Address /<br />
ID” tab page, is always used as the logical<br />
base address. Depending on whether an<br />
input or output address exists, the ID’s<br />
‘B#16#54’ for the input and ‘B#16#55’ for<br />
the output are specified for the ‘IOID’<br />
parameter. If the input and output<br />
addresses are identical, the ID ‘B#15#54’<br />
for inputs is also parameterized.<br />
For more information on the system<br />
functions, refer to the reference manual<br />
“System Software for S7-300/400 System<br />
and Standard Functions.”<br />
This program example shows how DR94 is<br />
read and stored in DB94 in STEP7. The<br />
process is triggered by setting marker<br />
M20.4. Cyclic updates are not carried out.<br />
3/19 <strong>WL</strong> PROFIBUS/MODBUS Communication and Electronic Accessories<br />
Figure<br />
3-11<br />
Cyclic (Recurring) Use of<br />
Acyclic Services<br />
If data is to be read via the C1 channel<br />
(DPV1 class 1 master) or C2 channel (DPV1<br />
class 2 master) in a recurring time frame,<br />
the minimum interval between two read<br />
requests for each channel must be 200ms.<br />
Write requests via the C1 or C2 channel<br />
should generally be sent on an eventcontrolled<br />
basis rather than in a recurring<br />
time frame.<br />
If these intervals are undershot, resource<br />
problems can occur in the communication<br />
interfaces, which could, in turn, result in<br />
communication on the C1 and/or C2<br />
channels being interrupted.
Certification<br />
<strong>WL</strong> <strong>Circuit</strong> Breaker<br />
Figure<br />
3-12<br />
Certificates for <strong>WL</strong> and VL. It used to be the case that two products tested in two different test centers (Furth, Germany, and Johnson City, USA) were issued a<br />
common PROFIBUS certificate.<br />
<strong>WL</strong> PROFIBUS/MODBUS Communication and Electronic Accessories<br />
SECTION 3<br />
3/20
Notes<br />
<strong>WL</strong> PROFIBUS/MODBUS Communication and Electronic Accessories
MODBUS Profile<br />
for <strong>WL</strong> <strong>Circuit</strong> Breaker<br />
MODBUS Communications with the 4-1<br />
<strong>WL</strong> <strong>Circuit</strong> Breaker<br />
Integration into Supervisory Systems 4-2 – 4-6<br />
Supported Function Codes 4-7 – 4-8<br />
Exception Responses 4-9 – 4-10<br />
Default Register List 4-11 – 4-15<br />
<strong>WL</strong> Configurator Brief Description 4-16<br />
<strong>WL</strong> PROFIBUS/MODBUS Communication and Electronic Accessories<br />
SECTION 4
Communication with the <strong>WL</strong> Breaker<br />
<strong>WL</strong> <strong>Circuit</strong> Breaker<br />
The <strong>WL</strong> <strong>Circuit</strong> Breaker supports the<br />
industry standard MODBUS protocol<br />
through the COM16 interface.<br />
Communication connections to the<br />
COM16 are made through the DB-9 port<br />
on the front of the COM16; see Graphic<br />
4-2 for connecting cable pin assignments.<br />
Customers can connect twisted shielded<br />
pair RS 485 cable to Ethernet Converters,<br />
MODBUS Masters, PLCs or supervisory control<br />
systems. When the <strong>WL</strong> <strong>Circuit</strong> Breaker is<br />
installed in <strong>Siemens</strong> switchgear as part of<br />
an ACCESS power monitoring system, the<br />
default wiring will be through a <strong>Siemens</strong><br />
power meter Ethernet gateway or Ethernet<br />
converter connected to a WinPM.Net<br />
workstation. For customers with existing<br />
MODBUS networks or who require<br />
Graphic<br />
4-1<br />
WinPM.Net<br />
integration into a MODBUS system the<br />
following information can be used<br />
to develop a software interface to the<br />
<strong>WL</strong> COM16.<br />
Data in the COM16 is organized in what is<br />
referred to as “Datasets.” Each dataset<br />
contains a group of functionally common<br />
registers. For instance all metered data is<br />
organized in a dataset, which consists of<br />
119 registers, min./max. information in<br />
another dataset, and diagnostic information<br />
in another dataset. In all, the COM16 has a<br />
total of 28 datasets, which can be read via<br />
communication. Users can take advantage<br />
of this structure and ask for blocks of data<br />
in one message request, making integration<br />
into MODBUS systems fast and efficient.<br />
The COM16 also supports pre-configured<br />
or standard register maps for simple data<br />
interfacing. Users can define what types<br />
of data they want in any of three default<br />
register sets. Type 1 provides 4 default<br />
registers, Type 2 provides 8 registers, and<br />
Type 3 provides 14 registers, all in<br />
consecutive order for easy requests.<br />
Each register includes a corresponding<br />
status register, which can be read in order<br />
to validate the real-time data. This register<br />
is referred to as the property byte.<br />
The <strong>WL</strong> <strong>Circuit</strong> Breaker can be configured<br />
remotely using the WinPM.Net software or<br />
using the set-up tool, <strong>WL</strong> Config.<br />
<strong>Siemens</strong> Power Monitoring and control software WinPM.Net communicates to multiple device types using Ethernet, modem and RS 485 serial networks.<br />
The integration of the <strong>WL</strong> <strong>Circuit</strong> Breaker into WinPM.Net is a key component of totally integrated power.<br />
4/1 <strong>WL</strong> PROFIBUS/MODBUS Communication and Electronic Accessories
Integration into Supervisory Systems<br />
<strong>WL</strong> <strong>Circuit</strong> Breaker<br />
Graphic 4-2<br />
1 2 3 4 5<br />
6 7 8<br />
Pin 1 - Common<br />
Pin 5 - B, Tx/Rx +<br />
Pin 9 - A, Tx/Rx –<br />
Function 01: Read Coils<br />
9<br />
COM16 Supported Function Codes<br />
Data formatting byte order<br />
Data points larger than two bytes are transmitted in the Motorola Format (Big-Endian)<br />
Byte order Type of data<br />
Byte 0 Byte 0<br />
Byte 1 Byte 1<br />
Byte 0 High byte<br />
Byte 1 Low byte<br />
Byte 0 High byte<br />
Byte 1 Low byte<br />
Byte 2 High byte<br />
Byte 3 Low byte<br />
High word<br />
Low word<br />
Function This function reads the state of multiple Control Bits and Extra Flags in a COM16 slave.<br />
char, unsigned char<br />
signed int, unsigned int<br />
signed long, unsigned long<br />
Bit Start Address Any value from 0000 hex to 000F hex. If any other address is specified, an Exception Code of 02 (Invalid Data Address)<br />
will be returned.<br />
Quantity of Bits If “Quantity of Bits” is not in the range of 1 to 16, an Exception Code of 03 (Invalid Data Value) will be returned. If an attempt<br />
to read a bit beyond Bit Address 000F hex is made, an Exception Code of 02 (Invalid Data Address) will be returned.<br />
Function 02: Read Discrete Inputs<br />
Function This function reads the state of the bits in the Status Register in a COM16 slave.<br />
Bit Start Address Any value from 0000 hex to 000F hex. If any other address is specified, an Exception Code of 02 (Invalid Data Address)<br />
will be returned.<br />
Quantity of Bits If “Quantity of Bits” is not in the range of 1 to 16, an Exception Code of 03 (Invalid Data Value) will be returned. If an attempt<br />
to read a bit beyond Bit Address 000F hex is made, an Exception Code of 02 (Invalid Data Address) will be returned.<br />
<strong>WL</strong> PROFIBUS/MODBUS Communication and Electronic Accessories<br />
SECTION 4<br />
Default Communication Parameters<br />
The COM16 comes set-up with the following default Communication Parameters:<br />
Graphic 4-3<br />
Baud: 19,200 Unit ID: 126 Parity: Even<br />
4/2
Integration into Supervisory Systems<br />
<strong>WL</strong> <strong>Circuit</strong> Breaker<br />
Function 03: Read Holding Registers<br />
Function This function reads a set of registers from a COM16 slave.<br />
Start Address Any value within the address range defined for each of the data sets. If any other address is specified, an Exception Code<br />
of 02 (Invalid Data Address) will be returned.<br />
Quantity of Registers If “Quantity of Registers” is not in the range of 1 to 125, an Exception Code of 03 (Invalid Data Value) will be returned. If<br />
the “Quantity of Registers” is not correct for the Dataset indicated by the “Start Address”, an Exception Code of 02 (Invalid<br />
Data Address) will be returned.<br />
Example:<br />
Request Message to slave<br />
The following is an example of a request to read Dataset 0 from a COM16 slave device at<br />
MODBUS address 7. The length of Dataset 0 is 4 bytes.<br />
07H Slave Address<br />
03H Function Code<br />
00H Register Start Address "High" (Dataset 0 address is 0000 hex)<br />
b7H Register Start Address "Low"<br />
00H Quantity of Registers "High" (Register quantity is 4 decimal)<br />
04H Quantity of Registers "Low"<br />
xxH CRC Check Code "Low"<br />
xxH CRC Check Code "High"<br />
Reply Message from slave<br />
The response returns 2 registers containing the contents of Dataset 0.<br />
07H Slave Address<br />
03H Function Code<br />
04H Byte Count (Bytes returned is 4)<br />
00H Register Address 00H Data "High"<br />
03H Register Address 00H Data "Low"<br />
00H Register Address 00H Data "High"<br />
00H Register Address 01H Data "Low"<br />
xxH CRC Check Code "Low"<br />
xxH CRC Check Code "High"<br />
4/3 <strong>WL</strong> PROFIBUS/MODBUS Communication and Electronic Accessories
Integration into Supervisory Systems<br />
<strong>WL</strong> <strong>Circuit</strong> Breaker<br />
Function 04: Read Input Registers<br />
Function This function reads the Basic Data Registers from a COM16 slave. All three Basic Types (1, 2 and 3) are supported. (see pages 4/11<br />
and 4/12 for Basic Data)<br />
Start Address Any Data Block register address that is valid for the currently selected Basic Type. If any other address is specified, an Exception<br />
Code of 02 (Invalid Data Address) will be returned.<br />
Quantity of If “Quantity of Registers” is not in the range of 1 to 125, an Exception Code of 03 (Invalid Data Value) will be returned. If the<br />
Registers<br />
“Quantity of Registers” specified attempts to read beyond the last register of the currently selected Basic Type, an Exception Code<br />
02 (Invalid Data Address) will be returned.<br />
Function 05: Write Single Coil<br />
Function This function sets the state of a single Control bit or Extra flag in a COM16 slave.<br />
Bit Address Any value from 0000 hex to 000F hex. If any other address is specified, an Exception Code of 02 (Invalid Data Address)<br />
will be returned.<br />
Bit status The following two values are valid as the Bit Status:<br />
FF00H set bit<br />
0000H clear bit<br />
If any other value is specified, an Exception Code of 03 (Invalid Data Value) will be returned.<br />
Function 07: Read Exception Status<br />
Function This function reads the state of eight Exception Status bits from the COM16 slave. The bits are defined in Table 3-1.<br />
Bit Number <strong>WL</strong><br />
0 Set = Inspect breaker contacts*<br />
1 Set = Communication with trip unit is OK<br />
2 Set = COM16 is OK<br />
3 not defined, always zero<br />
4 not defined, always zero<br />
5 not defined, always zero<br />
6 not defined, always zero<br />
7 not defined, always zero<br />
Table 4-1<br />
*Refer to the Operator's Manual for proper procedure (only for <strong>WL</strong> ANSI / UL 1066 version).<br />
<strong>WL</strong> PROFIBUS/MODBUS Communication and Electronic Accessories<br />
SECTION 4<br />
4/4
Integration into Supervisory Systems<br />
<strong>WL</strong> <strong>Circuit</strong> Breaker<br />
Function 08: Diagnostics<br />
Function This function provides a method for checking the communication between the master and a COM16 slave. COM16 slaves<br />
support the diagnostic sub-functions Return Query Data (0000 hex) and Clear Event Counter (000A hex).<br />
Diagnostic Code 0000 hex: Echoes the test data sent by the master.<br />
000A hex: Clears the COM16 slave’s communications counters. (The data field for both Request and Reply is set to 0000 hex.)<br />
If any other value is specified, an Exception Code of 03 (Invalid Data Value) will be returned.<br />
Function 11: Get Communication Event Counter<br />
Function Returns a status word and an event count from the COM16 slave's communications event counter. The event counter is<br />
incremented once for each successful message completion. It is not incremented for exception responses or Fetch<br />
Communication Event Counter commands. The event counter can be reset by means of the Diagnostics function (code 08),<br />
with the sub-function Clear Counters (code 000A hex).<br />
The normal response contains a two-byte status word, and a two-byte event count. The status word will be all ones (FFFF hex)<br />
if the COM16 slave is still processing a previously issued program command (a busy condition exists). Otherwise, the status<br />
word will be all zeros.<br />
Function 12: Get Communication Event Log<br />
Function Returns a status word, event count, message count and a field of event bytes from the slave. The status word and event count<br />
are identical to that returned by Function 11 (Fetch Communications Event Counter). The message counter is incremented<br />
once for each message processed by the slave. The event bytes field contains 64 bytes, with each byte corresponding to the<br />
status of one MODBUS send or receive operation for the slave. The slave enters the events into the field in chronological<br />
order. Byte 1 is the most recent event. Each new byte flushes the oldest byte from the field.<br />
The normal response contains a two-byte Status field, a two-byte Event Count field, a two-byte Message Count field and a 64<br />
byte Event Byte field. The Byte Count contains the total number of bytes in these four fields.<br />
4/5 <strong>WL</strong> PROFIBUS/MODBUS Communication and Electronic Accessories
Integration into Supervisory Systems<br />
<strong>WL</strong> <strong>Circuit</strong> Breaker<br />
What the Event Bytes Contain<br />
For a COM16 slave, an event byte returned by the Fetch<br />
Communications Event Log function can be either of two types.<br />
The type is defined by bit 7 (the high–order bit) in each byte.<br />
<strong>WL</strong> PROFIBUS/MODBUS Communication and Electronic Accessories<br />
COM16 slave Receive Event<br />
The slave stores this type of event byte when a query message is<br />
received. It is stored before the slave processes the message. This<br />
event is defined by bit 7 set to a logic “1”. The other bits will be<br />
set to a logic “1” if the corresponding condition is TRUE. The bit<br />
layout is:<br />
Bit Contents<br />
0 Not Used<br />
1 Communications Error<br />
2 Not Used<br />
3 Not Used<br />
4 Character Overrun<br />
5 Currently in Listen Only Mode (always zero, the COM16 does not<br />
support Listen Only Mode)<br />
6 Broadcast Received<br />
7 1<br />
Table 4-2<br />
COM16 slave Send Event<br />
The slave stores this type of event byte when it finishes processing<br />
a query message. It is stored if the slave returned a normal or<br />
exception response, or no response. This event is defined by bit 7<br />
set to a logic “0”, with bit 6 set to a “1”. The other bits will be set to<br />
a logic “1” if the corresponding condition is TRUE.<br />
The bit layout is:<br />
Bit Contents<br />
0 Read Exception Sent (Exception Codes 1-3)<br />
1 Slave Abort Exception Sent (Exception Code 4)<br />
2 Slave Busy Exception Sent (Exception Codes 5-6)<br />
3 Slave Program NAK Exception Sent (Exception Code 7)<br />
4 Write Timeout Error Occurred<br />
5 Currently in Listen Only Mode (always zero, the COM16 does not<br />
support Listen Only Mode)<br />
6 1<br />
7 0<br />
Table 4-3<br />
SECTION 4<br />
4/6
Supported Function Codes<br />
<strong>WL</strong> <strong>Circuit</strong> Breaker<br />
Function 15: Write Multiple Coils<br />
Function This function sets the state of multiple control bits and extra flags in a COM16 slave.<br />
Bit Start Address Any value from 0000 hex to 000F hex. If any other address is specified, an Exception Code of 02 (Invalid Data Address) will<br />
be returned.<br />
Quantity of Bits If “Quantity of Bits” is not in the range of 1 to 16, an Exception Code of 03 (Invalid Data Value) will be returned. If an attempt to<br />
write a bit beyond Bit Address 000F hex is made, an Exception Code of 02 (Invalid Data Address) will be returned.<br />
Byte Count This is the “Quantity of Bits” / 8. If the division remainder is non-zero, then 1 is added to “Byte Count”. If “Byte Count” is incorrect, an<br />
Exception Code of 03 (Invalid Data Value) is returned.<br />
The following is an example of a request to set the state of six extra flags in a COM16 slave device at MODBUS address 7. Attempts<br />
to change unused bits will have no effect. Setting the indicated bits would: Clear Logs, Clear Min./Max., Clear Counters and Sync<br />
Time Stamp.<br />
Bit: 10 11 12 13 14 15<br />
State: 1 1 0 0 1 1<br />
The data contents are one byte: 33 hex (0011 0011 binary). The binary bits correspond in the following way:<br />
The byte transmitted (33 hex) addresses bits 10 ... 15, with the least significant bit addressing the lowest bit (10) in this set. The<br />
unused bits are zero-filled.<br />
The response returns the slave address, function code, starting address and Quantity of Bits written.<br />
4/7 <strong>WL</strong> PROFIBUS/MODBUS Communication and Electronic Accessories
Supported Function Codes<br />
<strong>WL</strong> <strong>Circuit</strong> Breaker<br />
Function 16: Write Multiple Registers<br />
Function This function writes a complete Dataset to a COM16 slave.<br />
Start Address Any value within the address range defined for each of the data sets. If any other address is specified, an Exception<br />
Code of 02 (Invalid Data Address) will be returned.<br />
Quantity of Registers If “Quantity of Registers” is not in the range of 1 to 125, an Exception Code of 03 (Invalid Data Value) will be<br />
returned. If the “Quantity of Registers” is not correct for the Dataset indicated by the “Start Address”, an Exception<br />
Code of 02 (Invalid Data Address) will be returned.<br />
Example:<br />
Request Message to slave<br />
The following is an example of a write of Dataset 93 (Control Metering/Trip Unit) to a<br />
COM11/COM16 slave device at Modbus address 7. Some Datasets, such as Dataset 93,<br />
do not end on an even word boundary. For these Datasets an extra 0 filled byte is<br />
added to the end of the Dataset for both reads and writes.<br />
07H Slave Address<br />
10H Function Code (16 decimal)<br />
5DH Register Start Address "High" (Dataset 93 address is 5D00 hex)<br />
00H Register Start Address "Low"<br />
00H Quantity of Registers "High"<br />
0EH Quantity of Registers "Low" (14 decimal)<br />
1CH Byte Count (28 decimal)<br />
00H Register Address 5DH Data "High"<br />
00H Register Address 00H Data "Low"<br />
.<br />
.<br />
.<br />
00H Register Address 5DH Data "High"<br />
00H Register Address 1AH Data "Low"<br />
xxH CRC Check Code "Low"<br />
xxH CRC Check Code "High"<br />
Reply Message from slave<br />
The response returns the Start Address and the number of registers written.<br />
07H Slave Address<br />
10H Function Code (16 decimal)<br />
5DH Register Start Address "High" (Dataset 93 address is 5D00 hex)<br />
00H Register Start Address "Low"<br />
00H Quantity of Registers "High"<br />
0EH Quantity of Registers "Low" (14 decimal)<br />
xxH CRC Check Code "Low"<br />
xxH CRC Check Code "High"<br />
<strong>WL</strong> PROFIBUS/MODBUS Communication and Electronic Accessories<br />
SECTION 4<br />
4/8
Exception Responses<br />
<strong>WL</strong> <strong>Circuit</strong> Breaker<br />
Except for broadcast messages, when a master device sends a<br />
query to a slave device, it expects a normal response. One of<br />
four possible events can occur from the master's query:<br />
1. If the slave device receives the query without a<br />
communication error, and can handle the query normally,<br />
it returns a normal response.<br />
2. If the slave does not receive the query due to a communication<br />
error, no response is returned. The master program will<br />
eventually process a timeout condition for the query.<br />
3. If the slave receives the query, but detects a communication<br />
error (parity or CRC), no response is returned. The master<br />
program will eventually process a timeout condition for<br />
the query.<br />
4. If the slave receives the query without a communication error,<br />
but cannot handle it (for example, if the request is to read a<br />
non-existent coil or register), the slave will return an exception<br />
response informing the master of the nature of the error.<br />
The exception response message has two fields that differentiate<br />
it from a normal response:<br />
Function Code Field: In a normal response, the slave echoes the<br />
function code of the original query in the function code field of the<br />
response. All function codes a most-significant bit (MSB) of 0 (their<br />
values are all below 80 hex). In an exception response, the slave<br />
sets the MSB of the function code to 1 (adds 80 hex to the function<br />
code). With the function code's MSB set, the master's application<br />
program can recognize the exception response and can examine<br />
the data field for the exception code.<br />
Data Field: In a normal response, the slave may return data or<br />
statistics in the data field (any information that was requested<br />
in the query). In an exception response, the slave returns an<br />
exception code in the data field. This defines the slave condition<br />
that caused the exception.<br />
Example: Request Message to slave<br />
The following is an example of a request to read Dataset 1<br />
(Diagnostic Information) from a COM16 slave device at MODBUS<br />
address 7. Dataset 1 has 8 registers, but in this example, the<br />
Master tries to read just 6 registers.<br />
07H Slave Address<br />
03H Function Code<br />
01H Register Start Address “High” (Dataset 1 address is<br />
0100 hex)<br />
00H Register Start Address “Low”<br />
00H Quantity of Registers “High”<br />
06H Quantity of Registers “Low” (6 registers is<br />
not valid)<br />
xxH CRC Check Code “Low”<br />
xxH CRC Check Code “High”<br />
Reply Message from slave<br />
The response returns the function code with the high bit set<br />
indicating an exception response. The Exception Code returned<br />
is 03 (Invalid Data Value). This exception code indicates that an<br />
illegal amount of data was specified for the requested Dataset.<br />
07H Slave Address<br />
83H Function Code<br />
03H Exception Code (Illegal Register Amount)<br />
xxH CRC Check Code “Low”<br />
xxH CRC Check Code “High”<br />
4/9 <strong>WL</strong> PROFIBUS/MODBUS Communication and Electronic Accessories
Exception Responses<br />
<strong>WL</strong> <strong>Circuit</strong> Break<br />
Exception Codes<br />
The following functions are not supported by the COM16. If a<br />
COM16 slave receives a query for any of these functions, an<br />
Exception Code of 01 (Illegal Function) will be the response.<br />
Function 06: Write Single Register<br />
Function 17: Report Slave ID<br />
Function 20: Read General Reference<br />
Function 21: Write General Reference<br />
Function 22: Mask Write 4X Register<br />
Function 23: Read/Write 4X Registers<br />
Function 24: Read FIFO Queue<br />
<strong>WL</strong> PROFIBUS/MODBUS Communication and Electronic Accessories<br />
SECTION 4<br />
Code Name Meaning<br />
01 hex Illegal Function The function code received in the query is not an allowable action for the COM16 slave. If a Poll Program<br />
Complete command was issued, this code indicates that no program function preceded it.<br />
02 hex Illegal Data Address The data address received in the query is not an allowable address for the COM16 slave.<br />
03 hex Illegal Data Value A value contained in the query data field is not an allowable value for the COM16 slave.<br />
04 hex Slave Device Failure An unrecoverable error occurred while the COM16 slave was attempting to perform the requested action.<br />
05 hex Acknowledge The COM16 slave has accepted the request and is processing it, but a long duration of time will be required to do<br />
so. This response is returned to prevent a timeout error from occurring in the master. The master can next issue a<br />
Poll Program Complete message to determine if processing is completed.<br />
06 hex Slave Device Busy The COM16 slave is still busy processing the previous request. The master should re-transmit the message later<br />
when the COM16 slave is free.<br />
07 hex Negative Acknowledge This code is returned for an unsuccessful programming request using function code 13 or 14 decimal.<br />
The COM16 slave will never return this exception response since it does not support function 13 or 14.<br />
08 hex Memory Parity Error The COM16 slave attempted to read extended memory, but detected a parity error in the memory. The master<br />
can retry the request, but service may be required on the COM16 slave device.<br />
Table 4-4<br />
4/10
Default Register List<br />
<strong>WL</strong> <strong>Circuit</strong> Break<br />
Default Register Lists (Function 04 Data Blocks)<br />
Basic Data Type 1 Registers and Default Data Points<br />
Register Byte Name Default Data Point – <strong>WL</strong><br />
1 0, 1 Status Register <strong>WL</strong> status bits<br />
2 2, 3 Data Block 1 Phase 1 current (24070)<br />
3 4, 5 Data Block 2 Phase 2 current (24071)<br />
4 6, 7 Data Block 3 Phase 3 current (24072)<br />
5 8, 9 Data Block 4 Max current in phase under highest load (13150)<br />
6<br />
7<br />
Table 4-5<br />
Table 4-6<br />
10 Block 1 property byte PB of phase 1 current<br />
11 Block 2 property byte PB of phase 2 current<br />
12 Block 3 property byte PB of phase 3 current<br />
13 Block 4 property byte PB of max current in phase under highest load<br />
Basic Data Type 2 Registers and Default Data Points<br />
Register Byte Name Default Data Point – <strong>WL</strong><br />
1 0, 1 Status Register <strong>WL</strong> status bits<br />
2 2, 3 Data Block 1 Phase 1 current (24070)<br />
3 4, 5 Data Block 2 Phase 2 current (24071)<br />
4 6, 7 Data Block 3 Phase 3 current (24072)<br />
5 8, 9 Data Block 4 Max current in phase under highest load (13150)<br />
6 10, 11 Data Block 5 Current in neutral conductor (13152)<br />
7 12, 13 Data Block 6 Average phase to phase voltage (24083)<br />
8 14, 15 Data Block 7 Average of power factors of 3 phases (13149 OR 24114)<br />
9 16, 17 Data Block 8 Total active energy of 3 phases* (24106)<br />
10<br />
11<br />
12<br />
13<br />
18 Block 1 property byte PB of phase 1 current<br />
19 Block 2 property byte PB of phase 2 current<br />
20 Block 3 property byte PB of phase 3 current<br />
21 Block 4 property byte PB of max current in phase under highest load<br />
22 Block 5 property byte BP of current in neutral conductor<br />
23 Block 6 property byte BP of average phase to phase voltage<br />
24 Block 7 property byte BP of average of power factors of 3 phases<br />
25 Block 8 property byte BP of total active energy of 3 phases<br />
*Only 2 bytes of the 4 byte data point will be communicated (range: 0 - 65535MWh)<br />
4/11 <strong>WL</strong> PROFIBUS/MODBUS Communication and Electronic Accessories
Default Register List<br />
<strong>WL</strong> <strong>Circuit</strong> Break<br />
Basic Data Type 3 Registers and Default Data Points<br />
Register Byte Name Default Data Point – <strong>WL</strong><br />
1 0, 1 Status Register <strong>WL</strong> status bits<br />
2 2, 3 Data Block 1 Phase 1 current (24070)<br />
3 4, 5 Data Block 2 Phase 2 current (24071)<br />
4 6, 7 Data Block 3 Phase 3 current (24072)<br />
5 8, 9 Data Block 4 Max current in phase under highest load (13150)<br />
6 10, 11 Data Block 5 Current in neutral conductor (13152)<br />
7 12, 13 Data Block 6 Phase to phase voltage L1 to L2 (24077)<br />
8 14, 15 Data Block 7 Phase to phase voltage L2 to L3 (24078)<br />
9 16, 17 Data Block 8 Phase to phase voltage L3 to L1 (24879)<br />
10 18, 19 Data Block 9 Phase to neutral voltage L1 (24080)<br />
11 20, 21 Data Block 10 Phase to neutral voltage L2 (24081)<br />
12 22, 23 Data Block 11 Phase to neutral voltage L3 (24082)<br />
13 24, 25 Data Block 12 Average of power factors of 3 phases (13149 OR 24114)<br />
14 26, 27 Data Block 13 Total active energy of 3 phases* (24106)<br />
15 28, 29 Data Block 14 Total apparent power of 3 phases (24085)<br />
16<br />
17<br />
18<br />
19<br />
20<br />
21<br />
22<br />
Table 4-7<br />
30 Block 1 property byte PB of phase 1 current<br />
31 Block 2 property byte PB of phase 2 current<br />
32 Block 3 property byte PB of phase 3 current<br />
33 Block 4 property byte PB of max current in phase under highest load<br />
34 Block 5 property byte PB of current in neutral conductor<br />
35 Block 6 property byte PB of phase to phase voltage L1 to L2<br />
36 Block 7 property byte PB of phase to phase voltage L2 to L3<br />
37 Block 8 property byte PB of phase to phase voltage L3 to L1<br />
38 Block 9 property byte PB of phase to neutral voltage L1<br />
39 Block 10 property byte PB of phase to neutral voltage L2<br />
40 Block 11 property byte PB of phase to neutral voltage L3<br />
41 Block 12 property byte PB of average of power factors of 3 phases<br />
42 Block 13 property byte PB of total active energy of 3 phases*<br />
43 Block 14 property byte PB of total apparent power of 3 phases<br />
*Only 2 bytes of the 4 byte data point will be communicated (range: 0 - 65535MWh)<br />
<strong>WL</strong> PROFIBUS/MODBUS Communication and Electronic Accessories<br />
SECTION 4<br />
For additional information on the controlling documents for the definitions of all MODBUS Public Function Codes referenced may be downloaded in PDF<br />
format from the MODBUS website http://www.modbus.org.<br />
4/12
Default Register List<br />
<strong>WL</strong> <strong>Circuit</strong> Break<br />
Complete List of Datasets<br />
Datasets: addresses, number of registers and read/write access of each.<br />
Starting Padding Read/<br />
register Number Number of byte write<br />
Dataset Description address of registers data bytes required access<br />
0 NST 2000/S7 diagnostic information 0000h 2 4 — Rd<br />
1 NST 2000/S7 diagnostic information (includes DS0) 0100h 8 16 — Rd<br />
51 Main overview 3300h 119 238 — Rd<br />
60 Control waveform 3C00h 28 55 Yes Rd/Wr<br />
61 Diagnostic waveform 3D00h 27 54 — Rd<br />
62 Diagnostic waveform data channel A and B 3E00h 120 240 — Rd<br />
64 Diagnostic harmonics 4000h 66 131 Yes Rd<br />
68 Modules information overview 4400h 23 45 Yes Rd/Wr<br />
69 Control modules 4500h 22 43 Yes Rd<br />
72 Metering data: min./max. current, form factor,<br />
crest factor 4800h 118 236 — Rd<br />
73 Metering data: min./max. voltage 4900h 87 174 — Rd<br />
74 Metering data: min./max. power 4A00h 68 136 — Rd<br />
76 Metering data: min./max. frequency and THD 4C00h 46 92 — Rd<br />
77 Metering data: min./max. temperature 4D00h 29 58 — Rd<br />
78 Metering data: min./max. current (VL only) 4E00h 52 104 — Rd<br />
91 Statistic information 5B00h 42 84 — Rd<br />
92 Diagnostic breaker 5C00h 97 194 — Rd<br />
93 Control metering/trip unit 5D00h 14 27 Yes Wr<br />
94 Metering data 5E00h 99 197 Yes Rd<br />
97 Identification details 6100h 112 223 Yes Rd<br />
98 HW/SW versions 6200h 47 93 Yes Rd<br />
100 Identification NST2000 6400h 50 100 — Rd<br />
128 Metering parameters 8000h 52 103 Yes Rd/Wr<br />
129 Protective parameters 8100h 70 139 Yes Rd/Wr<br />
130 Set point parameters 8200h 74 148 — Rd/Wr<br />
131 Parameters ON/OFF 8300h 35 70 — Rd/Wr<br />
160 Bus parameters A000h 39 77 Yes Rd/Wr<br />
162 Device configuration A200h 38 75 Yes Rd/Wr<br />
165<br />
Note:<br />
Identification description A500h 97 194 — Rd/Wr<br />
1. Each Dataset’s starting address is the Dataset’s number, converted to hex, used as the high byte of the address. Example for Dataset 51:51 decimal<br />
equals 33 hex, which gives an address of 3300 hex.<br />
2. Notice that datasets: 60, 64, 68, 69, 93, 94, 97, 98, 128, 129, 160 and 162 have an odd number of data bytes and must be padded with an extra byte<br />
at the end of the dataset (set to 00 hex) to create an even number of words (registers).<br />
3. Dataset 98 is for internal use only.<br />
Table 4-8<br />
4/13 <strong>WL</strong> PROFIBUS/MODBUS Communication and Electronic Accessories
Default Register List<br />
<strong>WL</strong> <strong>Circuit</strong> Break<br />
Sample Dataset<br />
Dataset 94 – Current Metering Values<br />
Starting Address: 5E00 hex, Total Registers: 99, Access: Read Only<br />
Byte Register Description Format Length Scale<br />
Units Min Max (Bits)<br />
0 64065 Phase unbalance current (in %) % 0 100 unsigned char 8 0<br />
1 64065 Reserved — — — — 8 —<br />
2 64066 Demand current 3-phases A 8000 unsigned int 16 0<br />
4 64067 Demand current L1 A 30 8000 unsigned int 16 0<br />
6 64068 Demand current L2 A 30 8000 unsigned int 16 0<br />
8 64069 Demand current L3 A 30 8000 unsigned int 16 0<br />
10 64070 Phase A current A 0 65535 unsigned int 16 0<br />
12 64071 Phase B current A 0 65535 unsigned int 16 0<br />
14 64072 Phase C current A 0 65535 unsigned int 16 0<br />
16 64073 Current demand over three phases A 0 65535 unsigned int 16 0<br />
18 64074 Current N-phase A 0 65535 unsigned int 16 0<br />
20 64075 Ground fault current A 0 65535 unsigned int 16 0<br />
22 64076 Phase unbalance voltage (in %) % 0 100 unsigned char 8 0<br />
23 64076 Reserved — — — — 8 —<br />
24 64077 Delta voltage between Phase L1 and L2 V 15 1150 unsigned int 16 0<br />
26 64078 Delta voltage between Phase L2 and L3 V 15 1150 unsigned int 16 0<br />
28 64079 Delta voltage between Phase L3 and L1 V 15 1150 unsigned int 16 0<br />
30 64080 Star voltage Phase L1 V 10 700 unsigned int 16 0<br />
32 64081 Star voltage Phase L2 V 10 700 unsigned int 16 0<br />
34 64082 Star voltage Phase L3 V 10 700 unsigned int 16 0<br />
36 64083 Demand of the delta voltage V 5 1150 unsigned int 16 0<br />
38 64084 Demand of the star voltage V 10 700 unsigned int 16 0<br />
40 64085 Sum of apparent power kVA 39 24000 unsigned int 16 0<br />
42 64086 Sum of real power kW -24000 24000 signed int 16 0<br />
44 64087 Real power in Phase L1 kW -8000 8000 signed int 16 0<br />
46 64088 Real power in Phase L2 kW -8000 8000 signed int 16 0<br />
48 64089 Real power in Phase L3 kW -8000 8000 signed int 16 0<br />
50 64090 Sum of reactive power kvar -24000 24000 signed int 16 0<br />
52 64091 Demand of the real power 3-phases kW -8000 8000 signed int 16 0<br />
54 64092 Demand of the real power in Phase L1 kW -8000 8000 signed int 16 0<br />
56 64093 Demand of the real power in Phase L2 kW -8000 8000 signed int 16 0<br />
58 64094 Demand of the real power in Phase L3 kW -8000 8000 signed int 16 0<br />
60 64095 Demand of the apparent power 3-phases kVA 13 8000 unsigned int 16 0<br />
62 64096 Apparent power in Phase L1 kVA 13 8000 unsigned int 16 0<br />
64 64097 Apparent power in Phase L2 kVA 13 8000 unsigned int 16 0<br />
66 64098 Apparent power in Phase L3 kVA 13 8000 unsigned int 16 0<br />
68 64099 Demand of the apparent power<br />
i. d. Phase L1<br />
kVA 13 8000 unsigned int 16 0<br />
<strong>WL</strong> PROFIBUS/MODBUS Communication and Electronic Accessories<br />
SECTION 4<br />
(continued on the next page)<br />
4/14
Default Register List<br />
<strong>WL</strong> <strong>Circuit</strong> Break<br />
Dataset 94 – Current Metering Values<br />
Starting Address: 5E00 hex, Total Registers: 99, Access: Read Only (continued from the previous page)<br />
Byte Register Description Format Length Scale<br />
Units Min Max (Bits)<br />
70 64100 Demand of the apparent power<br />
i. d. Phase L2<br />
kVA 13 8000 unsigned int 16 0<br />
72 64101 Demand of the apparent power<br />
i. d. Phase L3<br />
kVA 13 8000 unsigned int 16 0<br />
74 64102 Demand of the reactive power<br />
3-phases<br />
kvar -8000 8000 signed int 16 0<br />
76 64103 Reactive power in Phase L1 kvar -8000 8000 signed int 16 0<br />
78 64104 Reactive power in Phase L2 kvar -8000 8000 signed int 16 0<br />
80 64105 Reactive power in Phase L3 kvar -8000 8000 signed int 16 0<br />
82 64106 Real energy in normal direction MWh 0 10000 unsigned long 32 0<br />
86 64108 Real energy in reverse direction MWh 0 10000 unsigned long 32 0<br />
90 64110 Reactive energy in normal direction Mvarh 0 10000 unsigned long 32 0<br />
94 64112 Reactive energy in reverse direction Mvarh 0 10000 unsigned long 32 0<br />
98 64114 Demand of the power factor PF 600 1000 signed int 16 0.001<br />
100 64115 Power factor in Phase L1 PF 600 1000 signed int 16 0.001<br />
102 64116 Power factor in Phase L2 PF 600 1000 signed int 16 0.001<br />
104 64117 Power factor in Phase L3 PF 600 1000 signed int 16 0.001<br />
106 64118 Frequency Hz 1500 44000 unsigned int 16 0.01<br />
108 64119 THD of the current % 1 100 unsigned char 8 0<br />
109 64119 THD of the voltages % 1 100 unsigned char 8 0<br />
110 64120 Form factor 0 0 255 unsigned char 8 0.1<br />
111 64120 Crest factor 0 0 255 unsigned char 8 0.1<br />
112 64121 Reserved - - - - 16 -<br />
114 64122 Temperature in the cubicle<br />
(detected in the COM16)<br />
°C -127 128 unsigned char 8 0<br />
115 64122 Temperature in the circuit breaker<br />
(detected in BSS)<br />
°C -20 85 unsigned char 8 0<br />
Table 4-9<br />
Bit Mapping for Breaker Status Register 413158<br />
Byte Register Description<br />
0 Bit 0 Breaker Open<br />
0 Bit 1 Breaker Closed<br />
0 Bit 2 Breaker Tripped (mechanical trip indication)<br />
0 Bit 3 Breaker is ready to close<br />
0 Bit 4 Storage spring is charged<br />
0 Bit 5 1st auxillary release is operated<br />
0 Bit 6 2nd auxillary release is operated<br />
Table 4-10<br />
4/15 <strong>WL</strong> PROFIBUS/MODBUS Communication and Electronic Accessories
<strong>WL</strong> Configurator<br />
<strong>WL</strong> <strong>Circuit</strong> Break<br />
<strong>WL</strong> Configuration software, <strong>WL</strong> Config © ,<br />
is a software configuration tool used to<br />
program protective settings, set points<br />
and selective functions in the <strong>WL</strong> trip<br />
unit. It is designed for use on a Windows<br />
OS PC with a minimum of 128MB RAM<br />
and a 1.2GHz or faster processor.<br />
The installation is a simple and intuitive<br />
process, with step-by-step instructions<br />
for the user.<br />
<strong>WL</strong> PROFIBUS/MODBUS Communication and Electronic Accessories<br />
<strong>WL</strong> Config runs in a web browser window,<br />
with the "Main Menu" tree below displayed<br />
at start-up:<br />
After the program is installed on the PC,<br />
<strong>WL</strong> Config © communicates with <strong>WL</strong> Trip<br />
Units via the PC’s serial port.The COM16<br />
MODBUS communication module is<br />
required for use with this software. An<br />
RS485 to RS232 converter is provided as<br />
part of the <strong>WL</strong> Config Software Kit (catalog<br />
number: <strong>WL</strong>CONFIG). <strong>WL</strong> Config uses the<br />
MODBUS protocol to communicate with<br />
the COM16 (typically at 19,200 baud, even<br />
parity and with a default MODBUS address<br />
of 126). The latest version of this software<br />
can be downloaded at http://www2.sea.<br />
siemens.com/Products/PowerDistribution/<br />
Product/<strong>Circuit</strong>_<strong>Breakers</strong>_Support/<strong>Siemens</strong>_<br />
<strong>Circuit</strong>_<strong>Breakers</strong>_Software_Downloads.htm.<br />
The internal CubicleBUS communications<br />
bus of the <strong>WL</strong> <strong>Circuit</strong> Breaker allows<br />
connectivity between the COM16, Digital<br />
I/O, Analog I/O, and Electronic Trip Units<br />
(ETU). CubicleBUS requires 24V DC power<br />
and provides a serial link to all the modules<br />
in the CubicleBUS system. 24V DC power<br />
must be available in the system for<br />
communication to exist between the PC<br />
and the COM16. The data generated by<br />
the Trip Unit is accumulated at the COM16,<br />
Figure 4-2 Figure 4-3<br />
SECTION 4<br />
which serves as a gateway to the<br />
CubicleBUS data. The main purpose of <strong>WL</strong><br />
Config is to configure the programmable<br />
communication, protective and alarm<br />
parameters of the <strong>WL</strong> Trip Unit, and also<br />
configure CubicleBUS module parameters.<br />
The parameters changed by the user and<br />
sent to the device are verified by the PC<br />
program and the device for a valid setting,<br />
and if out of range, an error message is<br />
displayed. Alarms can also be configured<br />
for any associated I/O modules.<br />
<strong>WL</strong> Config can interrogate a Trip Unit for<br />
instantaneous or historical data and display<br />
that information for user evaluation. If<br />
the system is equipped with the optional<br />
Metering Function Plus module, the voltage<br />
and current waveforms and any harmonic<br />
information can be viewed.<br />
Note: <strong>WL</strong> Config can also be used in an<br />
offline mode, without a <strong>WL</strong> Trip Unit attached,<br />
to allow the configuration of a particular job to<br />
be completed and verified prior to downloading.<br />
This offers the advantages of quickly configuring<br />
many trip units with the same data and also<br />
provides organized electronic files for storing<br />
past configurations.<br />
4/16
Notes<br />
<strong>WL</strong> PROFIBUS/MODBUS Communication and Electronic Accessories
Breaker Data Adapter (BDA)<br />
Breaker Data Adapter Plus (BDA Plus)<br />
BDA/BDA Plus Description 5-1 – 5-3<br />
System Requirements 5-4<br />
Connecting the BDA 5-5 – 5-7<br />
Communication via the Serial Interface 5-8 – 5-21<br />
Communication via the Ethernet Interface 5-22 – 5-23<br />
Operating Instructions 5-24 – 5-25<br />
Troubleshooting 5-26<br />
<strong>WL</strong> PROFIBUS/MODBUS Communication and Electronic Accessories<br />
SECTION 5
BDA/BDA Plus Description<br />
<strong>WL</strong> <strong>Circuit</strong> Breaker<br />
The Breaker Data Adapter (BDA) is a<br />
unique circuit breaker configuration<br />
device that includes an integrated<br />
webserver for configuring, monitoring<br />
and diagnosing a circuit breaker.<br />
The BDA Plus also features an<br />
Ethernet interface for connection to<br />
the Ethernet, Intranet or Internet.<br />
Description<br />
The BDA can be used to read and change<br />
the parameters of <strong>WL</strong> <strong>Circuit</strong> <strong>Breakers</strong><br />
and display measured values, as well as<br />
visualize.It can also analyze and store<br />
diagnostic data.<br />
It is comprised of a microcomputer on<br />
which an embedded Linux operating<br />
system featuring a web server application<br />
runs. The HTML pages and the Java<br />
program codes are stored in the internal<br />
flash and can be displayed on a browser.<br />
The browser itself displays the HTML<br />
pages, while the more complex functions<br />
are implemented using Java applets. A<br />
Java Virtual Machine (VM) is required to<br />
run the Java applets.<br />
All the pages that can be displayed are<br />
stored in the BDA in English and German;<br />
the language is selected when the data<br />
is called up in the browser for the first<br />
time. A new language can be selected<br />
during operation.<br />
The cable supplied is used to connect the<br />
BDA to the <strong>WL</strong> <strong>Circuit</strong> Breaker. The BDA can<br />
either be connected directly to the trip unit<br />
or to the last CubicleBUS module. The<br />
indicator with the browser application<br />
(e.g. laptop) is connected to the BDA<br />
using a null modem cable. The Breaker<br />
Data Adapter Plus features an additional<br />
Ethernet interface, which means that the<br />
BDA Plus can also be addressed via the<br />
Intranet or Internet. The communication<br />
options available via the Intranet or<br />
Internet are restricted only by the<br />
network administration.<br />
All write actions (changing parameters<br />
or switching actions) are password<br />
protected.<br />
When connected temporarily, the BDA can<br />
be used to read and change parameters,<br />
perform diagnoses, or display measured<br />
values. For this reason, a magnet is<br />
supplied with the BDA so that it can be<br />
attached to doors and other elements<br />
containing iron. The DIN rail installation<br />
kit supplied can be used to connect the<br />
BDA permanently. Depending on the<br />
application, the BDA Plus is normally<br />
used for a permanent connection. In this<br />
way, it can be accessed via the Ethernet,<br />
Intranet or Internet.<br />
If the <strong>WL</strong> is to be switched open or closed<br />
via the BDA, the PROFIBUS/MODBUS<br />
COM15/COM16 module must also be<br />
installed. This contains the connections<br />
for activating the opening and closing<br />
solenoids. The PROFIBUS/MODBUS<br />
communication function does not have<br />
to be enabled at this point.<br />
Benefits of the BDA:<br />
• No special software has to be installed;<br />
the display software is supplied with<br />
the circuit breaker data directly from<br />
the BDA. The appropriate help pages<br />
are also stored directly in the BDA,<br />
which means they are always available<br />
when they are needed.<br />
• The comprehensive use of Java<br />
technology ensures the systems can<br />
operate regardless of the operating<br />
system. This means that the BDA can<br />
be used with all Windows versions,<br />
Linux, and all other operating systems<br />
provided by the corresponding Java<br />
Virtual Machine.<br />
• Smaller hand-held devices with PocketPC<br />
as the operating system can also be<br />
used, as can PCs or notebooks, provided<br />
they fulfill the system requirements.<br />
Breaker Data Adapter (BDA)<br />
5/1 <strong>WL</strong> PROFIBUS/MODBUS Communication and Electronic Accessories<br />
Figure<br />
5-1
BDA/BDA Plus Description<br />
<strong>WL</strong> <strong>Circuit</strong> Breaker<br />
BDA in Offline Mode (or BDA Plus)<br />
In offline mode, the BDA or BDA Plus is<br />
only connected to a laptop (represents all<br />
input/output devices). All the required<br />
parameters can be set in this operating<br />
mode and saved for later use (download<br />
to the circuit breakers). No power is supplied<br />
via the laptop COM interface, which means<br />
that an additional power supply unit (24V<br />
DC) must be connected to the BDA. (See<br />
graphic 5-1).<br />
BDA as a Hand-Held Device<br />
(or BDA Plus)<br />
As a hand-held device, the BDA is operated<br />
by connecting it temporarily to the unit test<br />
socket (See graphic 5-2).<br />
The circuit breakers in a system can be<br />
configured one after the other using just<br />
one BDA, and the parameter data saved to<br />
a laptop for further processing. In addition,<br />
all the diagnostic data of the circuit breaker<br />
can be read via the BDA.<br />
An additional 24V DC power supply is<br />
required if the circuit breaker is not yet<br />
supplied with power (e.g. by means of an<br />
external 24V DC source for the CubicleBUS.<br />
<strong>WL</strong> PROFIBUS/MODBUS Communication and Electronic Accessories<br />
Graphic<br />
5-1<br />
Graphic<br />
5-2<br />
Laptop<br />
Laptop<br />
TCP/IP on RS232<br />
The BDA must be supplied externally with 24 V DC. Parameters can be set, stored,<br />
and printed out.<br />
TCP/IP on RS232<br />
CubicleBUS<br />
In temporary mode, the BDA is normally attached using magnets.<br />
SECTION 5<br />
24V DC<br />
Power Supply<br />
<strong>WL</strong> <strong>Circuit</strong> Breaker<br />
5/2
BDA/BDA Plus Description<br />
<strong>WL</strong> <strong>Circuit</strong> Breaker<br />
BDA Plus as an Ethernet Interface<br />
In addition to the previously mentioned<br />
functions, the BDA Plus enables data to<br />
be accessed via Ethernet. In this case,<br />
the circuit breaker data is not transmitted<br />
as net data, but displayed on HTML<br />
pages in an application-specific format.<br />
The BDA/BDA Plus cannot be used to<br />
integrate the circuit breakers in higher<br />
level visualization systems. To display<br />
several <strong>WL</strong> <strong>Circuit</strong> <strong>Breakers</strong> around<br />
the clock online using communication<br />
without the PROFIBUS/MODBUS module,<br />
one BDA Plus is required for each circuit<br />
breaker. In this case, the circuit breaker is<br />
selected by entering the BDA-specific IP<br />
address in the browser. Password protection<br />
in the BDA and BDA Plus prevents<br />
unauthorized access.<br />
By making the appropriate settings on any<br />
firewall, <strong>WL</strong> <strong>Circuit</strong> <strong>Breakers</strong> can also be<br />
accessed via the Intranet and Internet<br />
via the BDA Plus.<br />
Graphic<br />
5-3<br />
Laptop<br />
Ethernet<br />
CubicleBUS<br />
DIN<br />
Rail<br />
<strong>WL</strong> <strong>Circuit</strong> Breaker<br />
Depending on the network settings (routing tables and firewall entries), the circuit breaker can be<br />
diagnosed by all PCs with an Internet connection.<br />
5/3 <strong>WL</strong> PROFIBUS/MODBUS Communication and Electronic Accessories
System Requirements<br />
<strong>WL</strong> <strong>Circuit</strong> Breaker<br />
System Requirements<br />
Certain prerequisites have to be fulfilled<br />
before the BDA or BDA Plus can be<br />
operated. One of the two standard<br />
browsers (Internet Explorer V5.5 or<br />
higher or Netscape Navigator V6.2 or<br />
higher) must be installed on the output<br />
device (e.g. laptop). Compatibility with<br />
other browsers cannot be guaranteed.<br />
To ensure independence between the<br />
operating systems and browsers, all the<br />
pages have been written in HTML code<br />
and Java applets. A Java Virtual Machine<br />
is required to display the pages.<br />
What is Java?<br />
Java is a platform-neutral object-oriented<br />
programming language originally developed<br />
by Sun Microsystems. Java is implemented<br />
in all IT areas of the commercial, industrial<br />
and administrative sectors, and is available<br />
on the internet for many operating systems<br />
and platforms – including cell phones and<br />
real-time mainframe systems.<br />
Unlike most compiler languages, Java<br />
applets are not directly translated into a<br />
set of commands that can be understood<br />
by a “Real Processor.” Instead, they are<br />
first converted to the “Java Byte Code.”<br />
Although this byte code is highly machineoriented,<br />
a “Java Virtual Machine” (VM),<br />
which emulates a standardized processor<br />
for all Java applets, is required on the<br />
target computer.<br />
Since Java normally compiles data twice<br />
(once with the developer and once with<br />
the user), this principle is known as the<br />
“Just-In-Time“ (JIT) Compiler. Java applets<br />
take longer to start since the machine code<br />
is generated during initialization.<br />
<strong>WL</strong> PROFIBUS/MODBUS Communication and Electronic Accessories<br />
However, the same Java applet can run on<br />
all supported systems without modifications.<br />
The Java Virtual Machine V2 V1.4.0_01<br />
may be required to display the BDA pages.<br />
When these pages are called up for the first<br />
time, the BDA checks whether Java VM2 is<br />
available on the browser. If not, the system<br />
automatically displays a window informing<br />
the user of this and automatically links the<br />
user to the appropriate Sun Microsystems<br />
page. An Internet connection must be<br />
established to ensure the automatic<br />
installation procedure functions properly.<br />
If this is not the case, the Virtual Machine<br />
required for the Microsoft Windows<br />
operating systems can be downloaded<br />
from the following address:<br />
http://java.sun.com<br />
Once installed, the option Java 2VM<br />
must be activated in the browser (if it<br />
is not already).<br />
To avoid conflicts with other Java versions,<br />
it is recommended that you uninstall older<br />
versions of Java and delete the cache in<br />
the browser.<br />
The target system with the browser also<br />
requires one or both of the following<br />
communication interfaces:<br />
• A serial interface with RS232 design,<br />
usually integrated on standard PCs<br />
(e.g. COM1) for point-to-point (PPP)<br />
communication with the BDA.<br />
• A LAN interface for communicating with<br />
the BDA Plus via Ethernet.<br />
SECTION 5<br />
<strong>Circuit</strong> Breaker Requirements<br />
The BDA can be connected to <strong>WL</strong> <strong>Circuit</strong><br />
<strong>Breakers</strong> with the following trip units:<br />
ETU745, ETU748, ETU755 and ETU776. It<br />
can be connected either directly to the trip<br />
unit test socket or to the last external<br />
CubicleBUS module.<br />
Getting started with the BDA Plus<br />
If the BDA Plus is being installed for the first<br />
time, the settings for the IP address and the<br />
standard gateway as well as the subnet mask<br />
must be set using the serial communication<br />
via RS232. After this the BDA Plus must be<br />
rebooted to load the Ethernet driver with<br />
the specified parameters.<br />
5/4
Connecting the BDA<br />
<strong>WL</strong> <strong>Circuit</strong> Breaker<br />
To operate the BDA, it must be<br />
connected to the target system (e.g.<br />
a PC) on one side and a circuit breaker<br />
on the other. Different scenarios are<br />
possible depending on the application.<br />
For <strong>WL</strong> <strong>Circuit</strong> <strong>Breakers</strong>, two basic methods<br />
are available for connecting the BDA,<br />
temporary or permanent installation.<br />
Temporary<br />
If the BDA is to be used as a local<br />
configuration tool and several circuit<br />
breakers are to be set in succession, the<br />
local front interface of the trip unit can<br />
be used. The cable required is supplied<br />
with the BDA. An additional 24V DC power<br />
supply unit is also required if the circuit<br />
breaker is not yet supplied with power<br />
via the CubicleBUS. For this purpose, a<br />
voltage connection is located on the top<br />
of the BDA next to the interface to the<br />
circuit breaker.<br />
In temporary mode, the BDA can be quickly<br />
secured to any metal surface using the<br />
supplied magnetic holder.<br />
Note: Do not use the supplied magnetic holder<br />
where it can fall into energized parts.<br />
Permanent<br />
The trip unit interface through the front<br />
connection is not suitable if a BDA or BDA<br />
Plus is to be permanently connected to a<br />
<strong>WL</strong> <strong>Circuit</strong> Breaker. The connection on<br />
the last CubicleBUS module, such as the<br />
COM15/COM16 module, or one of the<br />
other modules is more suitable. In this<br />
case, a cable is supplied with the BDA<br />
that can be connected directly to the RJ45<br />
plug-in contact of the CubicleBUS module.<br />
Figure<br />
5-2<br />
Top<br />
Bottom<br />
24 V DC power supply<br />
Typically, a BDA Plus is used for permanent<br />
installation. The DIN rail installation kit<br />
supplied is used to secure the device.<br />
The principle regarding the power supply is<br />
the same as for temporary operation: if the<br />
CubicleBUS is supplied with power the BDA<br />
will also operate without an extra power<br />
supply unit. Otherwise, the BDA must be<br />
connected to a 24V DC power supply unit.<br />
Connection to the circuit breaker<br />
RS232 plug for PPP connection Ethernet interface RESET button<br />
The physical BDA interfaces. The connection to the circuit breaker and optional power supply are<br />
on the top, while the RS232 interface (or the Ethernet interface in the case of BDA Plus) and the<br />
RESET button are on the bottom.<br />
5/5 <strong>WL</strong> PROFIBUS/MODBUS Communication and Electronic Accessories
Connecting the BDA<br />
<strong>WL</strong> <strong>Circuit</strong> Breaker<br />
Operation<br />
As a microcomputer, the BDA is booted<br />
in the same way as a PC. This takes<br />
approximately 40 seconds and is started<br />
automatically when the power supply is<br />
switched on. During this time, the content<br />
is loaded from the Flash memory to the<br />
main memory, an internal self test is<br />
carried out, the operating system<br />
(embedded Linux) is booted, and the<br />
web server application started.<br />
The RESET button on the underside<br />
enables the BDA to be restarted manually<br />
at any time.<br />
The LEDs indicate the operating status<br />
during the boot-up process. The upper<br />
DEVICE LED is first red/green, while the<br />
lower CubicleBUS LED is red only. After<br />
about 10 seconds, this also changes to<br />
red/green. During the load process, the<br />
Ethernet connection is checked for a<br />
connected network. Only then is the<br />
appropriate driver loaded. Since the BDA<br />
Plus is to be operated with an Ethernet<br />
connection, a physical connection to the<br />
Ethernet must already exist during the<br />
boot-up process.<br />
Meaning of the LEDs on the BDA<br />
LED Display Meaning<br />
red BDA out of order<br />
DEVICE<br />
green BDA in operation<br />
red/<br />
green<br />
BDA booting up<br />
BDA in online mode and<br />
connection to circuit<br />
red breaker interrupted<br />
green<br />
Connection<br />
exists to CubicleBUS<br />
CubicleBUS<br />
red/<br />
green<br />
BDA booting up<br />
BDA in offline<br />
off<br />
mode, even if<br />
circuit breaker<br />
is connected<br />
Table<br />
5-1<br />
The LEDs on the BDA indicate the<br />
current operating status.<br />
<strong>WL</strong> PROFIBUS/MODBUS Communication and Electronic Accessories<br />
ETU776 trip unit<br />
Breaker data adapter<br />
Local interface of trip unit<br />
PPP connection to PC<br />
Figure<br />
5-3<br />
Figure<br />
5-4<br />
BDA Plus<br />
For temporary operation, the BDA can be connected to the local interface of the trip unit.<br />
In this configuration, only the RS232 connection to the PC is typically used.<br />
External<br />
CubicleBUS<br />
Module<br />
Connection to Ethernet<br />
SECTION 5<br />
In a permanent installation, the BDA should be connected to the last external CubicleBUS<br />
module. It can be secured using a DIN rail.<br />
5/6
Connecting the BDA<br />
<strong>WL</strong> <strong>Circuit</strong> Breaker<br />
When the boot-up process is complete,<br />
the DEVICE LED switches to green, while<br />
the CubicleBUS LED switches to green<br />
or is extinguished, depending on<br />
the connection.<br />
If the BDA is not supplied power via the<br />
CubicleBUS of the <strong>WL</strong>, it must be powered<br />
by an external 24V DC power supply.<br />
<strong>Siemens</strong> SITOP 24V DC power supplies<br />
are suitable for this purpose.<br />
Other 24V DC power supply units that<br />
supply the required power can also<br />
be used.<br />
Technical data for the BDA and BDA Plus<br />
Min./Max. operating voltage<br />
Current input from the CubicleBUS or power supply<br />
unit min./max.<br />
Power loss min./typ./max.<br />
Dimensions W/H/D<br />
Weight<br />
Operating temperature range<br />
Table<br />
5-2<br />
This table provides technical data for the BDA and BDA Plus<br />
19.2V / 28.8V<br />
100mA / 300mA<br />
3W / 5W / 7W<br />
82mm /153mm / 38mm<br />
0.38 kg<br />
0 to 55°C<br />
5/7 <strong>WL</strong> PROFIBUS/MODBUS Communication and Electronic Accessories
Communication via Serial Interface<br />
<strong>WL</strong> <strong>Circuit</strong> Breaker<br />
To operate the BDA, it must be<br />
connected to the target system (e.g.,<br />
a PC) on one side and a circuit breaker<br />
on the other. A range of options are<br />
available, depending on the application<br />
and operating system.<br />
To ensure that serial communication is<br />
possible between the target system<br />
and the BDA, you should carry out the<br />
following steps:<br />
• Connect the BDA to the circuit breaker<br />
and power supply.<br />
• Connect the BDA to the COM interface<br />
of the target system (e.g. PC) using a<br />
fully assigned null modem cable.<br />
Note: With a null modem cable, pins<br />
2 and 3, 4 and 6, and 7 and 8 must<br />
be assigned and reversed with respect<br />
to each other. The selected COM port<br />
cannot be used by a different application.<br />
• Installing a standard modem.<br />
Once the physical connection has been<br />
established using a null modem cable, a<br />
standard modem must be installed on<br />
each PC. The procedure for installing the<br />
modem varies slightly depending on the<br />
operating system. The screenshots on the<br />
following pages provide a step-by-step<br />
guide of the procedure. The standard<br />
modem to be selected – 28800 bps – is<br />
not related to the actual transmission<br />
rate. The examples illustrate the<br />
connection to the COM1 interface; other<br />
interfaces must be set accordingly. The<br />
installation process always begins in the<br />
Control Panel of the operating system.<br />
The default settings in the “Properties”<br />
windows of the modem do not usually<br />
have to be changed.<br />
<strong>WL</strong> PROFIBUS/MODBUS Communication and Electronic Accessories<br />
They are shown as a reference. The<br />
screenshots on the following pages<br />
for Windows98 are identical for<br />
Windows95, WindowsNT, and<br />
WindowsME. WindowsXP screens<br />
are virtually the same as those in<br />
Windows2000.<br />
• Installing a data communications<br />
connection.<br />
Once a standard modem has been<br />
installed, a communications link must<br />
be established via modem. To do so, a<br />
data communications connection must<br />
be set up via “Workstation > Data<br />
Communications Network.” Once the<br />
appropriate modem has been selected,<br />
the maximum rate has to be selected<br />
again. The name of the connection is<br />
user defined, while the user name<br />
must be “ppp” and the address “555.”<br />
A pre-selection code and password<br />
must not be entered. All of these<br />
settings are shown on the following<br />
pages. Windows98 screenshots are<br />
used to represent the operating systems<br />
Windows95, Windows98, WindowsNT,<br />
and WindowsME. The screenshots from<br />
WindowsXP are used for Windows2000<br />
and WindowsXP.<br />
• Establishing the connection.<br />
A communications link is established<br />
by activating the installed data<br />
communications connection. Once<br />
the user name and password have<br />
been checked (a password must not be<br />
entered), the window for establishing<br />
the connection disappears from the<br />
Windows systray. The systray is the area<br />
on the bottom right next to the system<br />
clock in the toolbar. A small icon with<br />
two computers appears here. Doubleclicking<br />
this opens a window displaying<br />
the properties of this connection. A test<br />
ping can also be used to check that the<br />
connection has been established<br />
SECTION 5<br />
correctly. Once you have opened the<br />
entry screen (Start > Execute) and<br />
entered “ping 2.2.2.1, ” a DOS box<br />
appears that displays either “Reply from<br />
2.2.2.1 after...” (connection OK) or “Reply<br />
timed out” (connection not available).<br />
• Start the browser (Internet Explorer or<br />
Netscape Navigator)<br />
• Entering the target IP address 2.2.2.1.<br />
You have to enter 2.2.2.1 in the address<br />
line. The usual “http://” does not have to<br />
be entered. When you press ENTER, the<br />
pages will be loaded from the BDA.<br />
Note: You may have to include the<br />
address 2.2.2.1 in the list of addresses<br />
that do not use a proxy server. The use<br />
of a proxy server is optional and depends<br />
on the network.<br />
A desktop link can be created if the BDA<br />
connection is used frequently. To create<br />
an Internet Explorer link with the local IP<br />
address of the BDA on the desktop, you<br />
have to drag the Internet Explorer icon in<br />
the address line to the left of the address<br />
to the desktop. Alternatively, the BDA start<br />
icon can be used. To do so, press the left<br />
mouse button to save it on the hard disk<br />
as a bitmap and specify it as an icon in the<br />
properties window of the link saved on<br />
the desktop.addresses can be accessed<br />
from outside.<br />
5/8
Communication via Serial Interface<br />
<strong>WL</strong> <strong>Circuit</strong> Breaker<br />
Figure<br />
5-4<br />
Installing a standard modem with Windows98, part 1 (identical to Windows95, WindowsNT and WindowsME): A standard modem<br />
(28800 bps) is selected and installed in the Control Panel. The automatic identification function must be switched off for this purpose.<br />
5/9 <strong>WL</strong> PROFIBUS/MODBUS Communication and Electronic Accessories
Communication via Serial Interface<br />
<strong>WL</strong> <strong>Circuit</strong> Breaker<br />
Figure<br />
5-5<br />
Installing a standard modem with Windows98, part 2 (identical to Windows95, WindowsNT and WindowsME):<br />
Once you have installed the standard modem, you have to set it to the maximum rate of 115200; the default settings in the other windows<br />
are retained.<br />
<strong>WL</strong> PROFIBUS/MODBUS Communication and Electronic Accessories<br />
SECTION 5<br />
5/10
Communication via Serial Interface<br />
<strong>WL</strong> <strong>Circuit</strong> Breaker<br />
Figure<br />
5-6<br />
Installing a standard modem with Windows98, part 2 (identical to Windows95, WindowsNT and WindowsME):<br />
You now have to establish a data communications connection to the BDA. To do so, double-click “Establish New Connection” in the Control Panel<br />
and then maintain the windows as shown.<br />
5/11 <strong>WL</strong> PROFIBUS/MODBUS Communication and Electronic Accessories
Communication via Serial Interface<br />
<strong>WL</strong> <strong>Circuit</strong> Breaker<br />
Figure<br />
5-7<br />
Figure<br />
5-8<br />
Installing a data comm. connection to the BDA with Windows98, part 2 (identical to Windows95 and WindowsME):<br />
Once communication has been established, the connection window disappears from the Windows systray. To display the BDA pages,<br />
enter address 2.2.2.1 in the browser. To call up the connection window, double-click the relevant icon in the systray.<br />
Installing a standard modem with Windows2000, part 1 (identical to WindowsXP):<br />
To install a standard modem in WindowsXP, double-click the “Telephone and Modem Options” icon in the Control Panel.<br />
<strong>WL</strong> PROFIBUS/MODBUS Communication and Electronic Accessories<br />
SECTION 5<br />
5/12
Communication via Serial Interface<br />
<strong>WL</strong> <strong>Circuit</strong> Breaker<br />
Figure<br />
5-9<br />
Installing a standard modem with Windows2000, part 2 (identical to WindowsXP): Select the standard modem (28800) and assign it to<br />
a free COM interface.<br />
5/13 <strong>WL</strong> PROFIBUS/MODBUS Communication and Electronic Accessories
Communication via Serial Interface<br />
<strong>WL</strong> <strong>Circuit</strong> Breaker<br />
Figure<br />
5-10<br />
Installing a standard modem with Windows2000, part 3 (identical to WindowsXP): After installation, you have to set the maximum rate<br />
to115200. This completes the installation procedure.<br />
<strong>WL</strong> PROFIBUS/MODBUS Communication and Electronic Accessories<br />
SECTION 5<br />
5/14
Communication via Serial Interface<br />
<strong>WL</strong> <strong>Circuit</strong> Breaker<br />
Figure<br />
5-11<br />
Setting up a data communications connection to the BDA with WindowsXP, part 1:<br />
Go from the Control Panel to “Network Environments” and click “Establish New Connection,” as shown above. Then follow the instructions provided by the<br />
Installation Wizard.<br />
5/15 <strong>WL</strong> PROFIBUS/MODBUS Communication and Electronic Accessories
Communication via Serial Interface<br />
<strong>WL</strong> <strong>Circuit</strong> Breaker<br />
Figure<br />
5-12<br />
Setting up a data communications connection to the BDA with WindowsXP, part 2:<br />
Continue following the instructions and maintain the windows as shown above.<br />
<strong>WL</strong> PROFIBUS/MODBUS Communication and Electronic Accessories<br />
SECTION 5<br />
5/16
Communication via Serial Interface<br />
<strong>WL</strong> <strong>Circuit</strong> Breaker<br />
Figure<br />
5-13<br />
Setting up a data communications connection to the BDA with WindowsXP, part 3:<br />
Once the data communications co nnection has been successfully set up, WindowsXP establishes a connection with the BDA when you click “Dial.”<br />
5/17 <strong>WL</strong> PROFIBUS/MODBUS Communication and Electronic Accessories
Communication via Serial Interface<br />
<strong>WL</strong> <strong>Circuit</strong> Breaker<br />
Figure<br />
5-14<br />
Setting up a data communications connection to the BDA with WindowsXP, part 4:<br />
Once the connection has been established, start the browser and enter the address 2.2.2.1. To display the connection properties so that you can check them,<br />
double-click the appropriate icon in the systray.<br />
<strong>WL</strong> PROFIBUS/MODBUS Communication and Electronic Accessories<br />
SECTION 5<br />
5/18
Communication via Serial Interface<br />
<strong>WL</strong> <strong>Circuit</strong> Breaker<br />
Figure<br />
5-15<br />
Setting a data communications connection to the BDA with Windows2000, part 1 (similar to WindowsNT):<br />
A modem is installed for Windows2000 in the same way as for WindowsXP. You then have to set up the data communications connection o the BDA. To do so,<br />
proceed as shown in the screenshots.<br />
5/19 <strong>WL</strong> PROFIBUS/MODBUS Communication and Electronic Accessories
Communication via Serial Interface<br />
<strong>WL</strong> <strong>Circuit</strong> Breaker<br />
Figure<br />
5-16<br />
Setting up a data communications connection to the BDA with Windows2000, part 2 (similar to WindowsNT):<br />
The procedure for setting up the data communications connection for WindowsNT is largely the same as the example shown above for Windows2000.<br />
<strong>WL</strong> PROFIBUS/MODBUS Communication and Electronic Accessories<br />
SECTION 5<br />
5/20
Communication via Serial Interface<br />
<strong>WL</strong> <strong>Circuit</strong> Breaker<br />
Figure<br />
5-17<br />
Setting a data communications connection to the BDA with Windows2000, part 3 (similar to WindowsNT):<br />
Once the installation is complete and the connection has been established via the null modem cable, start the browser by entering the address 2.2.2.1. The PC<br />
temporarily adopts the address 2.2.2.2.<br />
5/21 <strong>WL</strong> PROFIBUS/MODBUS Communication and Electronic Accessories
Communication via Ethernet Interface<br />
<strong>WL</strong> <strong>Circuit</strong> Breaker<br />
In addition to communication via the<br />
serial RS232 channel, the BDA Plus<br />
features an Ethernet interface. If the BDA<br />
Plus is to be addressed via this interface,<br />
it must be integrated in the local<br />
Ethernet (LAN). This chapter explains a<br />
number of key terms and settings.<br />
Ethernet<br />
Unlike PROFIBUS-DP, Ethernet does not<br />
function according to a master-slave<br />
principle. All the stations have equal priority<br />
on the bus, which means that any station<br />
can be the sender and/or receiver.<br />
A sender can only send on the bus if no<br />
other station is sending at that point. This<br />
is due to the fact that the stations are<br />
always “listening in” to find out whether<br />
any messages are being sent to them or<br />
any senders are currently active.<br />
Graphic<br />
5-4<br />
Intranet<br />
Local proxy<br />
Company proxy<br />
Firewall<br />
Local proxy<br />
Gateway<br />
INTERNET<br />
Stations<br />
This diagram illustrates the structure of an Ethernet, how an intranet is integrated,<br />
and how this is connected to the Internet.<br />
<strong>WL</strong> PROFIBUS/MODBUS Communication and Electronic Accessories<br />
If a sender has started sending, it checks<br />
that the message it has sent is not corrupt.<br />
If the message is not corrupt, the send<br />
operation continues. If the sender detects<br />
that its data is corrupt, it must abort the<br />
send operation because a different sender<br />
has already started sending data.<br />
After a random time has elapsed, the sender<br />
restarts the send operation. This is known<br />
as CSMA/CD and, because it is a “random”<br />
access procedure, does not guarantee a<br />
response within a certain time frame. This<br />
largely depends on the bus load, which<br />
means that real-time applications cannot<br />
yet be implemented with Ethernet.<br />
Definition of Key Terms<br />
An Intranet system is comprised of several<br />
Ethernet lines connected to each other via<br />
gateways within a company. The structure<br />
of an Intranet system can be just as diverse<br />
as that of the Internet; it can be restricted to<br />
one location or distributed worldwide.<br />
Stations<br />
Repeater<br />
SECTION 5<br />
Ethernet/Intranet lines are connected to each<br />
other using repeaters, bridges/switches,<br />
routers and gateways. These modules<br />
work at different levels in the ISO/OSI<br />
7-layer model.<br />
The repeater (or star coupler) only<br />
regenerates and strengthens the electrical<br />
signal, it does not interpret bits. The bridge<br />
(or switch) physically separates the networks<br />
and performs fault and load disconnection.<br />
Filtering and guidance mechanisms are<br />
usually implemented. The router decouples<br />
the networks at the logical level (protocol<br />
level) by means of the specified addresses.<br />
Using routing tables, it knows which<br />
messages are to be sent to which address.<br />
It continues to work, however, on a<br />
protocol-dependent basis. The gateway<br />
also enables the router to convert services.<br />
This means that it can act as a security<br />
mechanism, such as a firewall, while<br />
functioning as a proxy.<br />
A proxy is a program in a gateway that acts<br />
as both the server and client. It processes<br />
requests, translates them if necessary, and<br />
forwards them to the addressees. Proxies<br />
are also used to control access (firewall)<br />
and forward requests for protocols that are<br />
not supported. Intranet users in particular<br />
are familiar with the Internet/Intranet page<br />
caching function offered by proxies.<br />
The Intranet is connected to the Internet via<br />
a company proxy, which can also act as a<br />
firewall. If a PC (user) wants to access<br />
an area of the Intranet from the Internet,<br />
the firewall must be informed of which<br />
addresses can be accessed from outside.<br />
5/22
Communication via Ethernet Interface<br />
<strong>WL</strong> <strong>Circuit</strong> Breaker<br />
IP Addresses<br />
The partner must have a unique address<br />
so that it can be addressed in the extensive<br />
Intranet/Internet system. The IP address<br />
format is used for this purpose, which, as<br />
of Version 4, comprises four figures from<br />
0 to 255, separated by a decimal point.<br />
Example: 146.254.245.62<br />
The address is 32 bits long. Three classes<br />
have been created to enable the addresses<br />
to be structured on a world-wide basis and<br />
to ensure that the same address does not<br />
exist twice. The IP address is comprised<br />
of a small header, which describes the class,<br />
a network number, and a host number.<br />
The address of a subnetwork (Intranet, for<br />
example) is encoded in the network number.<br />
The host number is basically the unique<br />
address of a station in a network of class X<br />
and subnetwork Y.<br />
The first byte of class A IP addresses<br />
contains a number from 0 to 127: e.g.<br />
98.x.x.x. This class can support up to 128<br />
subnetworks, each with around 16 million<br />
connections. Since class A networks are<br />
very limited in number, these addresses are<br />
only available for large global companies<br />
and organizations. A Network Information<br />
Center (NIC) is responsible for assigning<br />
the classes and network numbers.<br />
Class B networks (these begin with<br />
128.x.x.x to 191.x.x.x) support up to 16,384<br />
subnetworks, each with up to 65,535<br />
stations. The majority of large companies<br />
and providers have a class B address.<br />
With around 2.1 million subnetworks, each<br />
with up to 256 stations, class C addresses<br />
are often used by smaller providers and<br />
companies with no more than 256<br />
connections in their corporate network.<br />
The IP addresses start from 192.x.x.x to<br />
223.x.x.x<br />
Subnet Mask<br />
The subnet mask provides information on<br />
the size of the subnetwork (Intranet) and<br />
its address band. In this way, each station<br />
knows whether the IP address to be<br />
addressed is located in the same<br />
subnetwork or whether it has to be<br />
addressed via a gateway.<br />
Example:<br />
IP address 1st BDA: 206.150.100.89<br />
IP address 2nd BDA: 206.150.102.32<br />
IP address gateway: 206.150.100.1<br />
IP address browser: 206.150.100.50<br />
Subnet mask: 255.255.255.0<br />
Subnet mask 255.255.255.0 means that<br />
all addresses whose first three bytes are<br />
the same as the station address are located<br />
on the line of that station. These can be<br />
addressed directly (in the example above,<br />
from the browser of the first BDA). A<br />
comparison of the address of the second<br />
BDA with the subnet mask shows that this<br />
address is not on the same line as the<br />
station. This means that the gateway must<br />
be addressed, via which the request is then<br />
forwarded to the second BDA. The subnet<br />
mask is usually 255.255.255.0.<br />
BDA IP Address<br />
The BDA must be assigned its own unique<br />
IP address that has not been used before so<br />
that it can run on the Ethernet. This address<br />
must be in the same range as the other<br />
addresses on this line.<br />
Gateway IP Address<br />
If an address that is not located in the<br />
subnetwork is addressed in the browser,<br />
the request is forwarded to the gateway.<br />
The gateway knows the location to which<br />
the request has to be forwarded on account<br />
of the configuration. The IP address of the<br />
gateway must be obtained from the<br />
network administrator.<br />
If 0.0.0.0 is set as the gateway IP address, no<br />
access to a gateway has been configured.<br />
Operation<br />
Once the addresses have been set, it should<br />
be possible to call up the BDA Plus via<br />
Ethernet. This can be checked using a test<br />
ping. To do so, enter “ping x.x.x.x” in Start ><br />
Execute (x.x.x.x is the placeholder for the IP<br />
address of the BDA to be addressed). The<br />
DOS box that then appears tells you either<br />
that a reply from the "pinged" IP address<br />
is received, or that the request has been<br />
timed out. In this case, no connection has<br />
yet been established from the BDA Plus to<br />
the target system.<br />
Note: You may have to include the IP<br />
address of the BDA Plus in the list of<br />
addresses that do not use a proxy server.<br />
The use of a proxy server is optional and<br />
depends on the network.<br />
Once a connection has been established,<br />
start the browser and enter the IP address<br />
of the BDA Plus in the address line.<br />
5/23 <strong>WL</strong> PROFIBUS/MODBUS Communication and Electronic Accessories
Operating Instructions<br />
<strong>WL</strong> <strong>Circuit</strong> Breaker<br />
The BDA supports state-of-the-art<br />
communications technology. It can<br />
be implemented regardless of the<br />
operating system and browser used.<br />
The instructions provided here, show<br />
you how to make particular settings.<br />
A troubleshooting table is included<br />
at the end to help you solve<br />
any problems.<br />
Languages and Help<br />
The BDA interface is in German and English.<br />
The language is selected every time the<br />
browser is started. In addition to the HTML<br />
pages and Java applets, the BDA stores<br />
the accompanying help pages in different<br />
languages. The help pages can be called up<br />
(when they are available) via the question<br />
mark icon in the top right-hand corner of<br />
the screen. They are available whenever<br />
the BDA is activated. The help pages are<br />
available in German and English.<br />
Graphic<br />
5-5<br />
Parameter: read and writable<br />
Measured value: read only<br />
Parameter: read only<br />
Parameter not available<br />
Measured value not valid<br />
<strong>WL</strong> PROFIBUS/MODBUS Communication and Electronic Accessories<br />
Offline/Online Mode<br />
The BDA (and BDA Plus) can be run in two<br />
different operating modes.<br />
Online Mode<br />
Online mode is activated automatically when<br />
the BDA is connected to a circuit breaker.<br />
In this mode, the current operating and<br />
diagnostic data, as well as the parameters<br />
are displayed and loaded directly to the<br />
circuit breaker after they have been<br />
changed. Online mode is indicated<br />
by a green CubicleBUS LED.<br />
If the connection to the circuit breaker is<br />
interrupted, the BDA switches to offline<br />
mode. This also occurs if a file has been<br />
opened under “Parameter Transfer” or<br />
received from the circuit breaker.<br />
Offline Mode<br />
If the BDA is supplied with 24V DC and is<br />
not connected to a circuit breaker, the BDA<br />
starts in Offline mode, indicated by the<br />
CubicleBUS LED not illuminated. Offline<br />
mode is used to configure the BDA even if<br />
it is not connected to a circuit breaker, and<br />
allows the file to be saved.<br />
To switch from Offline to Online mode, first<br />
connect a circuit breaker. Then press either<br />
the “Online” or “Send Parameters” button in<br />
“Parameter Transfer.”<br />
MODBUS Address ( 1...125 )<br />
Current L1<br />
N-protection I N<br />
N-protection I N<br />
Demand L1<br />
439 A<br />
315 A<br />
The way data is displayed on the BDA pages depends on the property byte. This tells you which data<br />
is read only, which data can be written, and which data is not available.<br />
A<br />
11<br />
0 A<br />
SECTION 5<br />
Displaying Data<br />
<strong>WL</strong> <strong>Circuit</strong> <strong>Breakers</strong> use “Property Bytes,”<br />
which provide information on the required<br />
value, such as whether it is available, or<br />
readable and/or writable. The display then<br />
changes depending on the property byte.<br />
If a value is not available, for example,<br />
because the circuit breaker does not have any<br />
neutral conductor protection (N-conductor<br />
protection parameter), it is displayed as an<br />
empty white field with no outline.<br />
If a value is available, the system<br />
differentiates between whether it is only<br />
readable or also writable. “Read Only” data<br />
is displayed in black on a gray background<br />
in a black, outlined field. If the value is also<br />
writable, the background is white.<br />
Values that are available but not currently<br />
valid are displayed in red. This could be<br />
the case, for example, if the number of<br />
measured values available for calculating<br />
the long-term values of the current is<br />
insufficient because the circuit breaker<br />
has just been closed.<br />
5/24
Operating Instructions<br />
<strong>WL</strong> <strong>Circuit</strong> Breaker<br />
Password Protection<br />
All write actions that would result in a<br />
change to the status or a parameter in<br />
the circuit breaker are password protected.<br />
This ensures that parameters cannot be<br />
changed and switching is impossible<br />
without this password.<br />
Note: The electronic relays of the<br />
COM15/COM16 module are required to<br />
open and close the <strong>WL</strong> via the BDA.<br />
The default password is “sentron”<br />
This can be changed by choosing “Extras ><br />
Password” in the BDA tree (recommended).<br />
You have to enter the new password twice.<br />
When you click OK, the BDA asks you for<br />
the old password.<br />
If you have forgotten it, it can be reset<br />
by means of a master password. To<br />
do so, contact Technical Assistance at<br />
1-800-964-4114<br />
info.sea@sea.siemens.com<br />
Operation Example<br />
This example describes the functionality<br />
of the BDA. If you want to set<br />
PROFIBUS/MODBUS address of the<br />
COM15/COM16 module for a <strong>WL</strong> <strong>Circuit</strong><br />
Breaker, open the Communication node<br />
by choosing “Device Parameters > <strong>Circuit</strong><br />
Breaker.” Then click the input/output field<br />
next to the PROFIBUS/MODBUS address<br />
and edit it with the new address. Once<br />
you have changed this parameter and<br />
exited the field, the outline turns blue to<br />
indicate parameters that have not yet been<br />
transferred to the circuit breaker.<br />
You can then change other parameters.<br />
If you want to transfer the modified<br />
parameters to the circuit breaker, click<br />
OK on this page.<br />
If the parameter transfer process is the<br />
first write action in this session, the<br />
system prompts you to enter the password.<br />
Once you have entered the password<br />
successfully, the data is transmitted to the<br />
circuit breaker.<br />
If you want to reset the modified<br />
parameters, click the “Undo” button.<br />
If you exit the parameters page without<br />
clicking OK, the changes are ignored.<br />
Printing<br />
Since Java applets are used, the normal<br />
print function in your browser on the<br />
parameter pages will not provide a<br />
satisfactory printout.<br />
If you want to print the parameters for<br />
documentation purposes, open the pages<br />
to be printed from the tree in the BDA. All<br />
the parameter pages are displayed again<br />
under “Extras > Print,” and you can print<br />
them individually as required using the<br />
print menu in your browser.<br />
Comparing Parameters<br />
The parameter comparison function is<br />
used to check whether the parameters set<br />
with the BDA match those in the device.<br />
The following parameters are checked:<br />
• Protection parameters A and B<br />
• Extended protection function parameters<br />
• Threshold value settings<br />
• Measurement function settings<br />
• Communication parameters<br />
• Settings for the configurable<br />
output module<br />
The parameter comparison function can<br />
be used, for example, to ensure that the<br />
set parameters are transferred without any<br />
errors once they have been downloaded<br />
to the device.<br />
It is not possible to determine whether the<br />
parameters and settings loaded to the<br />
device have actually been transferred.<br />
The reason for this is as follows:<br />
• The BDA just forwards parameter<br />
changes. Whether a parameter is correct<br />
can only be verified in the memory<br />
location (e.g. in the trip unit). If this<br />
changes the value to one that has<br />
exceeded the maximum value, for<br />
example, the modified value is reported<br />
back to the BDA. This discrepancy<br />
would be detected when a subsequent<br />
parameter comparison is performed.<br />
• In the BDA interface, all of the values are<br />
not checked to confirm that they fall<br />
between minimum/maximum values.<br />
There are also other parameters that are<br />
not checked. This means that a parameter<br />
could be entered that cannot be copied<br />
into the trip unit in its current form.<br />
5/25 <strong>WL</strong> PROFIBUS/MODBUS Communication and Electronic Accessories
Troubleshooting<br />
<strong>WL</strong> <strong>Circuit</strong> Breaker<br />
Advantages through Communication<br />
Troubleshooting List<br />
Issue Description<br />
An error message appears (e.g. Modem is not<br />
initialized, recognized, etc.)<br />
Nothing happens after you select the language<br />
on the first page.<br />
You cannot establish a connection with<br />
the BDA.<br />
The system displays a message about security<br />
settings and the BDA pages<br />
stop loading.<br />
Table<br />
5-3<br />
<strong>WL</strong> PROFIBUS/MODBUS Communication and Electronic Accessories<br />
Solution<br />
SECTION 5<br />
Ensure that you are using a fully-assigned null modem cable. With a null modem cable, pins 2<br />
and 3, 4 and 6, and 7 and 8 must be assigned and reversed with respect to each other.<br />
Before starting the BDA, disconnect the null modem cable from the BDA and reboot the BDA<br />
(DEVICE LED is green). Then reconnect the cable.<br />
The COM port that you are using on the PC must utilized by a different application (go to the<br />
Device Manager to check it and free it up if necessary).<br />
Check the modem and data communications connection settings. You must choose “555” as the<br />
phone number and "ppp" as the user name.<br />
Set the baud rate for the COM interface that you are using to 115200.<br />
Ensure that the option “Use Java v1.4.0 ” is active in the browser.<br />
Delete the cache memory of the browser.<br />
Open the Java plug-in operator panel in the Control Panel. Check that the plug-in is active and<br />
Version 1.4.0 is selected under “Extended.” On the “Browser” tab page, the browser that you are<br />
using must be active, and the Java VM cache can be deleted. Then restart the system.<br />
If the problem persists, remove any older versions of Java you may have.<br />
Use a test ping to check that the connection has been established correctly. Select Start and<br />
enter "ping 2.2.2.1" in the Run window. A DOS box appears that displays either "Reply from<br />
2.2.2.1 after..." (connection OK) or "Reply timed out" (connection not available).<br />
Under Internet Options in the browser (under Tools in Microsoft Internet Explorer) select<br />
Connections. Under LAN settings disable the proxy server.<br />
Check Network Connections to verify that the Standard 2800 bps Modem is selected and<br />
assigned to the right COM port (under properties of the “BDA Communication via RS232”<br />
dial-up connection).<br />
Verify that the Standard 28800 bps Modem is enabled and is working properly. Go to Phone and<br />
Modem Options in the Control Panel or Modems in the Hardware Device Manager.<br />
If the problem persists, disable any other modems that may be enabled. Go to Phone and<br />
Modem Options in the Controls Panel or Modems in the Hardware Device Manager.<br />
The security level of the browser is set to “Secure” and stops Java applets from running, for<br />
example. For this reason, you have to reduce the security level to a level where the security<br />
message no longer appears and the BDA pages are displayed.<br />
This troubleshooting list helps you solve any problems you may encounter communicating with the BDA. If you have any other problems, Technical Assistance at<br />
1-800-964-4114 will be happy to help.<br />
5/26
Notes<br />
<strong>WL</strong> PROFIBUS/MODBUS Communication and Electronic Accessories
<strong>Siemens</strong> & Automation, Inc.<br />
3333 Old Milton Parkway<br />
Alpharetta, GA 30005<br />
1-800-964-4114<br />
info.sea@siemens.com<br />
www.sea.siemens.com/power<br />
Order No.: CBBR-<strong>WL</strong>CAG-1008 10MCP1008<br />
Printed in USA<br />
© 2008 <strong>Siemens</strong> Energy & Automation, Inc. All<br />
rights reserved. <strong>Siemens</strong> is a registered trademark<br />
of <strong>Siemens</strong> AG. Product names mentioned may be<br />
trademarks or registered trademarks of their<br />
respective companies. Specifications are subject<br />
to change without notice.