Assembly Instructions - Swing-N-Slide
Assembly Instructions - Swing-N-Slide
Assembly Instructions - Swing-N-Slide
You also want an ePaper? Increase the reach of your titles
YUMPU automatically turns print PDFs into web optimized ePapers that Google loves.
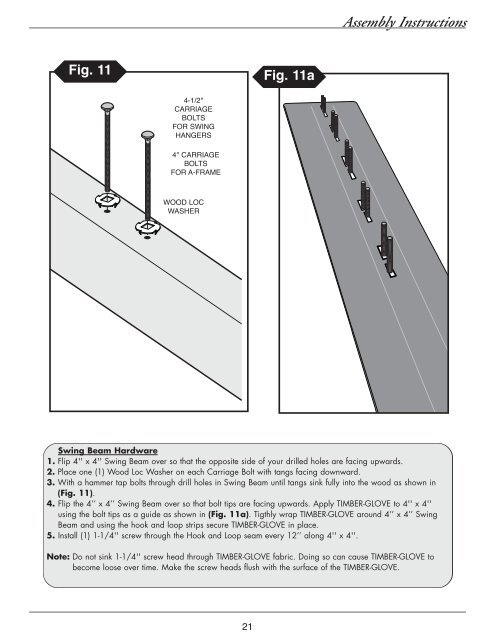
<strong>Assembly</strong> <strong>Instructions</strong>Fig. 11Fig. 11a4-1/2''CARRIAGEBOLTSFOR SWINGHANGERS4'' CARRIAGEBOLTSFOR A-FRAMEWOOD LOCWASHER<strong>Swing</strong> Beam Hardware1. Flip 4'' x 4'' <strong>Swing</strong> Beam over so that the opposite side of your drilled holes are facing upwards.2. Place one (1) Wood Loc Washer on each Carriage Bolt with tangs facing downward.3. With a hammer tap bolts through drill holes in <strong>Swing</strong> Beam until tangs sink fully into the wood as shown in(Fig. 11).4. Flip the 4’’ x 4’’ <strong>Swing</strong> Beam over so that bolt tips are facing upwards. Apply TIMBER-GLOVE to 4'' x 4''using the bolt tips as a guide as shown in (Fig. 11a). Tigthly wrap TIMBER-GLOVE around 4’’ x 4’’ <strong>Swing</strong>Beam and using the hook and loop strips secure TIMBER-GLOVE in place.5. Install (1) 1-1/4'' screw through the Hook and Loop seam every 12’’ along 4'' x 4''.Note: Do not sink 1-1/4'' screw head through TIMBER-GLOVE fabric. Doing so can cause TIMBER-GLOVE tobecome loose over time. Make the screw heads flush with the surface of the TIMBER-GLOVE.21


