Assembly Instructions - Swing-N-Slide
Assembly Instructions - Swing-N-Slide
Assembly Instructions - Swing-N-Slide
You also want an ePaper? Increase the reach of your titles
YUMPU automatically turns print PDFs into web optimized ePapers that Google loves.
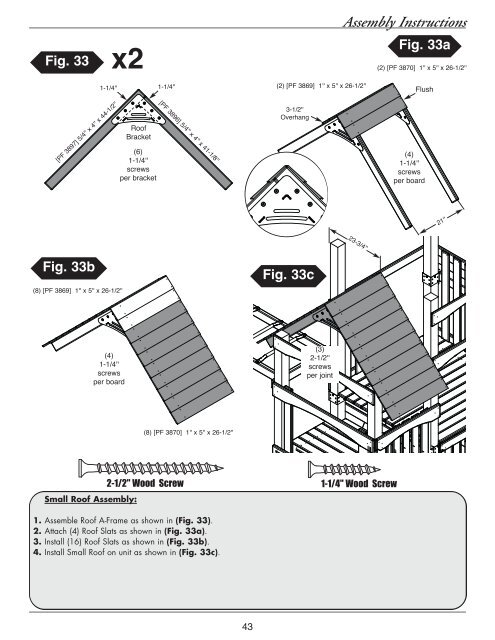
23-3/4''Fig. 33x2<strong>Assembly</strong> <strong>Instructions</strong>Fig. 33a(2) [PF 3870] 1'' x 5'' x 26-1/2''1-1/4''1-1/4''(2) [PF 3869] 1'' x 5'' x 26-1/2''Flush[PF 3897] 5/4'' x 4'' x 44-1/2''RoofBracket(6)1-1/4''screwsper bracket[PF 3896] 5/4'' x 4'' x 41-1/8''3-1/2''Overhang(4)1-1/4''screwsper board21''Fig. 33b(8) [PF 3869] 1'' x 5'' x 26-1/2''Fig. 33c(4)1-1/4''screwsper board(3)2-1/2''screwsper joint(8) [PF 3870] 1'' x 5'' x 26-1/2''Small Roof <strong>Assembly</strong>:2-1/2'' Wood Screw1-1/4'' Wood Screw1. Assemble Roof A-Frame as shown in (Fig. 33).2. Attach (4) Roof Slats as shown in (Fig. 33a).3. Install (16) Roof Slats as shown in (Fig. 33b).4. Install Small Roof on unit as shown in (Fig. 33c).43


