

Assembly Instructions - Swing-N-Slide
Assembly Instructions - Swing-N-Slide
Assembly Instructions - Swing-N-Slide

Create successful ePaper yourself
Turn your PDF publications into a flip-book with our unique Google optimized e-Paper software.
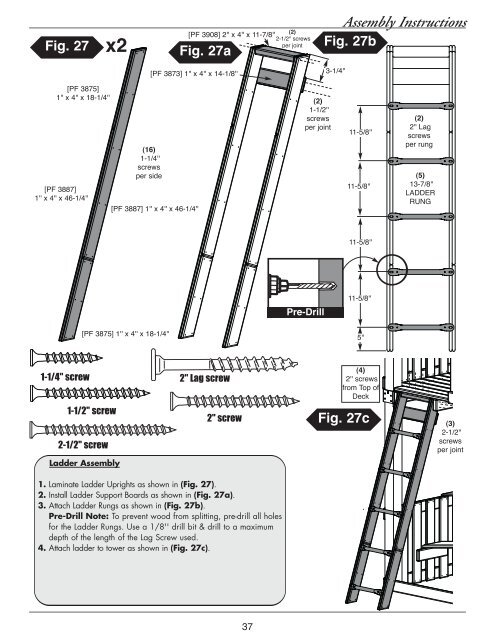
Fig. 27x2(2)[PF 3908] 2'' x 4'' x 11-7/8''2-1/2'' screwsper jointFig. 27a<strong>Assembly</strong> <strong>Instructions</strong>Fig. 27b[PF 3873] 1'' x 4'' x 14-1/8''3-1/4''[PF 3875]1'' x 4'' x 18-1/4''[PF 3887]1'' x 4'' x 46-1/4''(16)1-1/4''screwsper side[PF 3887] 1'' x 4'' x 46-1/4''(2)1-1/2''screwsper joint11-5/8''11-5/8''(2)2'' Lagscrewsper rung(5)13-7/8''LADDERRUNG11-5/8''11-5/8''Pre-Drill[PF 3875] 1'' x 4'' x 18-1/4''5''1-1/4'' screw2'' Lag screw(4)2'' screwsfrom Top ofDeck1-1/2'' screw2-1/2'' screw2'' screwFig. 27c(3)2-1/2''screwsper jointLadder <strong>Assembly</strong>1. Laminate Ladder Uprights as shown in (Fig. 27).2. Install Ladder Support Boards as shown in (Fig. 27a).3. Attach Ladder Rungs as shown in (Fig. 27b).Pre-Drill Note: To prevent wood from splitting, pre-drill all holesfor the Ladder Rungs. Use a 1/8'' drill bit & drill to a maximumdepth of the length of the Lag Screw used.4. Attach ladder to tower as shown in (Fig. 27c).37


