

Assembly Instructions - Swing-N-Slide
Assembly Instructions - Swing-N-Slide
Assembly Instructions - Swing-N-Slide

You also want an ePaper? Increase the reach of your titles
YUMPU automatically turns print PDFs into web optimized ePapers that Google loves.
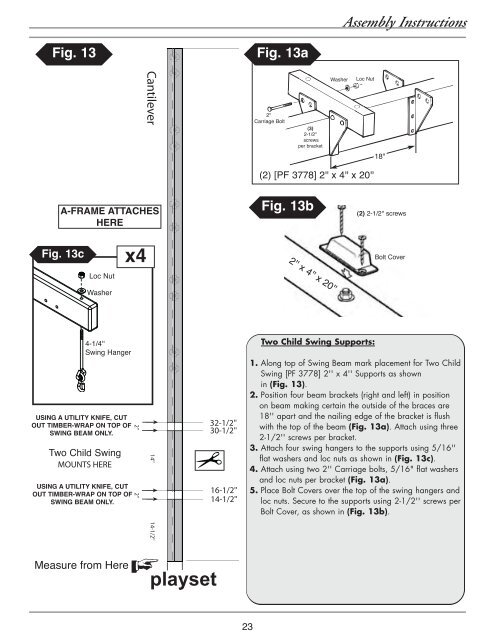
<strong>Assembly</strong> <strong>Instructions</strong>Fig. 13Fig. 13aWasherLoc Nut2''Carriage Bolt(3)2-1/2''screwsper bracket18"(2) [PF 3778] 2'' x 4'' x 20''A-FRAME ATTAcHESHEREFig. 13b(2) 2-1/2'' screwsFig. 13cx4Bolt Cover2'' x 4'' x 20''Loc NutWasher14-1/4''<strong>Swing</strong> HangerUSING A UTILITY KNIFE, cUTOUT NO HOOK TIMBER-WRAP AND LOOP ON TOP HERE OFSWING BEAM ONLY.Two OUTRIGGER Child <strong>Swing</strong> SWINGMOUNTS HEREUSING A UTILITY KNIFE, cUTOUT NO HOOK TIMBER-WRAP AND LOOP ON TOP HERE OFSWING BEAM ONLY.2''2''14''32-1/2''30-1/2''16-1/2''14-1/2''Two Child <strong>Swing</strong> Supports:1. Along top of <strong>Swing</strong> Beam mark placement for Two Child<strong>Swing</strong> [PF 3778] 2'' x 4'' Supports as shownin (Fig. 13).2. Position four beam brackets (right and left) in positionon beam making certain the outside of the braces are18'' apart and the nailing edge of the bracket is flushwith the top of the beam (Fig. 13a). Attach using three2-1/2'' screws per bracket.3. Attach four swing hangers to the supports using 5/16''flat washers and loc nuts as shown in (Fig. 13c).4. Attach using two 2'' Carriage bolts, 5/16" flat washersand loc nuts per bracket (Fig. 13a).5. Place Bolt Covers over the top of the swing hangers andloc nuts. Secure to the supports using 2-1/2'' screws perBolt Cover, as shown in (Fig. 13b).14-1/2''23


