PDF - Source : www.pcsoft-windev-webdev.com
PDF - Source : www.pcsoft-windev-webdev.com
PDF - Source : www.pcsoft-windev-webdev.com
- No tags were found...

You also want an ePaper? Increase the reach of your titles
YUMPU automatically turns print PDFs into web optimized ePapers that Google loves.
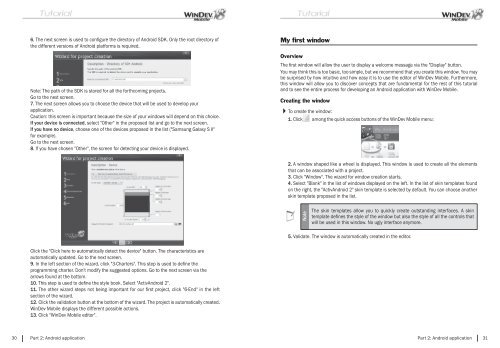
6. The next screen is used to confi gure the directory of Android SDK. Only the root directory ofthe different versions of Android platforms is required.Note: The path of the SDK is stored for all the forth<strong>com</strong>ing projects.Go to the next screen.7. The next screen allows you to choose the device that will be used to develop yourapplication.Caution: this screen is important because the size of your windows will depend on this choice.If your device is connected, select "Other" in the proposed list and go to the next screen.If you have no device, choose one of the devices proposed in the list ("Samsung Galaxy S II"for example).Go to the next screen.8. If you have chosen "Other", the screen for detecting your device is displayed.My first windowOverviewThe fi rst window will allow the user to display a wel<strong>com</strong>e message via the "Display" button.You may think this is too basic, too simple, but we re<strong>com</strong>mend that you create this window. You maybe surprised by how intuitive and how easy it is to use the editor of WinDev Mobile. Furthermore,this window will allow you to discover concepts that are fundamental for the rest of this tutorialand to see the entire process for developing an Android application with WinDev Mobile.Creating the window To create the window:1. Click among the quick access buttons of the WinDev Mobile menu:2. A window shaped like a wheel is displayed. This window is used to create all the elementsthat can be associated with a project.3. Click "Window". The wizard for window creation starts.4. Select "Blank" in the list of windows displayed on the left. In the list of skin templates foundon the right, the "ActivAndroid 2" skin template is selected by default. You can choose anotherskin template proposed in the list.NoteThe skin templates allow you to quickly create outstanding interfaces. A skintemplate defi nes the style of the window but also the style of all the controls thatwill be used in this window. No ugly interface anymore.5. Validate. The window is automatically created in the editor.Click the "Click here to automatically detect the device" button. The characteristics areautomatically updated. Go to the next screen.9. In the left section of the wizard, click "3-Charters". This step is used to defi ne theprogramming charter. Don't modify the suggested options. Go to the next screen via thearrows found at the bottom.10. This step is used to defi ne the style book. Select "ActivAndroid 2".11. The other wizard steps not being important for our fi rst project, click "6-End" in the leftsection of the wizard.12. Click the validation button at the bottom of the wizard. The project is automatically created.WinDev Mobile displays the different possible actions.13. Click "WinDev Mobile editor".30 Part 2: Android applicationPart 2: Android application 31