PDF - Source : www.pcsoft-windev-webdev.com
PDF - Source : www.pcsoft-windev-webdev.com
PDF - Source : www.pcsoft-windev-webdev.com
- No tags were found...
Create successful ePaper yourself
Turn your PDF publications into a flip-book with our unique Google optimized e-Paper software.
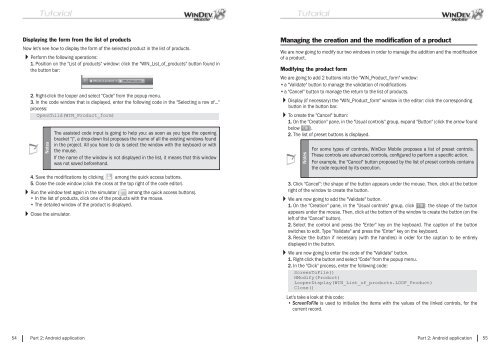
Displaying the form from the list of productsNow let's see how to display the form of the selected product in the list of products.Perform the following operations:1. Position on the "List of products" window: click the "WIN_List_of_products" button found inthe button bar:2. Right-click the looper and select "Code" from the popup menu.3. In the code window that is displayed, enter the following code in the "Selecting a row of..."process:NotesThe assisted code input is going to help you: as soon as you type the openingbracket "(", a drop-down list proposes the name of all the existing windows foundin the project. All you have to do is select the window with the keyboard or withthe mouse.If the name of the window is not displayed in the list, it means that this windowwas not saved beforehand.4. Save the modifi cations by clicking among the quick access buttons.5. Close the code window (click the cross at the top right of the code editor).Run the window test again in the simulator ( among the quick access buttons).• In the list of products, click one of the products with the mouse.• The detailed window of the product is displayed.Close the simulator.Managing the creation and the modification of a productWe are now going to modify our two windows in order to manage the addition and the modifi cationof a product.Modifying the product formWe are going to add 2 buttons into the "WIN_Product_form" window:• a "Validate" button to manage the validation of modifi cations• a "Cancel" button to manage the return to the list of products.Display (if necessary) the "WIN_Product_form" window in the editor: click the correspondingbutton in the button bar.To create the "Cancel" button:1. On the "Creation" pane, in the "Usual controls" group, expand "Button" (click the arrow foundbelow ).2. The list of preset buttons is displayed.NotesFor some types of controls, WinDev Mobile proposes a list of preset controls.These controls are advanced controls, confi gured to perform a specifi c action.For example, the "Cancel" button proposed by the list of preset controls containsthe code required by its execution.3. Click "Cancel": the shape of the button appears under the mouse. Then, click at the bottomright of the window to create the button.We are now going to add the "Validate" button.1. On the "Creation" pane, in the "Usual controls" group, click : the shape of the buttonappears under the mouse. Then, click at the bottom of the window to create the button (on theleft of the "Cancel" button).2. Select the control and press the "Enter" key on the keyboard. The caption of the buttonswitches to edit. Type "Validate" and press the "Enter" key on the keyboard.3. Resize the button if necessary (with the handles) in order for the caption to be entirelydisplayed in the button.We are now going to enter the code of the "Validate" button.1. Right-click the button and select "Code" from the popup menu.2. In the "Click" process, enter the following code:Let's take a look at this code:• ScreenToFile is used to initialize the items with the values of the linked controls, for thecurrent record.54 Part 2: Android applicationPart 2: Android application 55


