Here - Sage Pastel
Here - Sage Pastel
Here - Sage Pastel

Create successful ePaper yourself
Turn your PDF publications into a flip-book with our unique Google optimized e-Paper software.
Installation Guide
CONTENTS1 Hardware requirements pg 22 How to install <strong>Sage</strong> <strong>Pastel</strong> Xpress Version 12 pg 23 Starting <strong>Sage</strong> <strong>Pastel</strong> Xpress Version 12 pg 64 Registering your software pg 75 Working with companies pg 116 Converting from older versions pg 137 Managing your multi-user environment pg 178 Upgrading Pervasive pg 199 Troubleshooting your installation pg 2210 Keyboard shortcuts pg 2611 Useful contact details pg 28WELCOME TO sage PASTEL XPRESS Version 12Thank you for choosing <strong>Sage</strong> <strong>Pastel</strong> as your accounting software, support and serviceprovider. This <strong>Sage</strong> <strong>Pastel</strong> Xpress Version 12 installation guide assists you with thesmooth and effortless installation of your accounting software, providing you with easyto follow, step-by-step instructions.
1. HARDWARE REQUIREMENTS<strong>Sage</strong> <strong>Pastel</strong> Xpress Version 12 requires a computer equipped with a DVD-ROM,Microsoft® Windows XP, Windows 7 or Microsoft® Vista.For a single user version, or a workstation on a multi-user version, theminimum requirements are:• 512 MB RAM (We recommend 1GB or higher)• Screen Resolution of 1024 x 768• Pentium IVFor a server, the minimum requirements are:• 1GB RAM plus 128MB RAM per user• Pentium IV<strong>Sage</strong> <strong>Pastel</strong> Xpress will run on the following operating systems:• Windows XP Professional SP3• Windows Vista• Windows 7Note that neither Windows XP Home nor Vista Home can be used in a multi-userenvironment.Please note: Internet Explorer 6 or higher is required for the installation to continue.Please ensure you have this version installed on your system.2. SETTING UP YOUR PRODUCT IN FIVE EASY STEPSStep onePlace the DVD in the DVD-ROM drive. The DVD should start up automatically. If theDVD does not start up automatically:• Click Start on the Windows taskbar.• Click the Run option.• The Run window opens:2 | User Guide
In the Open field, enter the DVD-ROM drive letter together with “\Autorun\Autorun.exe”. The above screen shows what you would enter if your DVD-ROM is drive D.Instead of this, you can click the Browse button and select the file on the DVD-ROM.Click the OK button to continue.Step twoThe system will automatically take you to the “Install My Product” Screen. The followingscreen will appear:Click on <strong>Sage</strong> <strong>Pastel</strong> Xpress Version 12 and the next screen will display. Click Next tocontinue.User Guide | 3
The next screen to display is the License Agreement screen:Read the Licence Agreement, and click on “I accept the terms in the licenseagreement”. The installation will not continue unless you accept the license terms.Note that you can click the Back button at any time to review earlier screens.Step threeThe Setup Type screen displays:4 | User Guide
A Typical installation will install the program in English. If you wish to install additionallanguages, select the Custom option.Click Next to continue.Step fourThe Destination Folder screen will display:In this screen, you choose where to install <strong>Sage</strong> <strong>Pastel</strong> Xpress Version 12. Unless youhave a good reason, you should not change the default installation folder. If you do wishto change the installation folder, click the Change button and select the folder into whichyou wish to install.Click the Next button to continue.Step fiveThe Ready to Install screen displays:User Guide | 5
Click the Install button to begin the installation.The system displays a progress indicator:Once the install completes, the Completed screen displays:Click the Finish button to complete the install.3. STARTING <strong>Sage</strong> PASTEL XPRESS Version 12You can start <strong>Sage</strong> <strong>Pastel</strong> Xpress Version 12 in two ways:1. Locate the <strong>Sage</strong> <strong>Pastel</strong> Xpress Version 12 icon on your desktop:Double click the icon to start the system6 | User Guide
2. From the Start menu, choose All Programs I <strong>Pastel</strong> I <strong>Pastel</strong> Xpress Version 12 I <strong>Pastel</strong>Xpress Version 12.4. REGISTERING YOUR SOFTWAREYou will have to register your package before you can make full use of it. To register, youneed to obtain a Registration Code from <strong>Sage</strong> <strong>Pastel</strong>. You can do this by phone duringnormal working hours, or at any time via the internet. Registration is an annual activity,at no cost. You will also need to register if you install the system on another computer,or if you add more features. When you register, you do not lose any data you enteredprior to registration.Step oneThe first time you start <strong>Sage</strong> <strong>Pastel</strong> Xpress Version 12 the Welcome screen will display:Click the Next button to continue. The Registration Type screen displays:User Guide | 7
<strong>Here</strong> you choose the configuration you are registering:Use the Local/Server Registration option to register your package if you areregistering a:• Single user;• Multi-user Server;• Demonstration.Use the Workstation Registration option to link workstations to a multi-user registration.Once you complete the registration of the multi-user version using the Local/ServerRegistration option above, use this option to link each workstation installation to theserver registration. This works as follows: The Server Path field activates. Use the iconto navigate to the CUSTOM\ REGISTRATION folder on the computer on which youregistered the product. The Assistant will skip to the final screen.Use the Remote Server Registration option to register a multi-user version, wherethe server is a non-Windows server. This will use the workstation you are on to writeregistration information onto the non-Windows server, after which you can registerworkstations as in the previous option.Once you make your registration server choice, click the Next button to continue.Step twoThe Registration Details screen displays:Work in this screen as follows:• To register online, check the Register Online check box. This is the recommendedmethod, as you can register at any time. If you deselect the selection box, please callus during normal business hours to register.• To register a demonstration version, select the Demonstration selection box. TheSelect Your Country list box activates, and you can choose your country. TheAssistant will skip to the final screen.8 | User Guide
• To register a live version, deselect the Demonstration selection box. Enter the BaseSerial Number that is on your packaging or DVD, and enter your registered namein the Registered Name field. This name appears on all printouts you produce forany company. Note that for security purposes you cannot use generic names. Youprovide this name when you register.• Once you enter registration details, click the Next button to continue.If you are registering online, you need to be connected to the internet. The WebRegistration screen displays:If you are registering for the first time, a screen will appear displaying the Base SerialNumber entered into the Registration Wizard. Click Next.If you are upgrading from a previous version, a screen will appear displaying the BaseSerial Number entered into the Registration Wizard and you will need to enter theserial number of your previous version. Click Next. The following screen is displayed:User Guide | 9
Fill in the relevant details or update the displayed details if necessary on the screen, andclick the Next Step button.Step threeThe additional modules registration screen displays:If you purchased additional modules, enter the serial number for each module here.Click the Complete Registration button to continue.Your registration code will be returned to <strong>Sage</strong> <strong>Pastel</strong> Xpress Version 12. If you are notregistering online, the Registration Code screen displays:This works as follows:• The Access Code displays.• You now need to contact <strong>Sage</strong> <strong>Pastel</strong> Registrations and provide us with the companyname, base serial number and this access code10 | User Guide
Register online or contact <strong>Sage</strong> <strong>Pastel</strong> RegistrationsTo register by email, send all the required information to registrations@pastel.co.za.To register by phone, call <strong>Sage</strong> <strong>Pastel</strong> Registrations: 086 11 COVER (26837) duringnormal business hours.TIP: Registering online is faster, easier and more efficient than registering telephonicallyor via email. Save time and ensure accuracy by registering your product online.Step fourWhen you receive your registration code, enter it into the Registration Code field. Thisis a long code, so ensure you enter it correctly.Click the Next button. If the code is incorrect, enter it again.Step fiveOnce you complete the online or telephonic registration, the Summary screen displays.Click Next to finalise your registration.5. WORKING WITH COMPANIESWhen you have installed <strong>Sage</strong> <strong>Pastel</strong> Xpress Version 12, the system adds thedemonstration company to the Open a Company screen automatically.Step oneTo create a new company, you will select File | New. Choose the Use Setup Assistantoption. This is the recommended method of creating a new company. The SetupAssistant takes you through a series of screens and creates a company with all requiredparameters set up. Once the Setup Assistant creates a company, you can work in itimmediately.User Guide | 11
If you want detailed information on this topic, consult the online help.Note: <strong>Sage</strong> <strong>Pastel</strong> Xpress Start-Up is limited to a single company.To open an existing company, choose File | Open. The following screen will appear:Step twoClick on Add Company and you will see the following screen:Step threeYou will see your registered server. Click on Add Company and the following screen willappear:12 | User Guide
Browse to where the data is located.• Double-click on the data folder and then click OK. Now click on Close and you willsee your data in the list of companies available for you to open.• If you are working in a multi-user environment, and the company you want to openresides on another machine, you will need to map a network drive to the data folder.6. CONVERTING FROM OLDER VERSIONSThe software contains a Conversion Assistant that assists in converting data from olderversions. To convert the data please follow these instructions carefully.Step oneIn the company you are going to convert:• Update all outstanding open batches.• Run the Data Integrity option to verify there are no errors on the data.Step twoMake a backup of the data you are going to convert.Step threeYou must register your new product. (The conversion module only works with registeredversions. See Section 4 - Registering your Software).Step fourIn Windows, click on Start and select Programs. Click on <strong>Pastel</strong> and then <strong>Pastel</strong>Xpress Version 12 option, and then the Conversion option.User Guide | 13
Step fiveThe initial screen that displays will be the Conversion Assistant, click Next tocontinue.Step sixThe Version Selection screen displays:• Select the version from which you are converting, and then click on the Next buttonto continue.• In this, and all subsequent screens, you can click the Back button to review or edityour previous settings.Step sevenThe Data Location screen displays:14 | User Guide
You will need to select the location of the company that you wish to convert from in theolder version (e.g. C:\Xpress11\XYZ) by double-clicking on that data directory.Click the Next button.The system will request that the supervisor password be entered. (Should you not haveone, leave it blank and select OK).Step eightThe New Data Location screen displays:In the New Company Directory field, enter the name of the folder for the convertedcompany. You can enter a new name, however we recommend that the same name asthe original company is used to eliminate confusion, (e.g. XYZ). This folder will now becreated and appear within your Xpress12 folder.Click the Next button to continue.Step nineClick the Process button to start the conversion.Step tenIf you make use of customised forms in the older version, you will see a message thatasks whether you wish to overwrite the forms folder. To keep the customisation of yourdocuments, including customisations to stationery, click the No button. If you selectYes, you will need to redo any changes that you have on your current forms, includingadding logos to your forms.User Guide | 15
Step elevenOnce the conversion is complete, select Finish. You will need to complete this conversionprocess for each company that you wish to convert to <strong>Sage</strong> <strong>Pastel</strong> Xpress Version 12.Once you have converted your data you will need to add it to your list of availablecompanies on the Manage screen in <strong>Sage</strong> <strong>Pastel</strong> Xpress Version 12. See Section 5 –Working with Companies.Step twelveFor each converted company you will need to execute the procedure below:Go to Setup and select Validate Parameters.This process will enable you to see which setup areas still need to be completed orestablish if any data is missing from the setup sections. Should any data be missing,you will be required to add the necessary information.Select Setupand then ValidateParameters.Step thirteenWe suggest that you verify your data to ensure no problems have been encountered.You can do this by selecting File | Data Integrity and then choosing the Verify Data Onlyoption.Should you receive any errors on the report please contact the <strong>Sage</strong> <strong>Pastel</strong> Support team.We also recommend that you run the Verify History File Only option. The verifying of thedata will need to be completed in each company that has been converted.16 | User Guide
7. MANAGING YOUR MULTI-USER ENVIRONMENTIn a multi-user environment, it is a good idea to identify and set up a Fixed Gateway forthe <strong>Sage</strong> <strong>Pastel</strong> Xpress Version 12 data files.1. What does the Gateway do?• On a network where there is no dedicated server and the server which stores the datais also used to perform day to day functions, we refer to this type of setup as a peerto-peernetwork.• The Gateway facility allows you to access data on other computers on the network.• A Gateway therefore needs to be selected. The PC which is selected as the Gatewaywill “act” as a server since it will control the access to the files and the computer onwhich the data (company) is stored.2. Which PC should be selected as the Gateway?• It makes sense to select the PC with the best resources or specifications to act as theGateway.• Selecting the same PC where the data is stored to act as the Gateway also results inimproved speed since the request for information to be supplied and the supply of theinformation takes place on the same PC.3. What are the consequences of not selecting a Gateway?If no fixed Gateway is selected, then the system will operate on a “floating” gateway.This means that the first PC on the network to open that company will act as theGateway for that data directory, until it is shut down or turned off. Potential problemsexist in this scenario:• The machine with the least resources or the poorest specifications may be the firstto log in and act as the Gateway. This will result in poor speed performance for all themachines accessing the data.• Further, if the user acting as the Gateway shuts down the machine or stops thePervasive engine then all the other users will also encounter a problem (likely an errorcode 20).• Data corruption will occur if a user is trying to perform an update when this happens.• Since this is difficult to track, it is strongly recommended that a Fixed Gateway beselected.User Guide | 17
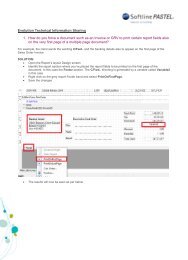
How and where does the Gateway get set?Go to the PC on which you will be storing the data (or you can do this from any otherPC) and click on Start. Select Programs and then Pervasive. SQL. Now chooseOther Utilities and then Gateway Locator.Click on this buttonto browse.Click Change toassign the PC onwhich the Gatewaywill be setup.Next to the window for Target Directory, click on the browse button to browse to thecompany folder, for example C:\Xpress12\Demo.NOTE: In the figure above the C: drive indicates the drive on the PC where the data willbe stored, and Demo refers to the company name.If you are doing this from another PC, you will browse for the PC on which the data isstored, and then for the company directory on that PC.If you have more than one company, then you will need to do this for each company,one at a time.Under Directory Status you will see that the Gateway is unassigned. Click onChange.This will display another window where you can select the Gateway PC (Ensure youhave ‘Assign a Gateway’ selected).Make sure the option toAssign a Gateway isselected.Enter the name of thecomputer that is selected asthe Gateway.18 | User Guide
• The system will default to the name of the PC that you are working from and youwill be required to alter it if you are not performing this from the PC selected to be theGateway.• If you are doing this on the Gateway PC, the PC name is correct and no change isrequired.NOTE: If you have more than one company in <strong>Sage</strong> <strong>Pastel</strong> Xpress Version 12 youcan select to have a different PC act as the Gateway for each company. If one userprocesses more often in a particular company, then we suggest you make that user’sPC the Gateway for that particular data set.• The Gateway for a particular company can be changed to a different PC at any timeby repeating the setup above.8. UPGRADING PERVASIVEWhen upgrading or if you have used Pervasive software beforehand, and you want tomake use of the latest version of Pervasive, you will have to uninstall the current versionof Pervasive from the workstations and where necessary from the server, to ensure thatthere are no components of the software on your machine.NOTE: Failing to uninstall Pervasive first will result in the new version of Pervasive notbeing installed.Follow these steps below to uninstall:• Insert the <strong>Sage</strong> <strong>Pastel</strong> Xpress Version 12 DVD into the DVD-ROM drive.• Once the autorun screen displays, select Exit.• Go into My Computer either by double-clicking the icon on the desktop or by goingvia the Start menu.• Locate the DVD-ROM drive, right-click and select Open from the pop-up menu.• Double-click on the Pervasive folder.• Double-click on the Workgroup for Windows.User Guide | 19
• Double-click on the PSA folder.Double click on the PSAfolder.• Double-click on Setup.Exe• When the Pervasive System Analyzer setup screen comes up, click on Next.• Select Next on the first 3 screens until you get to the screen displayed below.Ensure the first block isselected an the other is not.• Ensure that the Launch Pervasive System Analyser after Setup Completesoption has been selected.• Leave the Show the Readme file option unchecked.• Click on Finish.• The Pervasive welcome screen will be displayed. Select Next.• On the following screen as seen below, ensure that the Delete Components orArchives is checked and then click on Next.Ensure Delete componentsor archives is selected.Select Next to continue.20 | User Guide
• The Local Machine option must be checked on the following screen.Select Local Machine.• On the following Delete Options screen check both options, Delete Pervasive.SQLcomponents and Registry settings and Delete Pervasive Archives.Select both options.• Select Next to continue.• You will be requested to select whether you want to have the items permanentlydeleted, click on Yes.• Once this is completed, select Finish to complete the uninstall process.• You can choose to either restart your machine now or later.NOTE: You will have to complete the uninstall process on each workstation and/or onthe server in a Workgroup or Single User environment.User Guide | 21
9. TROUBLESHOOTING YOUR INSTALLATIONIn order to minimise potential problems, we recommend reading this section. For furthertroubleshooting information, please refer to the Troubleshooting section in the onlinehelp.Prior to installation:• Ensure that the minimum system requirements are met. These requirements aredetailed at the beginning of this guide.• Restart your system before installation to ensure that the resources for theinstallation process are cleared.• Login as the Administrator of the PC – this will ensure that you have all thenecessary rights in order to install your software.• Disable any virus checking software for the duration of the installation only.This is necessary because anti-virus software blocks writing to system files (e.g.*.VBX,*.DLL, *.OCX files) and the updating of some of these files may be required duringinstallation.TIP: Should there be a problem in disabling the anti-virus software it may need to beuninstalled completely and reinstalled after the installation. This is for the same reasonsas above.Error Code 20 – Record Manager InactiveThis error occurs when the Pervasive Database Engine is not running on the localmachine or the server.You should work through the following possibilities in sequence:• Missing or Incorrect Installation;• Firewall Settings;• Anti-Virus Settings.Missing or Incorrect InstallationError 20 can occur if Pervasive was installed incorrectly, or if an older version is presenton the workstation.To determine whether Pervasive is running and which version is running:1. When you start <strong>Pastel</strong>, in the Windows Taskbar at the bottom right corner where thetime displays, there should be a Pervasive icon:Pervasive.22 | User Guide
If this icon does not display, you should install Pervasive manually as outlined below.2. If the icon is present, it may be the incorrect version. The <strong>Sage</strong> <strong>Pastel</strong> install programwill not overwrite an older existing version of Pervasive on the workstation. To checkthe version, right click on the Pervasive icon, and choose About from the pop-upThe database version displays next to the OK button.3. If the Pervasive version is incorrect, you need to install or re-install Pervasive. To dothis, you need to first terminate the version that is running. Right click the icon again,and choose the Stop Engines and Exit option from the pop-up menu.To remove an older version of the Pervasive Engine, refer to Section 8-UpgradingPervasive.Firewall and Anti-Virus SettingsIf you have a firewall installed on the workstation, it may be inhibiting communicationbetween a workgroup or client/server version and causing an error 20. If this is thecase, you must enable the firewall software to allow such communication. We show youhow to control this in using the firewall built into Windows XP SP2. If you are using adifferent firewall, consult the software’s user guide.User Guide | 23
1. To check and set firewall settings in Windows XP SP31. In Windows, open the Control Panel and double click the Windows Firewalloption.2. Double click on Windows Firewall, and select the Exceptions tab3. Ensure the Display Notification checkbox is checked. If it is not checked, thencheck it and click OK, and try to access Pervasive once again. If there is nomessage from Windows Firewall, then this is not the problem.4. If you receive a message from Windows Firewall, start it up again as above, andreturn to the Exceptions tab and do the following:• Click Add Program, and browse to the program C:\PVSW\Bin\w3dbsmgr. exe.Click OK to save the program.• Click the Add Port button.In the Name field, enter “Pervasive”.In the Port Number field, enter 1583.Choose TCP.Click OK to save the new port.• Click OK in the Windows Firewall to save your settings and close the window.2. Anti-Virus blocking network communicationIf you have anti-virus software installed on your workstation, it could be causing anissue that gives rise to the error 20. You should disable the anti-virus software and seeif this helps. If it does, please get your Network or IT administrator to set the anti-virussoftware to allow Pervasive communication across the network.3. Check the network communication using the Pervasive System Analyzer• Click on Start, then Programs.• Click on Pervasive System Analyzer.• A window will be displayed on the screen, click on Next.Select the option Test Active Installation, and ensure all the options below that arealso selected.24 | User Guide
Make sure Test ActiveInstallation, together withall three options below, areenabled.• Now select the Server machine on the network. This will test network communicationbetween the Server and the Workstation.• Click on Next.• A summary indicating that ALL information sent has been received should display.Ensure the tests aresuccessful.• On the next screen run the Transactional Engine Test.• Ensure that the results are successful.• Click Next to proceed.• Now run the Relational Engine Test and make sure it is successful.• If errors were encountered on any of these tests, it is best that you request yournetwork or hardware technician to correct these.User Guide | 25
10. KEYBOARD SHORTCUTSFunction/ Operation CommentsShortcutKeyF1 Access Help The help facility is available by pressingF1 on any screen in your <strong>Sage</strong> <strong>Pastel</strong> product.F2 Open the Note facility Select F2 to open the Note facility, whichcan also be linked to customer andsupplier accounts.F3 Allocate Open Item F3 allows you quick access to thetransactionsOpen Item matching screen whenprocessing in journals or cashbooks.F4 Open the Price Useful for instant access to inventorySearch facilityitems’ selling prices. Also showsquantities on hand of inventory items.F5 Zoom in on a record F5 opens a zoom screen to performvarious record editing and enquiryfunctions.F6 Add a new record Quickly create a customer, supplier,general ledger or inventory account atthe touch of a button.F7 Reconcile function The F7 function key allows you toreconcile your physical bank statementwith <strong>Sage</strong> <strong>Pastel</strong>’s cashbook transactionsquickly and easily.F7 Modify a record when Modify or edit a customer in theon a Zoom screen cashbook, supplier or general ledgeraccount when zooming in for either ofthe above. Note: the F7 function onlyworks when on a zoom screen for anaccount.26 | User Guide
F8 Switch between VAT When processing in the cashbook orinclusive andjournal, select F8 to change anexclusive transactions amount from exclusive to inclusive orvice versa. Note: this function onlyworks in cashbooks and journals.F9 Open the calculator F9 brings up the calculator fromWindows. Select View on the calculatorand then click on Scientific for access tomany additional, useful calculatorfunctions.F12 Return to the previous When processing in documents,columnjournals or cashbooks, and you are inthe Account field, you cannot move offthe field without selecting an account.Pressing F12 while on the field will moveyou to the previous field without forcingyou to select an account.Ctrl + H Edit customer/supplier When processing document lines, youaddress detailscan use Ctrl + H to jump to the DeliveryAddress field instantly. Note: you needto be on the transaction lines to use thisshortcut.Ctrl + L Insert lines on invoices When processing documents, afterselecting the customer/supplier account,you can use Ctrl + L to jump straight tothe lines without tabbing through the restof the fields in the header section.Note: you need to be on a header field touse this shortcut.Ctrl + R Copy postal address In the Edit Customer/Supplier menu, youto delivery addresscan use this function to copy yourfield or vice versadelivery address to your postal addressfield, and vice versa.User Guide | 27
11. USEFUL CONTACT DETAILSCape TownSwitchboard +27 21 522 7400 ctsales@pastel.co.zaDurbanSwitchboard +27 31 537 7100 dbnsales@pastel.co.zaJohannesburgSwitchboard +27 11 304 3000 info@pastel.co.zaRegistrations +27 86 112 6837 registrations@pastel.co.zaProduct Sales +27 11 304 3600 sales@pastel.co.zaTraining +27 11 304 3670 training@pastel.co.zaInstallation Assistance +27 11 304 3830 installations@pastel.co.zaSupport Desk +27 86 112 6837 support@pastel.co.za<strong>Pastel</strong> Payroll +27 11 304 4000 info@pastelpayroll.co.zaInternationalSwitchboard +27 11 304 3400 info@sagepastel.comwww.sagepastel.comTIP: Your product comes with 30 days <strong>Sage</strong> FREE <strong>Pastel</strong> Cover. Unless you extend your<strong>Sage</strong> <strong>Pastel</strong> Cover, support will no longer be available to you after the 30-day period.<strong>Sage</strong> <strong>Pastel</strong> Cover is an annual support plan which gives you all the help your businessneeds. As a priority customer with <strong>Sage</strong> <strong>Pastel</strong> Cover, you’ll receive unlimited telephonicsupport, free software upgrades and updates, discounted training and more. To purchase<strong>Sage</strong> <strong>Pastel</strong> Cover call (011) 304 3600 or visit www.pastel.co.za.The specifications and information in this Installation Guide are correct at the time ofprinting. We continuously invest in Research and Development, and all the informationin this guide is subject to change without prior notice. Therefore, <strong>Sage</strong> <strong>Pastel</strong> cannot beheld responsible for errors or omissions. Copying or reprinting of this guide or sectionsthereof is not permitted without prior written authorisation.28 | User Guide
<strong>Sage</strong> <strong>Pastel</strong>: +27 11 304 3000 • <strong>Sage</strong> <strong>Pastel</strong> Intl: +27 11 304 3400www.pastel.co.za • www.sagepastel.cominfo@pastel.co.za • info@sagepastel.com© <strong>Sage</strong> <strong>Pastel</strong> Accounting 2013