IC-M402 - ICOM Canada
IC-M402 - ICOM Canada
IC-M402 - ICOM Canada
- No tags were found...

You also want an ePaper? Increase the reach of your titles
YUMPU automatically turns print PDFs into web optimized ePapers that Google loves.
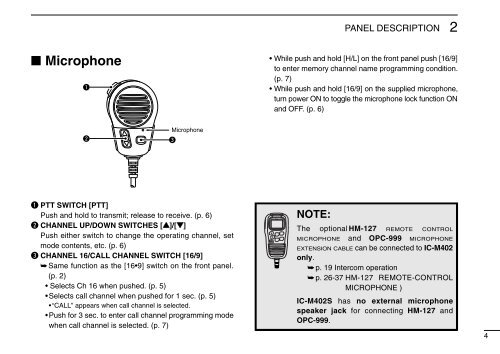
PANEL DESCRIPTION2■ Microphoneq• While push and hold [H/L] on the front panel push [16/9]to enter memory channel name programming condition.(p. 7)• While push and hold [16/9] on the supplied microphone,turn power ON to toggle the microphone lock function ONand OFF. (p. 6)wMicrophoneeq PTT SWITCH [PTT]Push and hold to transmit; release to receive. (p. 6)w CHANNEL UP/DOWN SWITCHES [Y]/[Z]Push either switch to change the operating channel, setmode contents, etc. (p. 6)e CHANNEL 16/CALL CHANNEL SWITCH [16/9]➥Same function as the [16•9] switch on the front panel.(p. 2)• Selects Ch 16 when pushed. (p. 5)•Selects call channel when pushed for 1 sec. (p. 5)•“CALL” appears when call channel is selected.•Push for 3 sec. to enter call channel programming modewhen call channel is selected. (p. 7)NOTE:The optional HM-127 REMOTE CONTROLM<strong>IC</strong>ROPHONE and OPC-999 M<strong>IC</strong>ROPHONEEXTENSION CABLE can be connected to <strong>IC</strong>-<strong>M402</strong>only.➥ p. 19 Intercom operation➥ p. 26-37 HM-127 REMOTE-CONTROLM<strong>IC</strong>ROPHONE )<strong>IC</strong>-<strong>M402</strong>S has no external microphonespeaker jack for connecting HM-127 andOPC-999.4