- Page 1 and 2: Voicemail Installation guide1841 Bo
- Page 3 and 4: ContentsIntroduction...............
- Page 5 and 6: Mailboxes..........................
- Page 7 and 8: IntroductionIN THIS GUIDEInstalling
- Page 9 and 10: 1 InstallationIN THIS CHAPTERPreins
- Page 11 and 12: Inspecting and installing hardwareB
- Page 13 and 14: • Connect the UPS data cable to a
- Page 15 and 16: 3. Connect the voice mail extension
- Page 17 and 18: Your screen should look like the il
- Page 19 and 20: If you are adding an administrator
- Page 21 and 22: The Port Type field should display
- Page 23 and 24: covered to voice mail internally (s
- Page 25 and 26: The following table shows the stand
- Page 27 and 28: Mailboxes: an introductionThis sect
- Page 29 and 30: Select LanguagemailboxThis speciali
- Page 31 and 32: When you press OK, the Guest Mailbo
- Page 33 and 34: 2. Enter the starting number of the
- Page 35 and 36: Adding front desk mailboxesThe foll
- Page 37 and 38: 2. Double-click the New Mailbox ico
- Page 39 and 40: Defining the guest services classTh
- Page 41 and 42: 6. Click the Service Class menu at
- Page 43 and 44: 4. Click the Dial button to display
- Page 45 and 46: 2. Double-click the New Mailbox ico
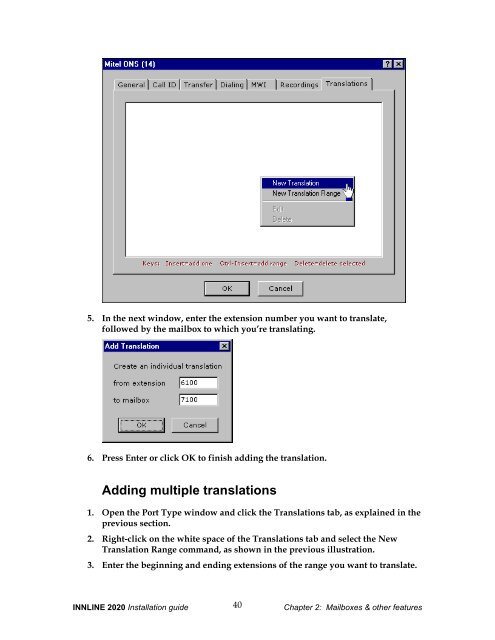
- Page 47: TranslationsWhenever a call is forw
- Page 51 and 52: 3. Add services to the menu using t
- Page 53 and 54: Using this configuration requires t
- Page 55 and 56: In the Greeting Prompt field, the f
- Page 57 and 58: The Key 1 Mailbox is referencing DI
- Page 59 and 60: 8. Click OK to close the Menu Mailb
- Page 61 and 62: Programming the fax number for repo
- Page 63 and 64: • Call Forward Usage report 8•
- Page 65 and 66: Guest Mailbox reportThe Guest Mailb
- Page 67 and 68: Maid Status report 10The Maid Statu
- Page 69 and 70: Port Usage reportThe Port Usage rep
- Page 71 and 72: |##################################
- Page 73 and 74: System Activity reportThe System Ac
- Page 75 and 76: 05/19 07:23:13 DIRECT 2714 1 1105/1
- Page 77 and 78: Staff Email Address reportThe Staff
- Page 79 and 80: INNLINE 2020 Installation guide71Ch
- Page 81 and 82: System housekeepingUse this option
- Page 83 and 84: ParameterManualBack-upManualRestore
- Page 85 and 86: System service logUse this window t
- Page 87 and 88: You can edit the following paramete
- Page 89 and 90: Voice port typesTo edit the system
- Page 91 and 92: Transfer tabParameter Description R
- Page 93 and 94: The window is divided into five tab
- Page 95 and 96: TenantsIf necessary, you can edit i
- Page 97 and 98: Parameter Description Range Default
- Page 99 and 100:
Parameter Description Range Default
- Page 101 and 102:
Parameter Description Range Default
- Page 103 and 104:
Parameter Description Range Default
- Page 105 and 106:
Parameter Description DefaultMessag
- Page 107 and 108:
Parameter Description Range Default
- Page 109 and 110:
ReportsYou can print several report
- Page 111 and 112:
You can edit the following paramete
- Page 113 and 114:
Parameter Description DefaultTransf
- Page 115 and 116:
AnnounceUse this option to add anno
- Page 117 and 118:
Maid status entryYou can use this f
- Page 119 and 120:
The Automated Attendant window has
- Page 121 and 122:
Parameter Description Range Default
- Page 123 and 124:
ParameterLocate PartyTake TutorialS
- Page 125 and 126:
Parameter Description DefaultSet Di
- Page 127 and 128:
Notifications - Special Message Not
- Page 129 and 130:
Parameter Description DefaultPauseU
- Page 131 and 132:
Special Message Notification report
- Page 133 and 134:
Delete Guest Mailboxes. Using this
- Page 135 and 136:
Greeting tabParameterActiveGreeting
- Page 137 and 138:
Parameter Description Range Default
- Page 139 and 140:
Phone Numbers tabThe features shown
- Page 141 and 142:
ParameterOperatorAuto-forwardCertif
- Page 143 and 144:
ParameterDisableMessageStorageDisab
- Page 145 and 146:
Notify 1, Notify 2, and Notify 3 ta
- Page 147 and 148:
To enter an email address, check th
- Page 149 and 150:
Click the Send button to send the t
- Page 151 and 152:
Administration mailboxesUse this op
- Page 153 and 154:
Question & Answer mailboxThis mailb
- Page 155 and 156:
Hotel Claritin Downtown Chicago #Qu
- Page 157 and 158:
4 Add-onfeaturesIN THIS CHAPTERInnC
- Page 159 and 160:
Parameters Description DefaultConne
- Page 161 and 162:
Check to enableInnConnect callforwa
- Page 163 and 164:
Step 6: Add and configure the SMDR
- Page 165 and 166:
With PrivateLine, the guest room’
- Page 167 and 168:
If a guest room has more than one e
- Page 169 and 170:
3. Highlight a DID phone number and
- Page 171 and 172:
Parameter Description DefaultAllow
- Page 173 and 174:
Step 8: Connect the DID card printe
- Page 175 and 176:
Step 11: Configure PrivateLine repo
- Page 177 and 178:
Fax Messages tab (Fax Sending)Param
- Page 179 and 180:
Wake-up off-loadingIf this feature
- Page 181 and 182:
911 notificationsThe 911 Notificati
- Page 183 and 184:
Parameter Description Range Default
- Page 185 and 186:
HHANGUP Mailbox ID, 23HASP connecti