5000 Series Indicators Instruction Manual - Scale Manuals
5000 Series Indicators Instruction Manual - Scale Manuals
5000 Series Indicators Instruction Manual - Scale Manuals

You also want an ePaper? Increase the reach of your titles
YUMPU automatically turns print PDFs into web optimized ePapers that Google loves.
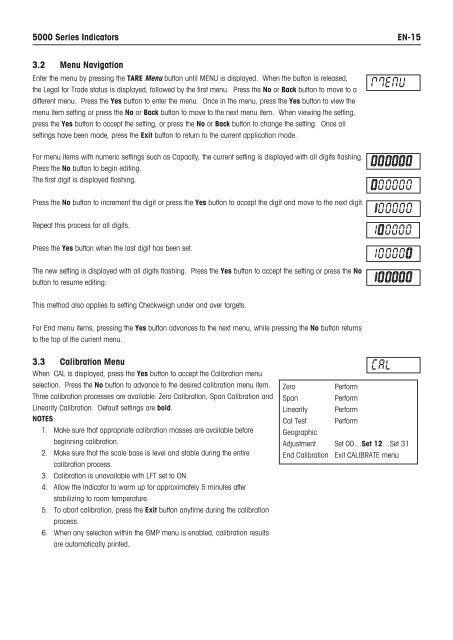
<strong>5000</strong> <strong>Series</strong> <strong>Indicators</strong>EN-153.2 Menu NavigationEnter the menu by pressing the TARE Menu button until MENU is displayed. When the button is released,the Legal for Trade status is displayed, followed by the first menu. Press the No or Back button to move to adifferent menu. Press the Yes button to enter the menu. Once in the menu, press the Yes button to view themenu item setting or press the No or Back button to move to the next menu item. When viewing the setting,press the Yes button to accept the setting, or press the No or Back button to change the setting. Once allsettings have been made, press the Exit button to return to the current application mode.For menu items with numeric settings such as Capacity, the current setting is displayed with all digits flashing.Press the No button to begin editing.The first digit is displayed flashing.Press the No button to increment the digit or press the Yes button to accept the digit and move to the next digit.Repeat this process for all digits.Press the Yes button when the last digit has been set.The new setting is displayed with all digits flashing. Press the Yes button to accept the setting or press the Nobutton to resume editing.This method also applies to setting Checkweigh under and over targets.For End menu items, pressing the Yes button advances to the next menu, while pressing the No button returnsto the top of the current menu.3.3 Calibration MenuWhen CAL is displayed, press the Yes button to accept the Calibration menuselection. Press the No button to advance to the desired calibration menu item.Three calibration processes are available: Zero Calibration, Span Calibration andLinearity Calibration. Default settings are bold.NOTES:1. Make sure that appropriate calibration masses are available beforebeginning calibration.2. Make sure that the scale base is level and stable during the entirecalibration process.3. Calibration is unavailable with LFT set to ON.4. Allow the Indicator to warm up for approximately 5 minutes afterstabilizing to room temperature.5. To abort calibration, press the Exit button anytime during the calibrationprocess.6. When any selection within the GMP menu is enabled, calibration resultsare automatically printed.ZeroPerformSpan PerformLinearity PerformCal Test PerformGeographicAdjustment Set 00…Set 12…Set 31End Calibration Exit CALIBRATE menu