Maintenance & Inspection Guide Leaded ROLâ¢200 ... - Johnstech
Maintenance & Inspection Guide Leaded ROLâ¢200 ... - Johnstech
Maintenance & Inspection Guide Leaded ROLâ¢200 ... - Johnstech
- No tags were found...

You also want an ePaper? Increase the reach of your titles
YUMPU automatically turns print PDFs into web optimized ePapers that Google loves.
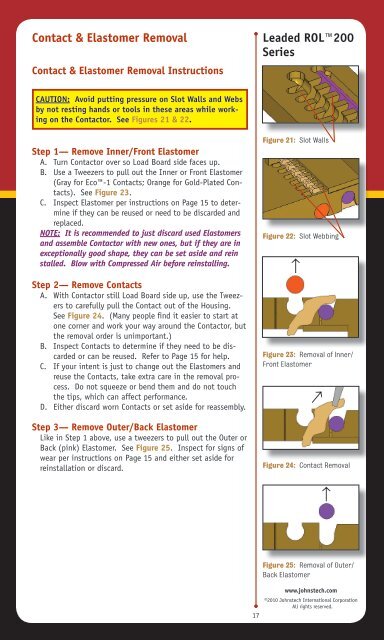
Contact & Elastomer RemovalContact & Elastomer Removal Instructions<strong>Leaded</strong> ROL200SeriesCAUTION: Avoid putting pressure on Slot Walls and Websby not resting hands or tools in these areas while workingon the Contactor. See Figures 21 & 22.Step 1— Remove Inner/Front ElastomerA. Turn Contactor over so Load Board side faces up.B. Use a Tweezers to pull out the Inner or Front Elastomer(Gray for Eco-1 Contacts; Orange for Gold-Plated Contacts).See Figure 23.C. Inspect Elastomer per instructions on Page 15 to determineif they can be reused or need to be discarded andreplaced.NOTE: It is recommended to just discard used Elastomersand assemble Contactor with new ones, but if they are inexceptionally good shape, they can be set aside and reinstalled. Blow with Compressed Air before reinstalling.Step 2— Remove ContactsA. With Contactor still Load Board side up, use the Tweezersto carefully pull the Contact out of the Housing.See Figure 24. (Many people find it easier to start atone corner and work your way around the Contactor, butthe removal order is unimportant.)B. Inspect Contacts to determine if they need to be discardedor can be reused. Refer to Page 15 for help.C. If your intent is just to change out the Elastomers andreuse the Contacts, take extra care in the removal process.Do not squeeze or bend them and do not touchthe tips, which can affect performance.D. Either discard worn Contacts or set aside for reassembly.Step 3— Remove Outer/Back ElastomerLike in Step 1 above, use a tweezers to pull out the Outer orBack (pink) Elastomer. See Figure 25. Inspect for signs ofwear per instructions on Page 15 and either set aside forreinstallation or discard.Figure 21: Slot WallsFigure 22: Slot Webbing→Figure 23: Removal of Inner/Front Elastomer→Figure 24: Contact Removal→Figure 25: Removal of Outer/Back Elastomer17www.johnstech.com©2010 <strong>Johnstech</strong> International CorporationAll rights reserved.