Maintenance & Inspection Guide Leaded ROLâ¢200 ... - Johnstech
Maintenance & Inspection Guide Leaded ROLâ¢200 ... - Johnstech
Maintenance & Inspection Guide Leaded ROLâ¢200 ... - Johnstech
- No tags were found...

Create successful ePaper yourself
Turn your PDF publications into a flip-book with our unique Google optimized e-Paper software.
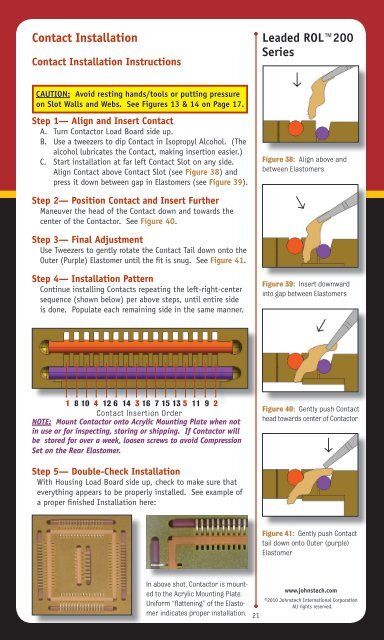
→Contact InstallationContact Installation InstructionsCAUTION: Avoid resting hands/tools or putting pressureon Slot Walls and Webs. See Figures 13 & 14 on Page 17.Step 1— Align and Insert ContactA. Turn Contactor Load Board side up.B. Use a tweezers to dip Contact in Isopropyl Alcohol. (Thealcohol lubricates the Contact, making insertion easier.)C. Start installation at far left Contact Slot on any side.Align Contact above Contact Slot (see Figure 38) andpress it down between gap in Elastomers (see Figure 39).Step 2— Position Contact and Insert FurtherManeuver the head of the Contact down and towards thecenter of the Contactor. See Figure 40.<strong>Leaded</strong> ROL200Series→Figure 38: Align above andbetween Elastomers→Step 3— Final AdjustmentUse Tweezers to gently rotate the Contact Tail down onto theOuter (Purple) Elastomer until the fit is snug. See Figure 41.Step 4— Installation PatternContinue installing Contacts repeating the left-right-centersequence (shown below) per above steps, until entire sideis done. Populate each remaining side in the same manner.Figure 39: Insert downwardinto gap between Elastomers1 8 10 4 12 6 14 3 16 7 15 13 5 11 9 2Contact Insertion OrderNOTE: Mount Contactor onto Acrylic Mounting Plate when notin use or for inspecting, storing or shipping. If Contactor willbe stored for over a week, loosen screws to avoid CompressionSet on the Rear Elastomer.Figure 40: Gently push Contacthead towards center of Contactor→Step 5— Double-Check InstallationWith Housing Load Board side up, check to make sure thateverything appears to be properly installed. See example ofa proper finished Installation here:Figure 41: Gently push Contacttail down onto Outer (purple)ElastomerIn above shot, Contactor is mountedto the Acrylic Mounting Plate.Uniform “flattening” of the Elastomerindicates proper installation.21www.johnstech.com©2010 <strong>Johnstech</strong> International CorporationAll rights reserved.