Maintenance & Inspection Guide Leaded ROLâ¢200 ... - Johnstech
Maintenance & Inspection Guide Leaded ROLâ¢200 ... - Johnstech
Maintenance & Inspection Guide Leaded ROLâ¢200 ... - Johnstech
- No tags were found...

You also want an ePaper? Increase the reach of your titles
YUMPU automatically turns print PDFs into web optimized ePapers that Google loves.
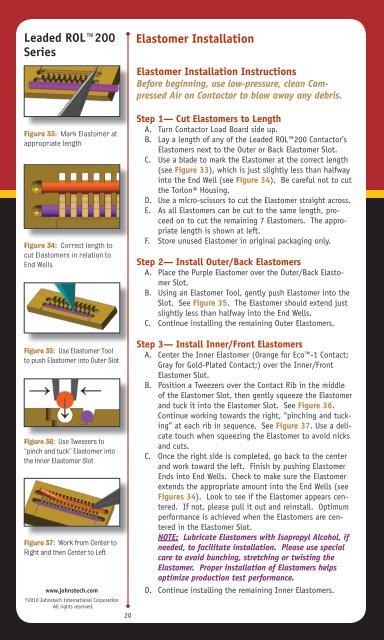
<strong>Leaded</strong> ROL200SeriesElastomer InstallationElastomer Installation InstructionsBefore beginning, use low-pressure, clean CompressedAir on Contactor to blow away any debris.Figure 33: Mark Elastomer atappropriate lengthFigure 34: Correct length tocut Elastomers in relation toEnd WellsFigure 35: Use Elastomer Toolto push Elastomer into Outer Slot→→→Figure 36: Use Tweezers to“pinch and tuck” Elastomer intothe Inner Elastomer SlotFigure 37: Work from Center toRight and then Center to Leftwww.johnstech.com©2010 <strong>Johnstech</strong> International CorporationAll rights reserved.20Step 1— Cut Elastomers to LengthA. Turn Contactor Load Board side up.B. Lay a length of any of the <strong>Leaded</strong> ROL200 Contactor’sElastomers next to the Outer or Back Elastomer Slot.C. Use a blade to mark the Elastomer at the correct length(see Figure 33), which is just slightly less than halfwayinto the End Well (see Figure 34). Be careful not to cutthe Torlon® Housing.D. Use a micro-scissors to cut the Elastomer straight across.E. As all Elastomers can be cut to the same length, proceedon to cut the remaining 7 Elastomers. The appropriatelength is shown at left.F. Store unused Elastomer in original packaging only.Step 2— Install Outer/Back ElastomersA. Place the Purple Elastomer over the Outer/Back ElastomerSlot.B. Using an Elastomer Tool, gently push Elastomer into theSlot. See Figure 35. The Elastomer should extend justslightly less than halfway into the End Wells.C. Continue installing the remaining Outer Elastomers.Step 3— Install Inner/Front ElastomersA. Center the Inner Elastomer (Orange for Eco-1 Contact;Gray for Gold-Plated Contact;) over the Inner/FrontElastomer Slot.B. Position a Tweezers over the Contact Rib in the middleof the Elastomer Slot, then gently squeeze the Elastomerand tuck it into the Elastomer Slot. See Figure 36.Continue working towards the right, “pinching and tucking”at each rib in sequence. See Figure 37. Use a delicatetouch when squeezing the Elastomer to avoid nicksand cuts.C. Once the right side is completed, go back to the centerand work toward the left. Finish by pushing ElastomerEnds into End Wells. Check to make sure the Elastomerextends the appropriate amount into the End Wells (seeFigures 34). Look to see if the Elastomer appears centered.If not, please pull it out and reinstall. Optimumperformance is achieved when the Elastomers are centeredin the Elastomer Slot.NOTE: Lubricate Elastomers with Isopropyl Alcohol, ifneeded, to facilitate installation. Please use specialcare to avoid bunching, stretching or twisting theElastomer. Proper installation of Elastomers helpsoptimize production test performance.D. Continue installing the remaining Inner Elastomers.