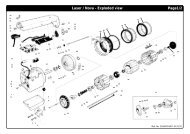
HD-X2 - IRO AB
HD-X2 - IRO AB
HD-X2 - IRO AB
- No tags were found...

You also want an ePaper? Increase the reach of your titles
YUMPU automatically turns print PDFs into web optimized ePapers that Google loves.
Sensors settings<strong>HD</strong>-<strong>X2</strong> 16The mechanical sensors are placed on the fixed part ofthe spool body.The sensor (1) controls MAX reserve level, and the sensor(2) controls MIN reserve level.1The force needed to press down the sensors is controlledby a spring, and it is adjustable with screw (3). Turnthe screw (3) anti-clockwise to increase the sensorstrength, turn it clockwise to reduce it.32Automatic calibration of the sensorsNoteBefore starting the automatic sensors calibration,check the following:• Remove all yarn from the feeder• The spool body must be in correct position.• The sensors must be free to correctly move up anddown.• The sensors ring must be correctly fixed.1. Switch OFF the feeder.2. Disable the TFE7 by moving the switch (4) upwards.The LED of TFE7 must be steady-ON in red color.(5)3. Switch ON the feeder and let it turn without weft for atleast 50 revolutions, until the winding disk stops.(feeder red light steady ON).4. Switch OFF the feeder, and enable the TFE7 by movingthe switch down5. Thread the yarn through the feeder (see page 15)6. Switch ON the feeder and load a new weft reserve.54LED (5)When disabled, the LED (5) is steady RED ON.When enabled, the LED (4) is GREEN only when theyarn is creating signal, other way it is OFF.Ref. No. 24-893H-2001-02/1232