DSX12 Instruction & Programming Manual - MacGregor Industries
DSX12 Instruction & Programming Manual - MacGregor Industries
DSX12 Instruction & Programming Manual - MacGregor Industries

You also want an ePaper? Increase the reach of your titles
YUMPU automatically turns print PDFs into web optimized ePapers that Google loves.
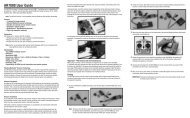
Installing the ReceiverInstalling the JR R1221The JR R1221 incorporates a single internal receiver and threeremote receivers offering the security of four simultaneous RFlinks for the ultimate in multi-path RF security. One internalreceiver is located on the main PC board, while 2 remotereceivers must be plugged into one of the antenna portsin order for the system to operate. A third remote receiver(included) can be plugged into the remaining remote antennaport giving a total of four operational receivers. By locatingthese receivers in different locations throughout the aircraft,each receiver is exposed to its own RF environment, greatlyimproving path diversity (the ability of the receiver to see thesignal in all conditions).Using double-sided foam tape (servo tape), mount the remotereceiver(s) keeping the remote antenna(s) at least 2” awayfrom the primary antenna. Ideally the antennas will be orientedperpendicular to each other; however, we’ve found this to notbe critical. 6”, 9”, 12”, 24”, and 36” leads are available and insophisticated aircraft, we’ve found it best to mount the remotereceivers in different parts of the aircraft keeping the remoteantennas as far away as practical from any conductive materials.A typical installation would include the main receiver mountedin the conventional location in the fuselage and the remoteantennas in the nose (jets) in the top turtle deck and even in thetail. The optimum location is as far away from any conductivematerials as practical.In helicopters, there is generally enough room on the servo trayto achieve the necessary separation. If necessary a mount canbe made using clear plastic to mount the external antenna.Other important installation tips:1. The servos should be mounted using rubber grommets andbrass eyelets to isolate them from vibration. Do not overtightenthe mounting screws; this will negate the vibrationabsorption effect of the rubber grommets.Note: The JR R1221 requires that at least two remotereceivers be used.Install the main receiver using the same method you would useto install a conventional receiver in your aircraft. Typically wrapthe main receiver in protective foam and fasten it in place usingrubber bands or Velcro straps. Alternately in electric models orin jets (low vibration), it’s acceptable to use thick double-sidedfoam tape to fasten the main receiver in place.The brass eyelets are pushed from the bottom up in the rubbergrommets. When the servo screw is tightened securely, itprovides the proper security as well as the proper vibrationisolation for your servo.2. The servo arms must be able to move freely over their entirerange of travel. Make sure that the control linkages do notbind or impede the movement of any of the servos.3. Mount all switches away from the engine exhaust andaway from any high vibration areas. Make sure the switchoperates freely and is able to operate over its full travel.Mounting the remote receiver(s) in a different location(s),from the primary receiver, gives tremendous improvementsin path diversity. Essentially each receiver sees a different RFenvironment and this is the key to maintaining a solid RF link,even in aircraft that have substantial conductive materials (i.e.turbine engines with metal tail pipes, carbon fiber, tuned pipes,etc.) which can attenuate the signal.I-16