4 CH MPEG-2 Digital Video Recorder
4 CH MPEG-2 Digital Video Recorder
4 CH MPEG-2 Digital Video Recorder
- No tags were found...

You also want an ePaper? Increase the reach of your titles
YUMPU automatically turns print PDFs into web optimized ePapers that Google loves.
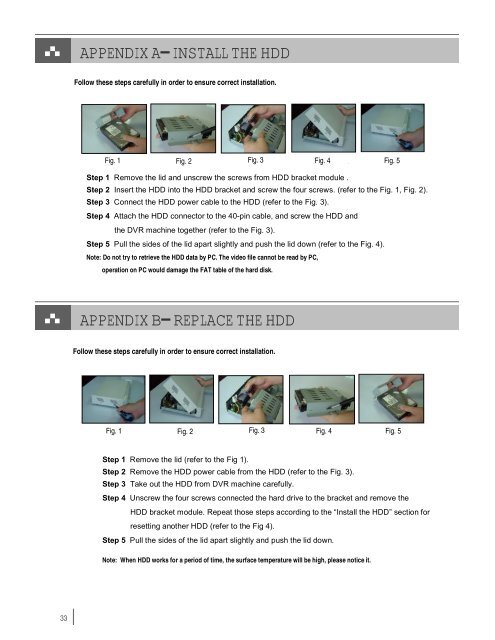
APPENDIX A– INSTALL THE HDDFollow these steps carefully in order to ensure correct installation.Fig. 1 Fig. 2 Fig. 3 Fig. 4 Fig. 5Step 1 Remove the lid and unscrew the screws from HDD bracket module .Step 2 Insert the HDD into the HDD bracket and screw the four screws. (refer to the Fig. 1, Fig. 2).Step 3 Connect the HDD power cable to the HDD (refer to the Fig. 3).Step 4 Attach the HDD connector to the 40-pin cable, and screw the HDD andthe DVR machine together (refer to the Fig. 3).Step 5 Pull the sides of the lid apart slightly and push the lid down (refer to the Fig. 4).Note: Do not try to retrieve the HDD data by PC. The video file cannot be read by PC,operation on PC would damage the FAT table of the harddisk.APPENDIX B– REPLACE THE HDDFollow these steps carefully in order to ensure correct installation.Fig. 1 Fig. 2 Fig. 3 Fig. 4 Fig. 5Step 1 Remove the lid (refer to the Fig 1).Step 2 Remove the HDD power cable from the HDD (refer to the Fig. 3).Step 3 Take out the HDD from DVR machine carefully.Step 4 Unscrew the four screws connected the hard drive to the bracket and remove theHDD bracket module. Repeat those steps according to the “Install the HDD” section forresetting another HDD (refer to the Fig 4).Step 5 Pull the sides of the lid apart slightly and push the lid down.Note: When HDD works for a period of time, the surface temperature will be high, please notice it.33