Getting Started with WebSphere Application Server

Create successful ePaper yourself
Turn your PDF publications into a flip-book with our unique Google optimized e-Paper software.
136 <strong>Getting</strong> <strong>Started</strong> <strong>with</strong> <strong>WebSphere</strong> <strong>Application</strong> <strong>Server</strong> Community Edition<br />
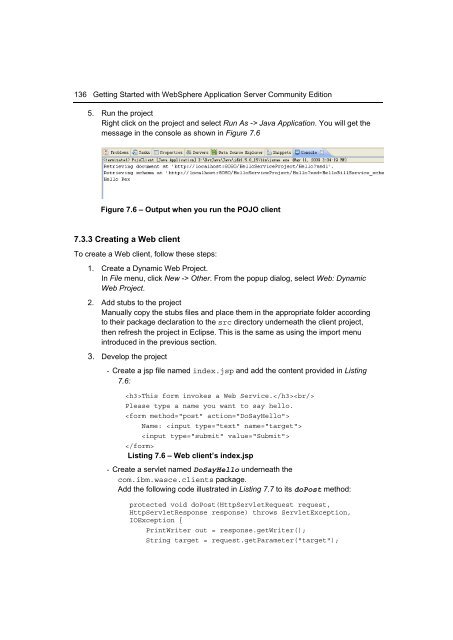
5. Run the project<br />
Right click on the project and select Run As -> Java <strong>Application</strong>. You will get the<br />
message in the console as shown in Figure 7.6<br />
Figure 7.6 – Output when you run the POJO client<br />
7.3.3 Creating a Web client<br />
To create a Web client, follow these steps:<br />
1. Create a Dynamic Web Project.<br />
In File menu, click New -> Other. From the popup dialog, select Web: Dynamic<br />
Web Project.<br />
2. Add stubs to the project<br />
Manually copy the stubs files and place them in the appropriate folder according<br />
to their package declaration to the src directory underneath the client project,<br />
then refresh the project in Eclipse. This is the same as using the import menu<br />
introduced in the previous section.<br />
3. Develop the project<br />
- Create a jsp file named index.jsp and add the content provided in Listing<br />
7.6:<br />
This form invokes a Web Service.<br />
Please type a name you want to say hello.<br />
<br />
Name: <br />
<br />
<br />
Listing 7.6 – Web client’s index.jsp<br />
- Create a servlet named DoSayHello underneath the<br />
com.ibm.wasce.clients package.<br />
Add the following code illustrated in Listing 7.7 to its doPost method:<br />
protected void doPost(HttpServletRequest request,<br />
HttpServletResponse response) throws ServletException,<br />
IOException {<br />
PrintWriter out = response.getWriter();<br />
String target = request.getParameter("target");