


Create successful ePaper yourself
Turn your PDF publications into a flip-book with our unique Google optimized e-Paper software.
CHEERLIGHTS ORB<br />
Tutorial<br />
>STEP-03<br />
Change the flow<br />
Double-click the inject timestamp node. A dialog box<br />
appears. Click the dropdown for Payload and choose<br />
‘string’. Under ‘string’, type ‘red’; this will be the<br />
message payload. In the ‘name’ box, rename the node<br />
e.g. to ‘red’, then click OK. Deploy and then inject by<br />
clicking the square on the left of the ‘red’ node. The<br />
message payload (red) appears in the debug tab.<br />
Add four more inject nodes and change the message<br />
payloads to green, blue, white, and black. Connect<br />
them all to the debug msg.payload node and deploy.<br />
Inject each colour – the message payloads appear in<br />
the debug tab.<br />
>STEP-04<br />
Add lights and orb<br />
For both the LedBorg and separate LEDs, scroll down<br />
the left-hand pane and drag a ledborg node onto the<br />
flow. Connect the inject nodes to the ledborg. Deploy<br />
and click some inject nodes; the LEDs or LedBorg will<br />
light up with the corresponding colour.<br />
Slice the bottom off the ping-pong ball and place over<br />
the LedBorg to act as a diffuser. If using LEDs, cut a small<br />
hole in the bottom of the ping-pong ball and push the<br />
LEDs into it. Keep the LEDs as low as possible inside the<br />
ball; use Blu-Tack to hold the ball if necessary.<br />
>STEP-05<br />
Connect to Twitter<br />
Add a twitter input node from the social section – it<br />
has a pimple on the right. Double-click and add Twitter<br />
credentials; you’ll need to be logged into Twitter. In the<br />
‘for’ box, add ‘cheerlights’. Add a function node; this<br />
is used to keep the wires tidy, so double-click and call<br />
it ‘spaghetti junction’. The message will pass through<br />
and not be changed. This node can be used for adding<br />
JavaScript code in future projects.<br />
Delete all the wires, and rewire all the colour inputs<br />
and twitter node to the input of the spaghetti<br />
junction node. Connect a debug node to the output<br />
of the spaghetti junction.<br />
>STEP-06<br />
Extract the colour<br />
The LedBorg only accepts certain colours; extra words<br />
such as ‘cheerlights’ means it won’t work. Connect<br />
a yellow switch node to the output of spaghetti<br />
junction. In its dropdown box, select ‘matches regex’;<br />
next to that, type ‘red’ and tick the ‘ignore case’ button.<br />
Click ‘+ rule’ and repeat for all the cheerlights colours;<br />
they’re shown in the info tab for the ledborg node.<br />
Connect a yellow change node to each of the outputs<br />
of the switch node. Double-click each one, and set the<br />
name and the payload to the required colour.<br />
Connect all the outputs of the change nodes to<br />
another spaghetti junction node, and then to an<br />
ledborg node before deploying. You can add more<br />
sheets on your Pi, but make sure there is only one<br />
ledborg node, and pins 11,13, and 15 aren’t used<br />
in other flows.<br />
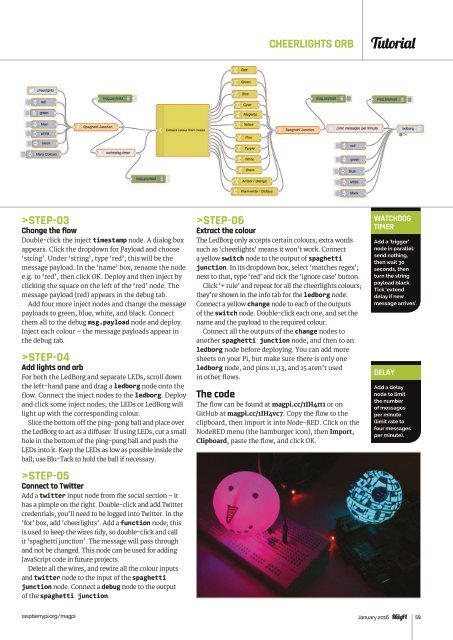
The code<br />
The flow can be found at magpi.cc/1IH4rt1 or on<br />
GitHub at magpi.cc/1IH4vc7. Copy the flow to the<br />
clipboard, then import it into Node‐RED. Click on the<br />
NodeRED menu (the hamburger icon), then Import,<br />
Clipboard, paste the flow, and click OK.<br />
WATCHDOG<br />
TIMER<br />
Add a ‘trigger’<br />
node in parallel:<br />
send nothing,<br />
then wait 30<br />
seconds, then<br />
turn the string<br />
payload black.<br />
Tick ‘extend<br />
delay if new<br />
message arrives’.<br />
DELAY<br />
Add a delay<br />
node to limit<br />
the number<br />
of messages<br />
per minute<br />
(limit rate to<br />
four messages<br />
per minute).<br />
raspberrypi.org/magpi January 2016 59