


You also want an ePaper? Increase the reach of your titles
YUMPU automatically turns print PDFs into web optimized ePapers that Google loves.
INTERACTIVE <strong>PI</strong>XEL PET<br />
Tutorial<br />
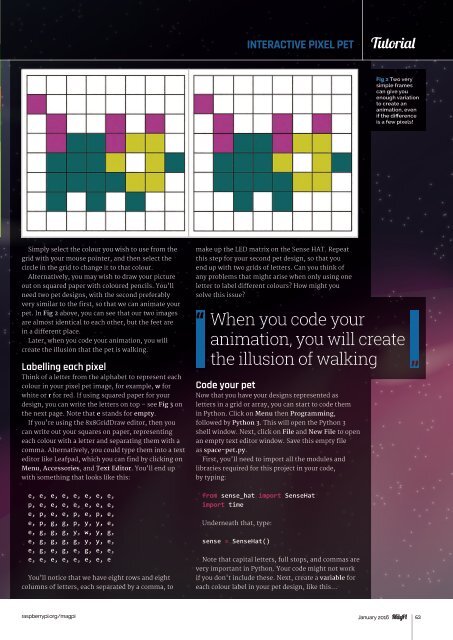
Fig 2 Two very<br />
simple frames<br />
can give you<br />
enough variation<br />
to create an<br />
animation, even<br />
if the difference<br />
is a few pixels!<br />
Simply select the colour you wish to use from the<br />
grid with your mouse pointer, and then select the<br />
circle in the grid to change it to that colour.<br />
Alternatively, you may wish to draw your picture<br />
out on squared paper with coloured pencils. You'll<br />
need two pet designs, with the second preferably<br />
very similar to the first, so that we can animate your<br />
pet. In Fig 2 above, you can see that our two images<br />
are almost identical to each other, but the feet are<br />
in a different place.<br />
Later, when you code your animation, you will<br />
create the illusion that the pet is walking.<br />
Labelling each pixel<br />
Think of a letter from the alphabet to represent each<br />
colour in your pixel pet image, for example, w for<br />
white or r for red. If using squared paper for your<br />
design, you can write the letters on top – see Fig 3 on<br />
the next page. Note that e stands for empty.<br />
If you're using the 8x8GridDraw editor, then you<br />
can write out your squares on paper, representing<br />
each colour with a letter and separating them with a<br />
comma. Alternatively, you could type them into a text<br />
editor like Leafpad, which you can find by clicking on<br />
Menu, Accessories, and Text Editor. You’ll end up<br />
with something that looks like this:<br />
make up the LED matrix on the Sense HAT. Repeat<br />
this step for your second pet design, so that you<br />
end up with two grids of letters. Can you think of<br />
any problems that might arise when only using one<br />
letter to label different colours? How might you<br />
solve this issue?<br />
When you code your<br />
animation, you will create<br />
the illusion of walking<br />
Code your pet<br />
Now that you have your designs represented as<br />
letters in a grid or array, you can start to code them<br />
in Python. Click on Menu then Programming,<br />
followed by Python 3. This will open the Python 3<br />
shell window. Next, click on File and New File to open<br />
an empty text editor window. Save this empty file<br />
as space-pet.py.<br />
First, you'll need to import all the modules and<br />
libraries required for this project in your code,<br />
by typing:<br />
e, e, e, e, e, e, e, e,<br />
p, e, e, e, e, e, e, e,<br />
e, p, e, e, p, e, p, e,<br />
e, p, g, g, p, y, y, e,<br />
e, g, g, g, y, w, y, g,<br />
e, g, g, g, g, y, y, e,<br />
e, g, e, g, e, g, e, e,<br />
e, e, e, e, e, e, e, e<br />
You’ll notice that we have eight rows and eight<br />
columns of letters, each separated by a comma, to<br />
from sense_hat import SenseHat<br />
import time<br />
Underneath that, type:<br />
sense = SenseHat()<br />
Note that capital letters, full stops, and commas are<br />
very important in Python. Your code might not work<br />
if you don't include these. Next, create a variable for<br />
each colour label in your pet design, like this…<br />
raspberrypi.org/magpi January 2016 63