


Create successful ePaper yourself
Turn your PDF publications into a flip-book with our unique Google optimized e-Paper software.
Tutorial<br />
STEP ASTRO BY <strong>PI</strong>STEP<br />
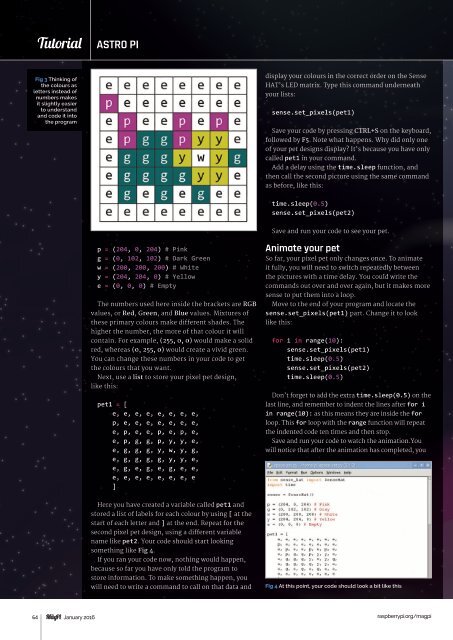
Fig 3 Thinking of<br />
the colours as<br />
letters instead of<br />
numbers makes<br />
it slightly easier<br />
to understand<br />
and code it into<br />
the program<br />
display your colours in the correct order on the Sense<br />
HAT’s LED matrix. Type this command underneath<br />
your lists:<br />
sense.set_pixels(pet1)<br />
Save your code by pressing CTRL+S on the keyboard,<br />
followed by F5. Note what happens. Why did only one<br />
of your pet designs display? It’s because you have only<br />
called pet1 in your command.<br />
Add a delay using the time.sleep function, and<br />
then call the second picture using the same command<br />
as before, like this:<br />
time.sleep(0.5)<br />
sense.set_pixels(pet2)<br />
Save and run your code to see your pet.<br />
p = (204, 0, 204) # Pink<br />
g = (0, 102, 102) # Dark Green<br />
w = (200, 200, 200) # White<br />
y = (204, 204, 0) # Yellow<br />
e = (0, 0, 0) # Empty<br />
The numbers used here inside the brackets are RGB<br />
values, or Red, Green, and Blue values. Mixtures of<br />
these primary colours make different shades. The<br />
higher the number, the more of that colour it will<br />
contain. For example, (255, 0, 0) would make a solid<br />
red, whereas (0, 255, 0) would create a vivid green.<br />
You can change these numbers in your code to get<br />
the colours that you want.<br />
Next, use a list to store your pixel pet design,<br />
like this:<br />
pet1 = [<br />
e, e, e, e, e, e, e, e,<br />
p, e, e, e, e, e, e, e,<br />
e, p, e, e, p, e, p, e,<br />
e, p, g, g, p, y, y, e,<br />
e, g, g, g, y, w, y, g,<br />
e, g, g, g, g, y, y, e,<br />
e, g, e, g, e, g, e, e,<br />
e, e, e, e, e, e, e, e<br />
]<br />
Animate your pet<br />
So far, your pixel pet only changes once. To animate<br />
it fully, you will need to switch repeatedly between<br />
the pictures with a time delay. You could write the<br />
commands out over and over again, but it makes more<br />
sense to put them into a loop.<br />
Move to the end of your program and locate the<br />
sense.set_pixels(pet1) part. Change it to look<br />
like this:<br />
for i in range(10):<br />
sense.set_pixels(pet1)<br />
time.sleep(0.5)<br />
sense.set_pixels(pet2)<br />
time.sleep(0.5)<br />
Don’t forget to add the extra time.sleep(0.5) on the<br />
last line, and remember to indent the lines after for i<br />
in range(10): as this means they are inside the for<br />
loop. This for loop with the range function will repeat<br />
the indented code ten times and then stop.<br />
Save and run your code to watch the animation.You<br />
will notice that after the animation has completed, you<br />
Here you have created a variable called pet1 and<br />
stored a list of labels for each colour by using [ at the<br />
start of each letter and ] at the end. Repeat for the<br />
second pixel pet design, using a different variable<br />
name like pet2. Your code should start looking<br />
something like Fig 4.<br />
If you ran your code now, nothing would happen,<br />
because so far you have only told the program to<br />
store information. To make something happen, you<br />
will need to write a command to call on that data and<br />
Fig 4 At this point, your code should look a bit like this<br />
64 January 2016<br />
raspberrypi.org/magpi