Installation, Owner, and Diagnostic Manual IntelliPak® - Trane
Installation, Owner, and Diagnostic Manual IntelliPak® - Trane
Installation, Owner, and Diagnostic Manual IntelliPak® - Trane

You also want an ePaper? Increase the reach of your titles
YUMPU automatically turns print PDFs into web optimized ePapers that Google loves.
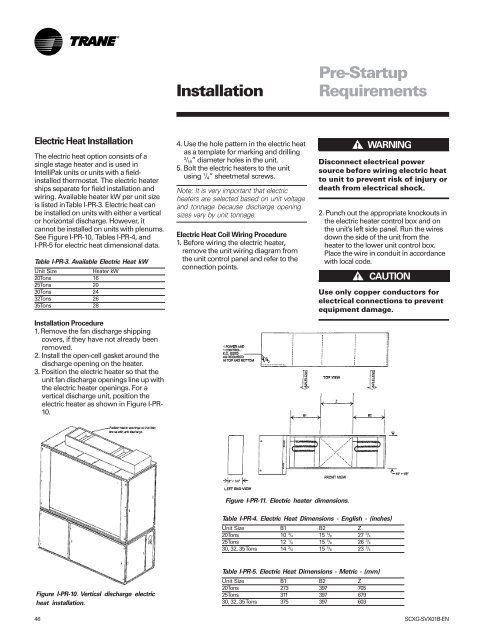
Electric Heat <strong>Installation</strong><br />
The electric heat option consists of a<br />
single stage heater <strong>and</strong> is used in<br />
IntelliPak units or units with a fieldinstalled<br />
thermostat. The electric heater<br />
ships separate for field installation <strong>and</strong><br />
wiring. Available heater kW per unit size<br />
is listed in Table I-PR-3. Electric heat can<br />
be installed on units with either a vertical<br />
or horizontal discharge. However, it<br />
cannot be installed on units with plenums.<br />
See Figure I-PR-10, Tables I-PR-4, <strong>and</strong><br />
I-PR-5 for electric heat dimensional data.<br />
Table I-PR-3. Available Electric Heat kW<br />
Unit Size Heater kW<br />
20 Tons 16<br />
25 Tons 20<br />
30 Tons 24<br />
32 Tons 26<br />
35 Tons 28<br />
<strong>Installation</strong> Procedure<br />
1. Remove the fan discharge shipping<br />
covers, if they have not already been<br />
removed.<br />
2. Install the open-cell gasket around the<br />
discharge opening on the heater.<br />
3. Position the electric heater so that the<br />
unit fan discharge openings line up with<br />
the electric heater openings. For a<br />
vertical discharge unit, position the<br />
electric heater as shown in Figure I-PR-<br />
10.<br />
Figure I-PR-10. Vertical discharge electric<br />
heat installation.<br />
<strong>Installation</strong><br />
4. Use the hole pattern in the electric heat<br />
as a template for marking <strong>and</strong> drilling<br />
3 /16” diameter holes in the unit.<br />
5. Bolt the electric heaters to the unit<br />
using 1 /4” sheetmetal screws.<br />
Note: It is very important that electric<br />
heaters are selected based on unit voltage<br />
<strong>and</strong> tonnage because discharge opening<br />
sizes vary by unit tonnage.<br />
Electric Heat Coil Wiring Procedure<br />
1. Before wiring the electric heater,<br />
remove the unit wiring diagram from<br />
the unit control panel <strong>and</strong> refer to the<br />
connection points.<br />
Figure I-PR- 1. Electric heater dimensions.<br />
Pre-Startup<br />
Requirements<br />
Disconnect electrical power<br />
source before wiring electric heat<br />
to unit to prevent risk of injury or<br />
death from electrical shock.<br />
2. Punch out the appropriate knockouts in<br />
the electric heater control box <strong>and</strong> on<br />
the unit’s left side panel. Run the wires<br />
down the side of the unit from the<br />
heater to the lower unit control box.<br />
Place the wire in conduit in accordance<br />
with local code.<br />
Use only copper conductors for<br />
electrical connections to prevent<br />
equipment damage.<br />
Table I-PR-4. Electric Heat Dimensions - English - (inches)<br />
Unit Size B1 B2 Z<br />
20 Tons 10 3 /4 15 5 /8 27 3 /4<br />
25 Tons 12 1 /4 15 5 /8 26 3 /4<br />
30, 32, 35 Tons 14 3 /4 15 5 /8 23 3 /4<br />
Table I-PR-5. Electric Heat Dimensions - Metric - (mm)<br />
Unit Size B1 B2 Z<br />
20 Tons 273 397 705<br />
25 Tons 311 397 679<br />
30, 32, 35 Tons 375 397 603<br />
����� WARNING<br />
!<br />
����� CAUTION<br />
!<br />
46 SCXG-SVX01B-EN