
Create successful ePaper yourself
Turn your PDF publications into a flip-book with our unique Google optimized e-Paper software.
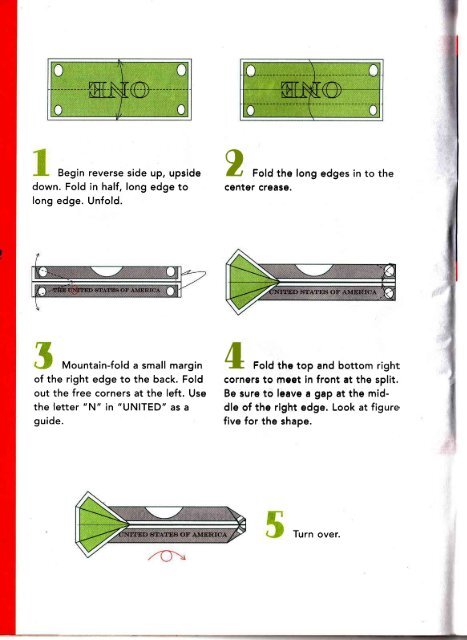
Begin with the<br />
obverse side up. Fold<br />
the short left-side<br />
edge up to the top<br />
long edge. Unfold.<br />
Fold the left <strong>and</strong> 5<br />
Fold the left cor-<br />
ner in half, along the<br />
crease.<br />
the top edges to meet<br />
at the crease.<br />
Use the crease<br />
to collapse the bill into<br />
the shape shown in<br />
figure ten. Notice that<br />
a crirnp is made at the<br />
center, where the<br />
dashed mountain <strong>and</strong><br />
valley lines occur.<br />
Unfold the<br />
front left flap.<br />
m Yourbitt<br />
should look like this.<br />
Fold the other bills<br />
so that you have five<br />
completed units to<br />
assemble.<br />
Mountain-fold<br />
the larger, right-side<br />
portion around the<br />
back. Use the vertical<br />
edge of paper of the<br />
top layer as a guide.<br />
Valley <strong>and</strong><br />
Mountain-fold the<br />
lower triangular flap to<br />
make it fit within the<br />
area of the top flap.<br />
Your bill should<br />
look like this. Unfold<br />
the last step.<br />
Fold in half <strong>by</strong><br />
bringing the left corner<br />
over to the upper<br />
right corner.<br />
Open the paper<br />
so that it resembles<br />
figure nine.<br />
ffi<br />
Rotate one<br />
unit so that the open<br />
flap is at the bottom.<br />
lnsert the kite-shaped<br />
half of another unit<br />
into the pocket of the<br />
first unit.<br />
When the<br />
two units have been<br />
brought together, fold<br />
the free flap over the<br />
point to keep them<br />
together.<br />
Pointed,<br />
Star.<br />
The Five-<br />
Five-Dollar<br />
Your model<br />
should look like this.<br />
Add the other units in<br />
the same way. As you<br />
assemble, be sure to<br />
collapse <strong>and</strong> pinch the<br />
"filled" points, holding<br />
them completely<br />
closed, until you connect<br />
the loose ends to<br />
close the star. You<br />
should fold each star<br />
point in half sharply to<br />
give the model a crisp<br />
appearance. Turn over.
![[Jeremy_Shafer]_Origami_Ooh_La_La__Action_Origami_opt](https://img.yumpu.com/60057821/1/184x260/jeremy-shafer-origami-ooh-la-la-action-origami-opt.jpg?quality=85)