Virtualization using XenEnterprise with Dell PowerEdge Servers and ...
Virtualization using XenEnterprise with Dell PowerEdge Servers and ...
Virtualization using XenEnterprise with Dell PowerEdge Servers and ...

You also want an ePaper? Increase the reach of your titles
YUMPU automatically turns print PDFs into web optimized ePapers that Google loves.
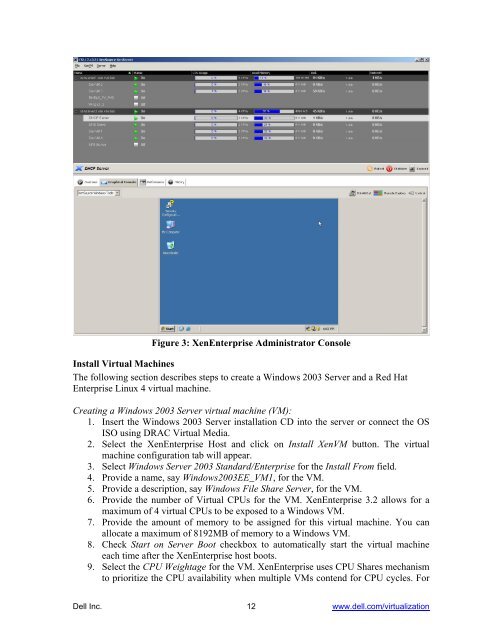
Figure 3: <strong>XenEnterprise</strong> Administrator Console<br />
Install Virtual Machines<br />
The following section describes steps to create a Windows 2003 Server <strong>and</strong> a Red Hat<br />
Enterprise Linux 4 virtual machine.<br />
Creating a Windows 2003 Server virtual machine (VM):<br />
1. Insert the Windows 2003 Server installation CD into the server or connect the OS<br />
ISO <strong>using</strong> DRAC Virtual Media.<br />
2. Select the <strong>XenEnterprise</strong> Host <strong>and</strong> click on Install XenVM button. The virtual<br />
machine configuration tab will appear.<br />
3. Select Windows Server 2003 St<strong>and</strong>ard/Enterprise for the Install From field.<br />
4. Provide a name, say Windows2003EE_VM1, for the VM.<br />
5. Provide a description, say Windows File Share Server, for the VM.<br />
6. Provide the number of Virtual CPUs for the VM. <strong>XenEnterprise</strong> 3.2 allows for a<br />
maximum of 4 virtual CPUs to be exposed to a Windows VM.<br />
7. Provide the amount of memory to be assigned for this virtual machine. You can<br />
allocate a maximum of 8192MB of memory to a Windows VM.<br />
8. Check Start on Server Boot checkbox to automatically start the virtual machine<br />
each time after the <strong>XenEnterprise</strong> host boots.<br />
9. Select the CPU Weightage for the VM. <strong>XenEnterprise</strong> uses CPU Shares mechanism<br />
to prioritize the CPU availability when multiple VMs contend for CPU cycles. For<br />
<strong>Dell</strong> Inc. 12 www.dell.com/virtualization