- Page 1 and 2:
JungleFlasher v0.1.82 (x86 and x64
- Page 3 and 4:
Introduction JungleFlasher is devel
- Page 5 and 6:
Benq too (though not automated like
- Page 7 and 8:
BEFORE USING JUNGLEFLASHER You Must
- Page 9 and 10:
WHEN you run Jungleflasher you MUST
- Page 11 and 12:
Samsung CLICK HERE BenQ CLICK HERE
- Page 13 and 14:
Samsung (TS-H943) MS25 /MS28. Overv
- Page 15 and 16:
Unlocking the drive. Before we can
- Page 17 and 18:
Unlocking the drive. Before we can
- Page 19 and 20:
Stock MS28’s (Unmodified). Sammy
- Page 21 and 22:
Xtreme 3.3 -> iXtreme 1.4 Unlock us
- Page 23 and 24:
Unlocking iXtreme 1.5 > 1.61 For th
- Page 25 and 26:
DeviceID Unlock / Vcc Trick (VIA/Nf
- Page 27 and 28:
Alternate method if you are struggl
- Page 29 and 30:
Reading the Firmware from the drive
- Page 31 and 32:
To save a firmware file based on wh
- Page 33 and 34:
Ok, now you have flashed your Samsu
- Page 35 and 36:
Unlocking the drive. Before we can
- Page 37 and 38:
BenQ UnLock Stock/ iXtreme 1.1 -> 1
- Page 39 and 40:
DeviceID Unlock / Vcc Trick (VIA/Nf
- Page 41 and 42:
CLICK HERE TO PROCEED If it didn’
- Page 43 and 44:
While ……. are appearing, Turn O
- Page 45 and 46:
Click Yes to auto load iXtreme (fro
- Page 47 and 48:
Write Command, will send Chip Erase
- Page 49 and 50:
Regardless of option chosen, the Hi
- Page 51 and 52:
Setting ModeB Connect your Hitachi
- Page 53 and 54:
The drive should now report as in M
- Page 55 and 56:
JungleUSB Drivers and USmodeB (XP O
- Page 57 and 58:
Click Have Disk Now click Browse an
- Page 59 and 60:
If all went well you should now hav
- Page 61 and 62:
Dumping the Firmware from the drive
- Page 63 and 64:
Once firmware is read, JungleFlashe
- Page 65 and 66:
The Drive is now unlocked! UNLOCKED
- Page 67 and 68:
JungleFlasher will now dump the dri
- Page 69 and 70:
Then, click Flash LT Plus JungleFla
- Page 71 and 72:
Power Off - Disconnect drive, conne
- Page 73 and 74:
JungleFlasher will dump the Hacked
- Page 75 and 76:
Spoofing a Hitachi Drive to report
- Page 77 and 78:
JungleFlasher will then read, compa
- Page 79 and 80:
Auto Spoofing a Hitachi As with all
- Page 81 and 82:
Power Off - Disconnect drive, conne
- Page 83 and 84: Possibly Stock 83850C v1? CLICK HER
- Page 85 and 86: Lite-On PLDS DG-16D2S(-09C) - Legac
- Page 87 and 88: IF you have previously flashed this
- Page 89 and 90: Then, pull the tray out fully and p
- Page 91 and 92: Note: If you wish to include calibr
- Page 93 and 94: Then, simply click Dummy from iXtre
- Page 95 and 96: optionally, choose to dump dummy.bi
- Page 97 and 98: Using USB Cable to connect (can als
- Page 99 and 100: There is now No Requirement to dump
- Page 101 and 102: Check the OSIG/models info match Ch
- Page 103 and 104: Erasing a Lite-On PLDS DG-16D2S. PL
- Page 105 and 106: Drive is now in Vendor Mode (0x72).
- Page 107 and 108: This will save you power cycling th
- Page 109 and 110: Select DVDKey32 Tab Check to see th
- Page 111 and 112: Here you must set the tray to ‘Ha
- Page 113 and 114: Jungleflasher will now prompt you t
- Page 115 and 116: Dumping OFW from LiteOn for 83850C
- Page 117 and 118: The MRA Hack Can be used on ALL cur
- Page 119 and 120: REFRESH BUTTON Turn power off to th
- Page 121 and 122: DO NOT POWER CYCLE! If everything h
- Page 123 and 124: Select Yes Now, Just follow the sta
- Page 125 and 126: Turn power to the drive off. Operat
- Page 127 and 128: Once you have the Correct status (s
- Page 129 and 130: Just follow the standard write proc
- Page 131 and 132: Now take the Xecuter Probe II and p
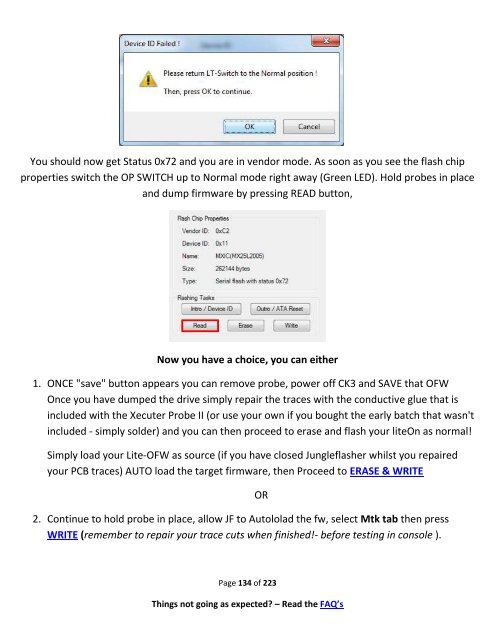
- Page 133: Turn the power OFF on the CK3. Push
- Page 137 and 138: In case you get STATUS 0x72 but the
- Page 139 and 140: Using Vampire if you are NOT USING
- Page 141 and 142: While you have the button on Vampir
- Page 143 and 144: Once you have soldered the jumper o
- Page 145 and 146: Check the running log to see all th
- Page 147 and 148: Is the Firmware in the same place o
- Page 149 and 150: It will open as source and auto loa
- Page 151 and 152: Using the KeyDatabase to Create you
- Page 153 and 154: Click Yes, Page 153 of 223 Things n
- Page 155 and 156: Removing VIA drivers (Windows XP/Vi
- Page 157 and 158: select Disable Acknowledge the warn
- Page 159 and 160: Manual Spoofing Hopefully the excel
- Page 161 and 162: USB Only, VIA Ports only & Include
- Page 163 and 164: The data required is located in 4 p
- Page 165 and 166: Spoofing as a different type of dri
- Page 167 and 168: Now click Spoof Source to Target! N
- Page 169 and 170: Advanced User Info Advanced Ctrl+Fk
- Page 171 and 172: Page 171 of 223 Things not going as
- Page 173 and 174: � Adview - Remembers whether Adva
- Page 175 and 176: 3. Will create a dummy.bin from the
- Page 177 and 178: Using the PMT With drive powered on
- Page 179 and 180: Page 179 of 223 Things not going as
- Page 181 and 182: Switch 3.3v inline switch ON again
- Page 183 and 184: From here the Jungleflasher procedu
- Page 185 and 186:
Using the PMT With drive powered on
- Page 187 and 188:
Page 187 of 223 Things not going as
- Page 189 and 190:
Switch Drive Power ON again This me
- Page 191 and 192:
This will as normal take you to the
- Page 193 and 194:
Then select Intro / Device ID butto
- Page 195 and 196:
Samsung Drives Using PMT or CK Prob
- Page 197 and 198:
Then power off your drive - you wil
- Page 199 and 200:
LiteOn Slim FW Ver. 0225 Dumping th
- Page 201 and 202:
(as shown below) Jungleflasher will
- Page 203 and 204:
Now select Slim Unlock Jungleflashe
- Page 205 and 206:
Now Jungleflasher will change to th
- Page 207 and 208:
Write Firmware to the Slim 9504 Sel
- Page 209 and 210:
Method B - Using SlimKey First sele
- Page 211 and 212:
Please do so - having a saved copy
- Page 213 and 214:
Common problems and Frequently Aske
- Page 215 and 216:
JungleFlasher will only show drives
- Page 217 and 218:
To overcome this, we can change one
- Page 219 and 220:
In what sequence should I switch th
- Page 221 and 222:
Additional Info for running JungleF
- Page 223:
JungleFlasher v0.1.82 beta Thanks t