Operating Instructions Digital Disk Recorder WJ-HL208/G
Operating Instructions Digital Disk Recorder WJ-HL208/G
Operating Instructions Digital Disk Recorder WJ-HL208/G

Create successful ePaper yourself
Turn your PDF publications into a flip-book with our unique Google optimized e-Paper software.
Display<br />
Highlight “Display” in the Devices menu and press the button. The Display setup screen allows you to<br />
select what information will be displayed on the monitor.<br />
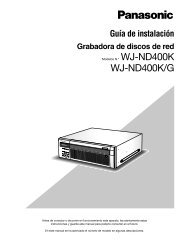
Figure 44 : Display - OSD screen<br />
Highlighting an item and pressing the button toggles<br />
that item On and Off. When an item is On, there is a<br />
checkmark in the box beside it. The following items<br />
can be turned On or Off:<br />
EL-Zoom : The icon displays on the enlarged video.<br />
Network : The icon displays when the unit is<br />
connected to a network via Ethernet.<br />
Freeze & Sequence : The icon displays while in the<br />
Freeze mode, and the displays while in the<br />
Sequence mode.<br />
Screen Group : The number of screen group displays<br />
when the recorder is not in the 3x3 display mode of the<br />
8-channel model.<br />
Free Space : The icon displays when the recorder is in the Overwrite mode, and the percentage of<br />
available storage space displays when the recorder is not in the Overwrite mode.<br />
Date/Time : The current date and time information displays.<br />
User Name : The name of the current user logged in displays.<br />
Camera No. : The camera number displays at the top-left corner of each camera screen.<br />
Camera Title : The camera title displays at the top-left corner of each camera screen.<br />
Record : The record related icons display on each camera screen.<br />
Audio : The icon displays on each camera screen for which the recorder can play live audio on a local<br />
system.<br />
PTZ : The icon displays on each PTZ camera screen.<br />
You can adjust the transparency of the setup screens by highlighting the slide bar beside “Transparency” and<br />
using the Left and Right arrow buttons.<br />
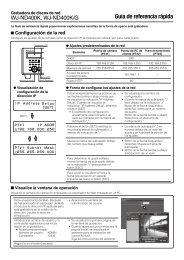
Figure 45 : OSD Margin screen<br />
Highlighting “OSD Margin…” and pressing the button displays how OSD<br />
text will be displayed on the monitor. You can adjust the horizontal and<br />
vertical margins so that text and icons will not be hidden beyond the edges<br />
of the monitor.<br />
Highlight the “Main Monitor” tab to switch to the Sequence screen.<br />
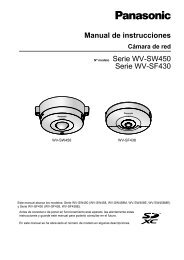
Figure 46 : Display - Main Monitor screen<br />
Highlight the box beside “Mode” and press the<br />
button. You can select between “Full Sequence” and<br />
“Partial Sequence”. (“Partial Sequence” is a function<br />
only of the 8-channel model.)<br />
Pressing the [SEQ] button causes the recorder to<br />
sequence cameras, and the recorder can sequence<br />
cameras in two modes: “Full Sequence” and “Partial<br />
Sequence”. In the Full mode, the recorder sequences<br />
through the cameras and displays them on the<br />
multi-screen. In the Partial mode, the bottom right<br />
window in a multi-screen format sequences through the<br />
cameras.<br />
Note: Any cameras that are Off or have lost video will be excluded from the Partial Sequence.<br />
Unless the user has authority to view covert cameras, the Covert cameras will be displayed<br />
with a black image in the Partial mode.<br />
35