Operating Instructions Digital Disk Recorder WJ-HL208/G
Operating Instructions Digital Disk Recorder WJ-HL208/G
Operating Instructions Digital Disk Recorder WJ-HL208/G

You also want an ePaper? Increase the reach of your titles
YUMPU automatically turns print PDFs into web optimized ePapers that Google loves.
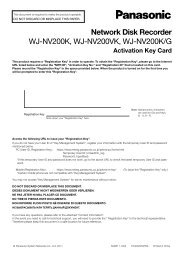
Figure 80 : System Event - Actions screen<br />
You can also have the recorder’s internal buzzer sound if an event is detected.<br />
The recorder can be set to react to system events.<br />
System events can be associated with an Alarm Output<br />
Terminal, sound the recorder’s internal buzzer, and/or<br />
notify a number of different devices.<br />
Highlight the “Alarm-Out” box beside the desired event<br />
(“Check Recording”, “Check Alarm-In”, “<strong>Disk</strong> Almost<br />
Full”, “<strong>Disk</strong> Full”, “<strong>Disk</strong> Bad”, “<strong>Disk</strong> Temperature”, “<strong>Disk</strong><br />
S.M.A.R.T.” or “Fan Error”), and press the button. A<br />
list of Alarm Outputs appears. You can associate as<br />
many Alarm-Outs with the Event as you wish. If the<br />
recorder detects that event, it triggers output signals on<br />
all the associated Alarm Output Terminals.<br />
Note: “Alarm-Out” action cannot be set to “System” and “Panic Record” events.<br />
Highlight the “Notify” box beside the desired event (“System”, “Panic Record”, “Check Recording”, “Check<br />
Alarm-In”, “<strong>Disk</strong> Almost Full”, “<strong>Disk</strong> Full”, “<strong>Disk</strong> Bad”, “<strong>Disk</strong> Temperature”, “<strong>Disk</strong> S.M.A.R.T.” or “Fan Error”),<br />
and press the button. You can toggle the entire list On and Off by highlighting “Notification” and pressing<br />
the button. You can toggle the individual items On and Off by highlighting that item and pressing the<br />
button. Highlight “OK” and press the button to accept your changes.<br />
You can save your System Event changes by highlighting “Save” and pressing the button. Selecting<br />
“Cancel” exits the screen without saving the changes.<br />
Event Status<br />
Highlight “Event Status” in the Event menu and press the button. The Event Status screen appears.<br />
Figure 81 : Event Status - Event Status screen<br />
The Event Status screen displays the status of the<br />
recorder’s systems and inputs. Events will be<br />
highlighted, and related channels or events will flicker<br />
for five seconds when detected.<br />
(Alarm-In), (Motion), (Video Loss) and<br />
(Video Blind) will be highlighted when each event is<br />
detected based on the settings you made in the<br />
Alarm-In, Motion Detection, Video Loss and Video<br />
Blind setup screen on the Event menu.<br />
(Check Alarm-In) and “Check Recording” will be highlighted when each event is detected based on the<br />
settings you made in the System Event setup screen on the Event menu.<br />
“Panic Record” will be highlighted while the recorder is in the panic recording mode.<br />
“<strong>Disk</strong> Almost Full” will be highlighted when the recorder is not in the Overwrite mode and the level of disk<br />
usage reaches the “<strong>Disk</strong> Almost Full” percentage you made in the System Event setup screen on the Event<br />
menu. “<strong>Disk</strong> Full” will be highlighted when the recorder is not in the Overwrite mode and all available storage<br />
space has been used.<br />
“Fan Error” will be highlighted when the cooling fan to the left (4-channel model : right) of the power cord on<br />
the rear panel is not working for more than four seconds.<br />
Highlighting the “Storage” tab will display the hard disk drive status. Refer to the System Event - Storage<br />
screen section for details.<br />
49