Operating Instructions Digital Disk Recorder WJ-HL208/G
Operating Instructions Digital Disk Recorder WJ-HL208/G
Operating Instructions Digital Disk Recorder WJ-HL208/G

You also want an ePaper? Increase the reach of your titles
YUMPU automatically turns print PDFs into web optimized ePapers that Google loves.
y highlighting that item and pressing the button. Highlight “OK” and press the button to accept your<br />
changes.<br />
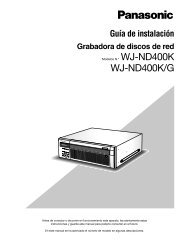
Figure 69 : Motion Detection - Actions 2 screen<br />
Highlight the desired box under the “PTZ” heading, and<br />
press the button. A list of PTZ presets appear.<br />
Select the preset position for each PTZ camera, where<br />
you want PTZ cameras to move to whenever the<br />
recorder detects motion on the selected camera’s<br />
input.<br />
Highlight the desired box under the “Spot Monitor”<br />
heading, and press the button. A list of Spot<br />
monitors and cameras appears. Each Spot monitor<br />
can be associated with a camera. The recorder will<br />
display the associated camera on the Spot monitor<br />
whenever it detects motions on the selected camera.<br />
You can save your Motion Detection changes by highlighting “Save” and pressing the button. Selecting<br />
“Cancel” exits the screen without saving the changes.<br />
Video Loss<br />
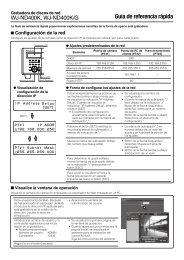
Highlight “Video Loss” in the Event menu and press the button. The Video Loss setup screen appears.<br />
Figure 70 : Video Loss - Settings screen<br />
Highlighting the box under the “Video Loss Interval”<br />
heading allow you to set the duration of a signal loss<br />
before the recorder will report a Video Loss. The<br />
recorder will not consider any signal loss from a<br />
camera to be a Video Loss if the detected signal loss is<br />
shorter than the interval set on this screen.<br />
Highlight “Use Ignoring Time” and press the button<br />
to toggle between On and Off. When set to On, the<br />
recorder will ignore video loss events occurring during<br />
the preset period. Highlighting “Time Setup...” and<br />
pressing the button allows you to set up event<br />
ignoring time.<br />
Note: The record action for motion events will not be affected by the Video Loss ignoring function.<br />
Highlight the “Actions 1” and “Actions 2” tabs and the Video Loss Actions 1 and Actions 2 screens display.<br />
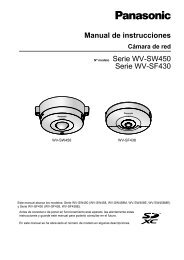
Figure 71 : Video Loss - Actions 1 screen<br />
The recorder can be set to react to video loss differently<br />
for each camera. Each camera can be associated with<br />
another camera, trigger an Alarm Output Terminal,<br />
sound the recorder’s internal buzzer, notify a number of<br />
different devices, move PTZ cameras to preset<br />
positions, and/or display a camera on a Spot monitor.<br />
Highlight the box under the “Record” heading and<br />
press the button. A list of cameras appears. You<br />
can associate as many cameras with that camera as<br />
you wish. If the recorder detects video loss on the<br />
selected camera, it starts recording video from all the<br />
associated cameras.<br />
Note: For the Record action, the camera you select should be set to the Event or Time & Event<br />
recording mode in the Schedule screen.<br />
45