StarNet v6 manual - Engineering Surveyor
StarNet v6 manual - Engineering Surveyor
StarNet v6 manual - Engineering Surveyor

You also want an ePaper? Increase the reach of your titles
YUMPU automatically turns print PDFs into web optimized ePapers that Google loves.
Chapter 4 Options<br />
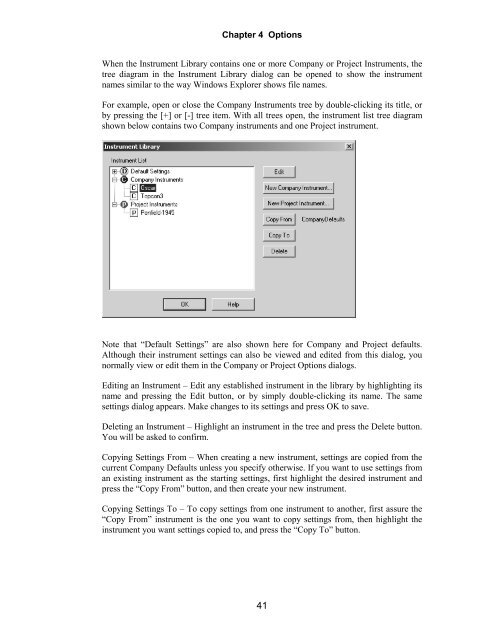
When the Instrument Library contains one or more Company or Project Instruments, the<br />
tree diagram in the Instrument Library dialog can be opened to show the instrument<br />
names similar to the way Windows Explorer shows file names.<br />
For example, open or close the Company Instruments tree by double-clicking its title, or<br />
by pressing the [+] or [-] tree item. With all trees open, the instrument list tree diagram<br />
shown below contains two Company instruments and one Project instrument.<br />
Note that “Default Settings” are also shown here for Company and Project defaults.<br />
Although their instrument settings can also be viewed and edited from this dialog, you<br />
normally view or edit them in the Company or Project Options dialogs.<br />
Editing an Instrument – Edit any established instrument in the library by highlighting its<br />
name and pressing the Edit button, or by simply double-clicking its name. The same<br />
settings dialog appears. Make changes to its settings and press OK to save.<br />
Deleting an Instrument – Highlight an instrument in the tree and press the Delete button.<br />
You will be asked to confirm.<br />
Copying Settings From – When creating a new instrument, settings are copied from the<br />
current Company Defaults unless you specify otherwise. If you want to use settings from<br />
an existing instrument as the starting settings, first highlight the desired instrument and<br />
press the “Copy From” button, and then create your new instrument.<br />
Copying Settings To – To copy settings from one instrument to another, first assure the<br />
“Copy From” instrument is the one you want to copy settings from, then highlight the<br />
instrument you want settings copied to, and press the “Copy To” button.<br />
41