CLIMATIC™ 50 User manual - Lennox
CLIMATIC™ 50 User manual - Lennox
CLIMATIC™ 50 User manual - Lennox

You also want an ePaper? Increase the reach of your titles
YUMPU automatically turns print PDFs into web optimized ePapers that Google loves.
Allocation of Displays to the BM<strong>50</strong><br />
Function<br />
Ensure there is a good connection between the BM<strong>50</strong> and its displays<br />
Description<br />
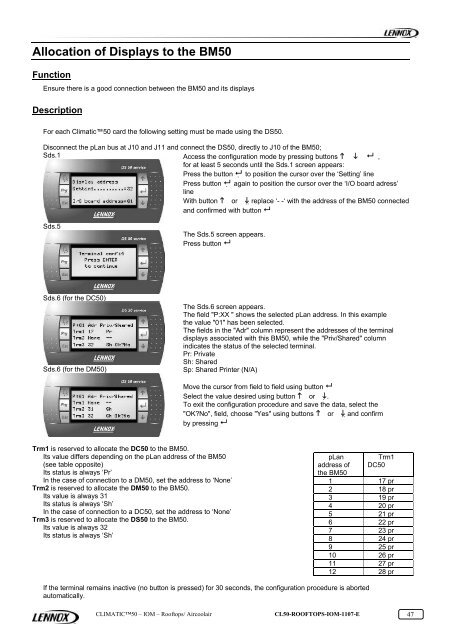
For each Climatic<strong>50</strong> card the following setting must be made using the DS<strong>50</strong>.<br />
Disconnect the pLan bus at J10 and J11 and connect the DS<strong>50</strong>, directly to J10 of the BM<strong>50</strong>;<br />
Sds.1<br />
Access the configuration mode by pressing buttons � � � ,<br />
for at least 5 seconds until the Sds.1 screen appears:<br />
Press the button � � to position the cursor over the ‘Setting’ line<br />
Press button � � again to position the cursor over the ‘I/O board adress’<br />
line<br />
With button � or �� �replace ‘- -‘ with the address of the BM<strong>50</strong> connected<br />
and confirmed with button �<br />
Sds.5<br />
Sds.6 (for the DC<strong>50</strong>)<br />
Sds.6 (for the DM<strong>50</strong>)<br />
The Sds.5 screen appears.<br />
Press button �<br />
Trm1 is reserved to allocate the DC<strong>50</strong> to the BM<strong>50</strong>.<br />
Its value differs depending on the pLan address of the BM<strong>50</strong><br />
(see table opposite)<br />
Its status is always ‘Pr’<br />
In the case of connection to a DM<strong>50</strong>, set the address to ‘None’<br />
Trm2 is reserved to allocate the DM<strong>50</strong> to the BM<strong>50</strong>.<br />
Its value is always 31<br />
Its status is always ‘Sh’<br />
In the case of connection to a DC<strong>50</strong>, set the address to ‘None’<br />
Trm3 is reserved to allocate the DS<strong>50</strong> to the BM<strong>50</strong>.<br />
Its value is always 32<br />
Its status is always ‘Sh’<br />
The Sds.6 screen appears.<br />
The field "P:XX " shows the selected pLan address. In this example<br />
the value "01" has been selected.<br />
The fields in the "Adr" column represent the addresses of the terminal<br />
displays associated with this BM<strong>50</strong>, while the "Priv/Shared" column<br />
indicates the status of the selected terminal.<br />
Pr: Private<br />
Sh: Shared<br />
Sp: Shared Printer (N/A)<br />
Move the cursor from field to field using button �<br />
Select the value desired using button � or ��.<br />
To exit the configuration procedure and save the data, select the<br />
"OK?No", field, choose "Yes" using buttons � or �� �and confirm<br />
by pressing �<br />
pLan<br />
address of<br />
the BM<strong>50</strong><br />
Trm1<br />
DC<strong>50</strong><br />
1 17 pr<br />
2 18 pr<br />
3 19 pr<br />
4 20 pr<br />
5 21 pr<br />
6 22 pr<br />
7 23 pr<br />
8 24 pr<br />
9 25 pr<br />
10 26 pr<br />
11 27 pr<br />
12 28 pr<br />
If the terminal remains inactive (no button is pressed) for 30 seconds, the configuration procedure is aborted<br />
automatically.<br />
CLIMATIC<strong>50</strong> – IOM – Rooftops/ Aircoolair CL<strong>50</strong>-ROOFTOPS-IOM-1107-E 47 47