GeoVision V8.5 Feature Guide (PDF) - XTECHCAM
GeoVision V8.5 Feature Guide (PDF) - XTECHCAM
GeoVision V8.5 Feature Guide (PDF) - XTECHCAM

You also want an ePaper? Increase the reach of your titles
YUMPU automatically turns print PDFs into web optimized ePapers that Google loves.
2.2 Live View Frame Rate Control and Buffer<br />
2<br />
Main System<br />
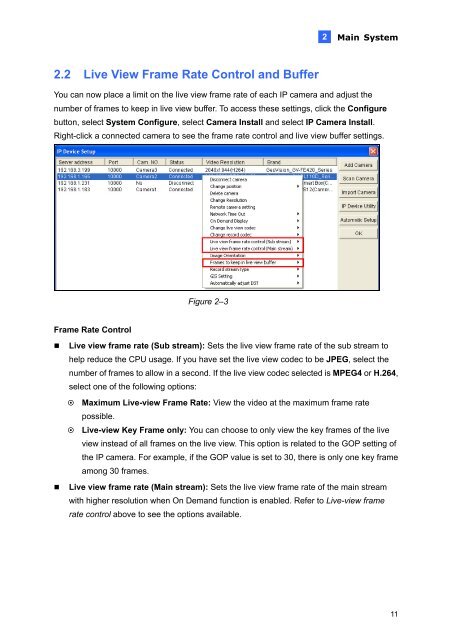
You can now place a limit on the live view frame rate of each IP camera and adjust the<br />
number of frames to keep in live view buffer. To access these settings, click the Configure<br />
button, select System Configure, select Camera Install and select IP Camera Install.<br />
Right-click a connected camera to see the frame rate control and live view buffer settings.<br />
Frame Rate Control<br />
Figure 2–3<br />
� Live view frame rate (Sub stream): Sets the live view frame rate of the sub stream to<br />
help reduce the CPU usage. If you have set the live view codec to be JPEG, select the<br />
number of frames to allow in a second. If the live view codec selected is MPEG4 or H.264,<br />
select one of the following options:<br />
� Maximum Live-view Frame Rate: View the video at the maximum frame rate<br />
possible.<br />
� Live-view Key Frame only: You can choose to only view the key frames of the live<br />
view instead of all frames on the live view. This option is related to the GOP setting of<br />
the IP camera. For example, if the GOP value is set to 30, there is only one key frame<br />
among 30 frames.<br />
� Live view frame rate (Main stream): Sets the live view frame rate of the main stream<br />
with higher resolution when On Demand function is enabled. Refer to Live-view frame<br />
rate control above to see the options available.<br />
11