INSTALLATION INSTRUCTIONS
INSTALLATION INSTRUCTIONS
INSTALLATION INSTRUCTIONS

You also want an ePaper? Increase the reach of your titles
YUMPU automatically turns print PDFs into web optimized ePapers that Google loves.
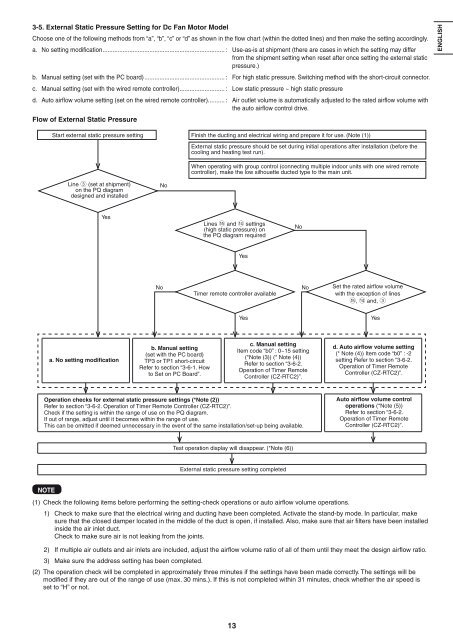
3-5. External Static Pressure Setting for Dc Fan Motor Model<br />
Choose one of the following methods from “a”, “b”, “c” or “d” as shown in the flow chart (within the dotted lines) and then make the setting accordingly.<br />
a. No setting modification ......................................................................... : Use-as-is at shipment (there are cases in which the setting may differ<br />
from the shipment setting when reset after once setting the external static<br />
pressure.)<br />
b. Manual setting (set with the PC board) ................................................ : For high static pressure. Switching method with the short-circuit connector.<br />
c. Manual setting (set with the wired remote controller) ........................... : Low static pressure ~ high static pressure<br />
d. Auto airflow volume setting (set on the wired remote controller). ......... : Air outlet volume is automatically adjusted to the rated airflow volume with<br />
the auto airflow control drive.<br />
Flow of External Static Pressure<br />
NOTE<br />
Start external static pressure setting Finish the ducting and electrical wiring and prepare it for use. (Note (1))<br />
External static pressure should be set during initial operations after installation (before the<br />
cooling and heating test run).<br />
Line 3 (set at shipment)<br />
on the PQ diagram<br />
designed and installed<br />
Yes<br />
a. No setting modification<br />
No<br />
When operating with group control (connecting multiple indoor units with one wired remote<br />
controller), make the low silhouette ducted type to the main unit.<br />
Lines e and d settings<br />
(high static pressure) on<br />
the PQ diagram required<br />
(1) Check the following items before performing the setting-check operations or auto airfl ow volume operations.<br />
1) Check to make sure that the electrical wiring and ducting have been completed. Activate the stand-by mode. In particular, make<br />
sure that the closed damper located in the middle of the duct is open, if installed. Also, make sure that air fi lters have been installed<br />
inside the air inlet duct.<br />
Check to make sure air is not leaking from the joints.<br />
2) If multiple air outlets and air inlets are included, adjust the airfl ow volume ratio of all of them until they meet the design airfl ow ratio.<br />
3) Make sure the address setting has been completed.<br />
(2) The operation check will be completed in approximately three minutes if the settings have been made correctly. The settings will be<br />
modifi ed if they are out of the range of use (max. 30 mins.). If this is not completed within 31 minutes, check whether the air speed is<br />
set to “H” or not.<br />
13<br />
Yes<br />
No No<br />
Timer remote controller available<br />
b. Manual setting<br />
(set with the PC board)<br />
TP3 or TP1 short-circuit<br />
Refer to section “3-6-1. How<br />
to Set on PC Board”.<br />
No<br />
Yes Yes<br />
c. Manual setting<br />
Item code “b0” : 0~15 setting<br />
(*Note (3)) (* Note (4))<br />
Refer to section “3-6-2.<br />
Operation of Timer Remote<br />
Controller (CZ-RTC2)”.<br />
Operation checks for external static pressure settings (*Note (2))<br />
Refer to section “3-6-2. Operation of Timer Remote Controller (CZ-RTC2)”.<br />
Check if the setting is within the range of use on the PQ diagram.<br />
If out of range, adjust until it becomes within the range of use.<br />
This can be omitted if deemed unnecessary in the event of the same installation/set-up being available.<br />
Test operation display will disappear. (*Note (6))<br />
External static pressure setting completed<br />
Set the rated airflow volume<br />
with the exception of lines<br />
e, d and, 3<br />
d. Auto airflow volume setting<br />
(* Note (4)) Item code “b0” : -2<br />
setting Refer to section “3-6-2.<br />
Operation of Timer Remote<br />
Controller (CZ-RTC2)”.<br />
Auto airflow volume control<br />
operations (*Note (5))<br />
Refer to section “3-6-2.<br />
Operation of Timer Remote<br />
Controller (CZ-RTC2)”.<br />
ENGLISH<br />
��������� E������� PORTUGUÊS<br />
�������<br />
����������