MilexTM Pessary Fitting Kit - CooperSurgical
MilexTM Pessary Fitting Kit - CooperSurgical
MilexTM Pessary Fitting Kit - CooperSurgical

Create successful ePaper yourself
Turn your PDF publications into a flip-book with our unique Google optimized e-Paper software.
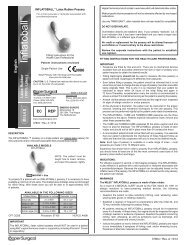
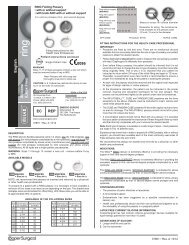
1. Wear dry gloves. When<br />
necessary, lubricate only the<br />
entering end of the pessary with<br />
TRIMO-SAN TM . Compress the<br />
pessary (bringing sides together)<br />
as shown in Figure 1.<br />
2. Use one finger of the opposite<br />
hand to depress the perineum.<br />
Hold the pessary almost parallel<br />
with the introitus (see Figure 2).<br />
Direct the entering end of the<br />
pessary past the cervix into the<br />
posterior fornix. Allow the pessary<br />
to open into shape after passing<br />
the introitus.<br />
Figure 1<br />
Figure 2<br />
3. Use the index finger to guide the pessary along the lower vaginal<br />
wall, behind the cervix, and into the posterior fornix.<br />
4. Use the index finger to bring the knob up behind the symphysis<br />
pubis (see Figure 3).<br />
5. Have the patient sit, stand and<br />
bear down slightly. If there is no<br />
leakage of urine and the patient is<br />
comfortable with the pessary in<br />
position, have her empty her<br />
bladder.<br />
• If she is unable to urinate with<br />
Figure 3<br />
the pessary in position, remove<br />
the pessary and fit her with a smaller size and repeat Step 5.<br />
• If the patient is able to void, continue with Step 6.<br />
6. If she can do so without difficulty and the pessary remains<br />
in position upon re-examination, and the patient is comfortable<br />
with the pessary in place, you have a good indication you have<br />
selected the correct size.<br />
7. Examine the patient while she is in the standing position to<br />
ensure the pessary has not shifted position. The patient should<br />
not feel the pessary once it is in position. The pessary should not<br />
be too loose as it may turn or be expelled and it should not be<br />
too tight as it may cause discomfort.<br />
8. The health care professional should be able to sweep one finger<br />
between the pessary and vaginal walls. If there is not enough<br />
space to do this, the next smaller pessary should be tried. If<br />
excessive space exists, the pessary will not be effective and may<br />
rotate or even be expelled.<br />
9. It is sometimes necessary to refit the patient with a different size<br />
or type of pessary after a period of time. Do not assume that a<br />
replacement will always be the same size as the previous one.<br />
Check the fitting to ensure continued patient comfort and relief<br />
of symptoms. The use life of a pessary is limited. Examine<br />
frequently for signs of deterioration.<br />
Note: It is essential that all incontinence pessaries be precisely fitted.<br />
Physicians should have available the four most commonly used<br />
sizes of this pessary (see the size chart).<br />
In a limited number of cases, a larger size INCONTINENCE DISH<br />
pessary (required to stabilize bladder base) may be difficult to pass<br />
through the introitus. In such instances the Milex FOLDING HODGE<br />
pessary with knob is an excellent alternative.<br />
PATIENT FOLLOW-UP:<br />
Have the patient:<br />
• Report immediately any difficulty in urinating<br />
• Report immediately any discomfort<br />
• Return within 24 hours for first examination<br />
• Return for second examination within 3 days<br />
• Return for examination every 4 to 6 weeks<br />
Note: Above schedule of follow-up examinations may be<br />
altered to fit the needs of the individual patient.<br />
At each check up, the pessary should be removed and cleaned. If<br />
no contraindications are present, the pessary is reinserted.<br />
TO REMOVE:<br />
Use the index finger to depress the perineum. Hook other index<br />
finger under the knob of the INCONTINENCE DISH pessary and pull<br />
down. Fold the pessary by bringing the sides together, angling<br />
it so that it is almost parallel to the introitus, and gently ease the<br />
pessary out.<br />
Note: If necessary, irrigate the vagina after removal of the pessary<br />
(and before reinsertion) to cleanse the vagina of excess discharge<br />
and secretions. HCPCS Supply Number A4320 (Irrigation Tray<br />
with Syringe, any purpose).<br />
During each visit, the vagina should be carefully inspected for<br />
evidence of pressure or allergic reaction. The patient should be<br />
questioned concerning discharge, and disturbance of bowel function<br />
or urination. It may be necessary to fit another size or an entirely<br />
different type of pessary if these conditions are present.<br />
DO NOT assume that a replacement will be the same size as the<br />
previous one. Check the fitting to ensure patient comfort and relief<br />
of symptoms.<br />
At each checkup, the pessary is removed and cleaned. If there are<br />
no contraindications, the pessary is reinserted.<br />
4