
You also want an ePaper? Increase the reach of your titles
YUMPU automatically turns print PDFs into web optimized ePapers that Google loves.
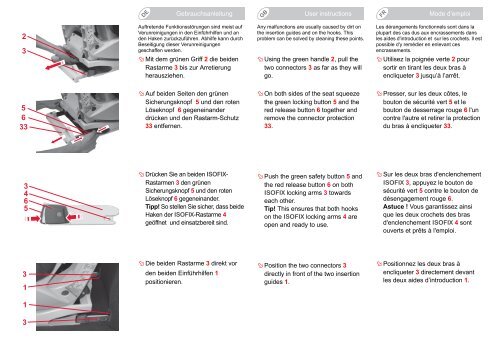
Auftretende Funktionsstörungen sind meist aufVerunreinigungen in den Einführhilfen und anden Haken zurückzuführen. Abhilfe kann durchBeseitigung dieser Verunreinigungengeschaffen werden. Mit dem grünen Griff 2 die beidenRastarme 3 bis zur Arretierungherausziehen.Any malfunctions are usually caused by dirt onthe insertion guides and on the hooks. Thisproblem can be solved by cleaning these points. Using the green handle 2, pull thetwo connectors 3 as far as they willgo.Les dérangements fonctionnels sont dans laplupart des cas dus aux encrassements dansles aides d'introduction et sur les crochets. Il estpossible d'y remédier en enlevant cesencrassements. Utilisez la poignée verte 2 poursortir en tirant les deux bras àencliqueter 3 jusqu’à l’arrêt. Auf beiden Seiten den grünenSicherungsknopf 5 und den rotenLöseknopf 6 gegeneinanderdrücken und den Rastarm-Schutz33 entfernen. On both sides of the seat squeezethe green locking button 5 and thered release button 6 together andremove the connector protection33. Presser, sur les deux côtes, lebouton de sécurité vert 5 et lebouton de desserrage rouge 6 l'uncontre l'autre et retirer la protectiondu bras à encliqueter 33. Drücken Sie an beiden ISOFIX-Rastarmen 3 den grünenSicherungsknopf 5 und den rotenLöseknopf 6 gegeneinander.Tipp! So stellen Sie sicher, dass beideHaken der ISOFIX-Rastarme 4geöffnet und einsatzbereit sind. Push the green safety button 5 andthe red release button 6 on bothISOFIX locking arms 3 towardseach other.Tip! This ensures that both hookson the ISOFIX locking arms 4 areopen and ready to use. Sur les deux bras d'enclenchementISOFIX 3, appuyez le bouton desécurité vert 5 contre le bouton dedésengagement rouge 6.Astuce ! Vous garantissez ainsique les deux crochets des brasd'enclenchement ISOFIX 4 sontouverts et prêts à l'emploi. Die beiden Rastarme 3 direkt vorden beiden Einführhilfen 1positionieren. Position the two connectors 3directly in front of the two insertionguides 1. Positionnez les deux bras àencliqueter 3 directement devantles deux aides d’introduction 1.