

Samsung DIGIMAX A503 - User Manual_6.42 MB, pdf, ENGLISH
Samsung DIGIMAX A503 - User Manual_6.42 MB, pdf, ENGLISH
Samsung DIGIMAX A503 - User Manual_6.42 MB, pdf, ENGLISH

Create successful ePaper yourself
Turn your PDF publications into a flip-book with our unique Google optimized e-Paper software.
PictBridge<br />
■You can use the USB cable to connect this camera to a printer that supports<br />
PictBridge (sold separately) and print the stored images directly. Movie clips and<br />
voice files cannot be printed.<br />
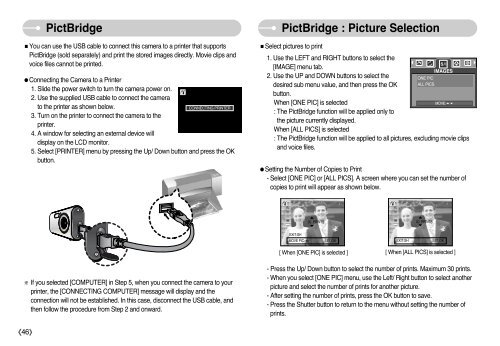
●Connecting the Camera to a Printer<br />
1. Slide the power switch to turn the camera power on.<br />
2. Use the supplied USB cable to connect the camera<br />
to the printer as shown below.<br />
CONNECTING PRINTER<br />
3. Turn on the printer to connect the camera to the<br />
printer.<br />
4. A window for selecting an external device will<br />
display on the LCD monitor.<br />
5. Select [PRINTER] menu by pressing the Up/ Down button and press the OK<br />
button.<br />
PictBridge : Picture Selection<br />
■Select pictures to print<br />
1. Use the LEFT and RIGHT buttons to select the<br />
[IMAGE] menu tab.<br />
IMAGES<br />
2. Use the UP and DOWN buttons to select the<br />
ONE PIC<br />
desired sub menu value, and then press the OK<br />
ALL PICS<br />
button.<br />
When [ONE PIC] is selected<br />
MOVE:<br />
: The PictBridge function will be applied only to<br />
the picture currently displayed.<br />
When [ALL PICS] is selected<br />
: The PictBridge function will be applied to all pictures, excluding movie clips<br />
and voice files.<br />
●Setting the Number of Copies to Print<br />
- Select [ONE PIC] or [ALL PICS]. A screen where you can set the number of<br />
copies to print will appear as shown below.<br />
<br />
<br />
00 PRINTS<br />
<br />
<br />
00 PRINTS<br />
EXIT:SH<br />
MOVE PIC: SET:OK EXIT:SH SET:OK<br />
[ When [ONE PIC] is selected ] [ When [ALL PICS] is selected ]<br />
※ If you selected [COMPUTER] in Step 5, when you connect the camera to your<br />
printer, the [CONNECTING COMPUTER] message will display and the<br />
connection will not be established. In this case, disconnect the USB cable, and<br />
then follow the procedure from Step 2 and onward.<br />
- Press the Up/ Down button to select the number of prints. Maximum 30 prints.<br />
- When you select [ONE PIC] menu, use the Left/ Right button to select another<br />
picture and select the number of prints for another picture.<br />
- After setting the number of prints, press the OK button to save.<br />
- Press the Shutter button to return to the menu without setting the number of<br />
prints.<br />
《46》


