Alcatel One Touch Premiere Manual - US Cellular
Alcatel One Touch Premiere Manual - US Cellular
Alcatel One Touch Premiere Manual - US Cellular

You also want an ePaper? Increase the reach of your titles
YUMPU automatically turns print PDFs into web optimized ePapers that Google loves.
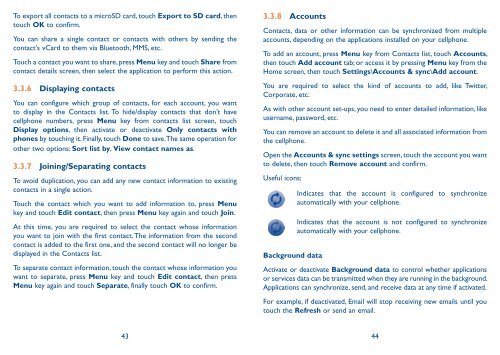
To export all contacts to a microSD card, touch Export to SD card, then<br />
touch OK to confirm.<br />
You can share a single contact or contacts with others by sending the<br />
contact's vCard to them via Bluetooth, MMS, etc.<br />
<strong>Touch</strong> a contact you want to share, press Menu key and touch Share from<br />
contact details screen, then select the application to perform this action.<br />
3.3.6 Displaying contacts<br />
You can configure which group of contacts, for each account, you want<br />
to display in the Contacts list. To hide/display contacts that don’t have<br />
cellphone numbers, press Menu key from contacts list screen, touch<br />
Display options, then activate or deactivate Only contacts with<br />
phones by touching it. Finally, touch Done to save. The same operation for<br />
other two options: Sort list by, View contact names as.<br />
3.3.7 Joining/Separating contacts<br />
To avoid duplication, you can add any new contact information to existing<br />
contacts in a single action.<br />
<strong>Touch</strong> the contact which you want to add information to, press Menu<br />
key and touch Edit contact, then press Menu key again and touch Join.<br />
At this time, you are required to select the contact whose information<br />
you want to join with the first contact. The information from the second<br />
contact is added to the first one, and the second contact will no longer be<br />
displayed in the Contacts list.<br />
To separate contact information, touch the contact whose information you<br />
want to separate, press Menu key and touch Edit contact, then press<br />
Menu key again and touch Separate, finally touch OK to confirm.<br />
3.3.8 Accounts<br />
Contacts, data or other information can be synchronized from multiple<br />
accounts, depending on the applications installed on your cellphone.<br />
To add an account, press Menu key from Contacts list, touch Accounts,<br />
then touch Add account tab; or access it by pressing Menu key from the<br />
Home screen, then touch Settings\Accounts & sync\Add account.<br />
You are required to select the kind of accounts to add, like Twitter,<br />
Corporate, etc.<br />
As with other account set-ups, you need to enter detailed information, like<br />
username, password, etc.<br />
You can remove an account to delete it and all associated information from<br />
the cellphone.<br />
Open the Accounts & sync settings screen, touch the account you want<br />
to delete, then touch Remove account and confirm.<br />
Useful icons:<br />
Background data<br />
43 44<br />
Indicates that the account is configured to synchronize<br />
automatically with your cellphone.<br />
Indicates that the account is not configured to synchronize<br />
automatically with your cellphone.<br />
Activate or deactivate Background data to control whether applications<br />
or services data can be transmitted when they are running in the background.<br />
Applications can synchronize, send, and receive data at any time if activated.<br />
For example, if deactivated, Email will stop receiving new emails until you<br />
touch the Refresh or send an email.